Quantcast
Channel: Hands On Bike
Viewing all 697 articles
Browse latest View live

Dahon MuEX: Installation of 10 Speed Ultegra/XTR Di2

$
0
0
Now, with all the Ultegra Di2 and XTR Di2 components gathered, and the compatibility issues solved, the Dahon MuEX is now ready to be upgraded! However, before mounting all the new Di2 components onto the bike, it is best to connect all the components together and update the firmware first. If there are any issues, it would be easier to troubleshoot with the components off the bike.

Circuit diagram for this Ultegra/XTR Di2 hybrid system

The wiring for this Di2 setup is very straightforward, as can be seen from this picture. Nothing complicated.

The tricky part for this setup is to update the firmware for all the components. As there is a mixture of older road 10 speed Ultegra 6770 parts, with new MTB XTR Di2 M9050 parts, it is important to update the firmware so that they can all communicate with each other.

Once again, the PC Linkage Device is used to update the Di2 firmware. This is not as straightforward as the components are not the default road Di2 components, since it has some XTR Di2 parts in it. As such, the XTR Di2 components need to be manually selected when choosing the components for identification and updating.

XTR Di2 shifters (SW-M9050) and System Display (SC-M9050) have to be manually selected for identification and update.

Once updated, there are some options that can be configured, such as multi-shift for the shifters. Shown here is the choice of gear display duration for the Di2 System Display.

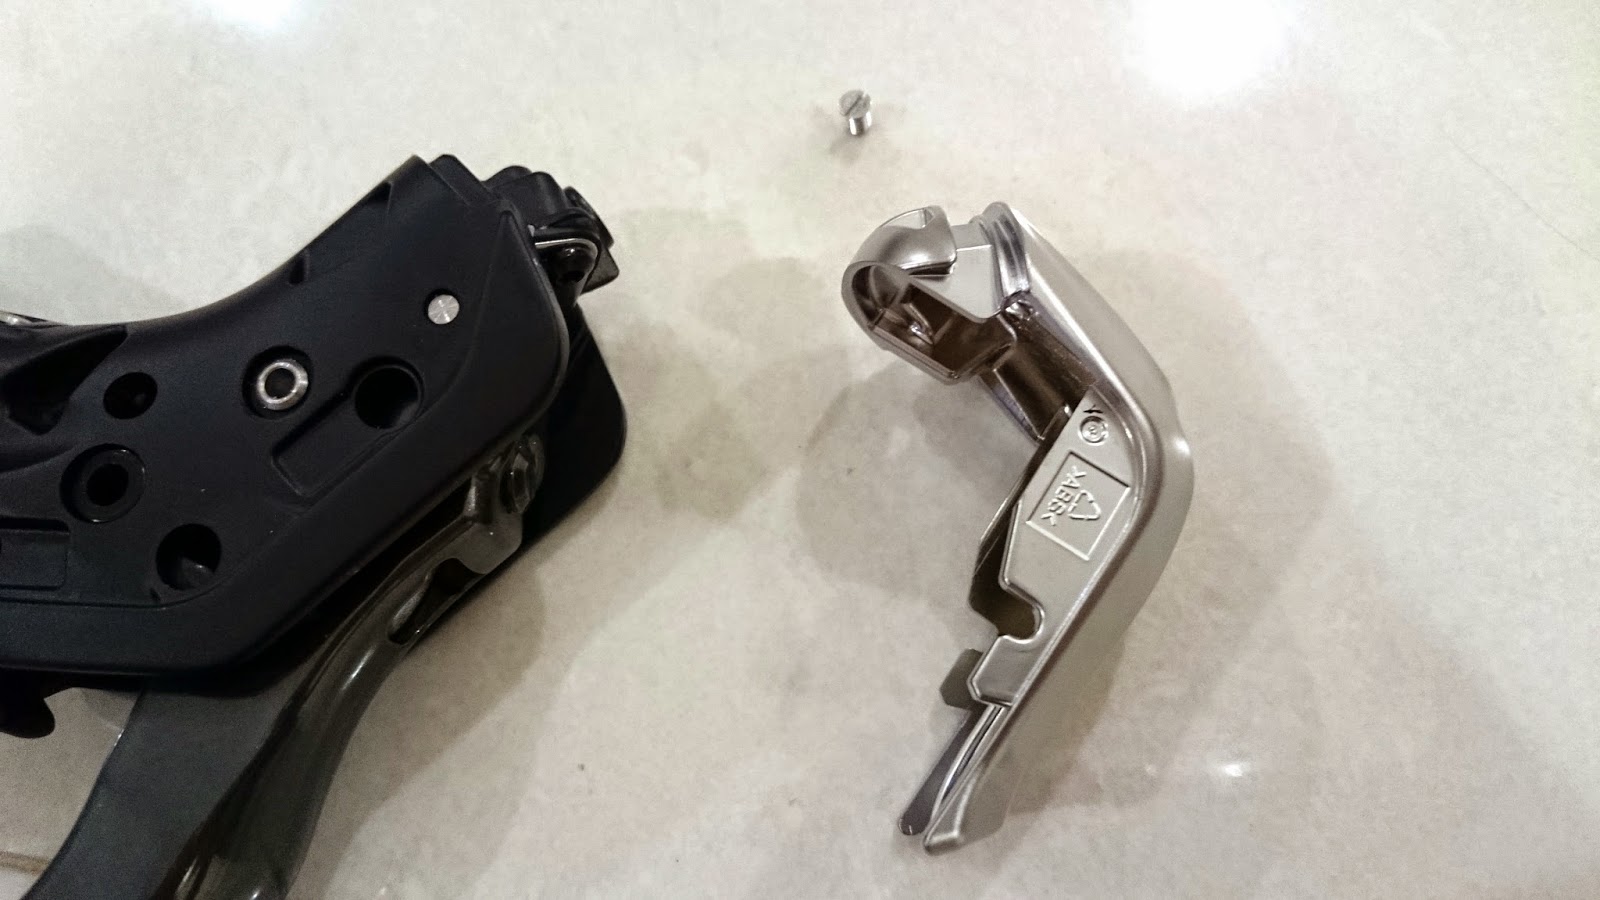
XTR Di2 shifter mounted on the handlebar. Sufficient clearance between the levers and the brake lever clamp band for comfortable operation with the thumb.

XTR Di2 System Display mounted near the centre of the handlebar for easy viewing.

As the default clamp band is for diameter 31.8mm handlebars, a rubber shim from the old S-Sun front light is used to mount it onto the diameter 25.4mm LitePro Monster handlebar.

With everything mounted onto the handlebar! The wiring is kind of messy, but I don't have a way to tidy them up. On the other hand, the wire from the System Display to Junction B is routed along the rear brake cable, so at least that part looks neat.

When upgrading from mechanical to electronic shifting, the main components for upgrade would be the shifting components such as the shifters, RD and FD. The drivetrain components such as the chain, cassette or crankset does not really need to be changed, as they can be the same regardless of mechanical or electronic shifting.

However, for electronic shifting, one thing to take note is that the Di2 front derailleur is very powerful. It will push the chain strongly against the side of the larger chainring, when shifting from the small to large chainring. As such, for a smooth and successful shift, the larger chainring needs to be very stiff to withstand the forces and not deflect too much. This is one of the reasons why the stiff and lightweight HollowGlide chainring is recommended for use with Di2 shifting.

Hollowglide outer chainring with Hollowtech crank arms. Stiff and lightweight.

With the Shimano 105 crankset, the 53T outer chainring is a single piece of flat aluminium chainring, which is good but not as stiff as the HollowGlide chainrings found on Ultegra or Dura-Ace cranksets. Since the Dahon Boardwalk has already received the new 11 speed Ultegra 6800 crankset, the natural thing to do is to use the older 10 speed Ultegra 6700 crankset on this Dahon MuEX.

How about the weight difference for the mechanical vs the electronic shifting components? As shown in the comparison table below, the electronic components are slightly heavier. Do note that this is the first generation Ultegra 6770 Di2 RD and FD, which are heavier than the new 11 speed Ultegra 6870 Di2 RD and FD.

I did not want to increase the overall weight of the bike with this Di2 upgrade, therefore I also decided to change the bottom bracket and the crankset to a more lightweight version, to offset the Di2 weight increase.


Weight comparison of the components, before and after. Overall weight of the bike is maintained.

The new Ultegra grade bottom bracket, BBR60. Not as small as the Dura-Ace 9000 BB, but smaller than the standard Hollowtech II BB. As such, it requires yet another adapter to use with the standard BB tool.

Lightweight at only 76 grams

Before change, the previous Shimano 105 BB-5700

New BB-R60 installed, with a matching black colour. A red 2.5mm spacer has been fitted under the right hand adapter, to push out the right crank arm a bit more. This is necessary to give more clearance between the FD and the right crank arm.

The 10 speed Ultegra 6700 53/39T crankset that was previously on the Dahon Boardwalk

The longer crank arm fixing bolt from the Ultegra 6800 crankset is required to allow it to engage the spindle, due to the offset of the right crank arm.

I am unable to use the original Ultegra 6700 crank arm fixing bolt, as the threads are not long enough to engage the threads in the spindle. This is due to the 2.5mm offset caused by the red spacer under the right hand adapter. Also, this means that the crankset is slightly offset to the right side, and the Q-factor for the left and right sides are slightly different. Hopefully this will not have a big impact on the pedaling.

A few more pictures of the assembled bike!

With the extra spacer under the right hand adapter of the BB, there is now good clearance between the FD and the right side crank arm.

Di2 battery, battery mount and the DIY mount velcro-ed to the frame. Black mounting tape was inserted between the frame and the DIY mount. I chose to use the wider velcro straps instead of cable ties for more stability.

Junction B mounted on the front of the seat tube with mounting tape, and cable tied for extra security. No danger of it falling off or moving as it is so lightweight.

Overall view of the seat tube area, with the battery and Junction B mounted in that area. Note the Di2 wire from Junction A that is routed along the rear brake cable, and into Junction B.

Ultegra Di2 6770 10 speed rear derailleur mounted on the bike

Ultegra Di2 6770 10 speed double FD, and Ultegra 6700 10 speed crankset mounted

No problem with folding the bike, still as compact as before.

Outdoor shot of the Ultegra Di2 2x10 speed drivetrain

XTR Di2 System Display, with the bright and sharp LCD numbers showing the current selected gear.

Overall view of the Dahon MuEX with Ultegra/XTR Di2

As an additional upgrade, I also changed the original Biologic Impel saddle to the Selle Italia SLS Kit Carbonio Flow saddle for more comfort and lighter weight.

Summary of the weight and cost of this newly upgraded Dahon MuEX Di2. Still cheaper and lighter than the Tern Verge X20!

With this upgrade, the Dahon MuEX has been transformed. It is still a lightweight and high performance 20 speed folding bike, but now with Ultegra/XTR Di2 components for effortless shifting. Maybe not so affordable now, but it is totally different from what is available out there. This is probably the only folding bike in the world with this Ultegra/XTR Di2 setup!

In addition, shifting with the XTR Di2 shifters is really fun and enjoyable, as every shift is crisp yet effortless. It is very easy to shift multiple gears, and there is no need for any trim adjustment of the front derailleur, since trimming is done automatically for Di2 drivetrains. The bright and sharp display also gives useful information about the current gear position, which is really useful for me.

Overall, this has been a good upgrade, where I have managed to install a hybrid Ultegra/XTR Di2 system on a folding bike, and also learnt a lot along the way.

Garmin Edge 510: In Depth Review

$
0
0
After 3 months of using the Garmin Edge 510 cycle computer on both the Merida Scultura 5000 and the Dahon Boardwalk, I have had the chance to try out most of the features on the Garmin.

With that, it is now possible to give a more detailed review about the Garmin Edge 510, and also introduce some of the more interesting features found on the Garmin.

First of all, the interface of this Garmin allows it to be used on different bikes easily, even though the bikes may have different sensors or wheel sizes. This is achieved by allowing different bike profiles to be created to suit the different bikes.

For example, the Merida is using 700C wheels with Schwalbe One 25C tires, with the Garmin GSC-10 ANT+ sensor installed on the bike. This sensor can track cadence and speed.

Garmin GSC-10 sensor on the Merida

As for the Dahon Boardwalk, it is using 20" wheels with Schwalbe Kojak tires. It has a new ANT+ Garmin speed sensor which does not require the use of a magnet on the spokes. Also, the Dahon Boardwalk has a Ultegra Di2 system, with a D-Fly wireless unit that enables gear data to be transmitted to and displayed on the Garmin Edge 510.

Dahon Boardwalk with D-Fly wireless unit that can transmit Di2 gear data to the Garmin

Despite the different sensors and setups, this is not a problem for the Garmin, as it is fully customisable to be able to be used effectively on both the bikes. I have created different bike profiles to suit the two different bikes, as shown below. Also, different activity profiles can be created, which refers to the different data fields that will be displayed on screen.

As long as the correct bike profile is chosen, it will detect the correct sensors and display the correct data. This setup only needs to be done once, as the linking of the ANT+ sensors to the Garmin is automatically done for subsequent usage. Choosing the different activity profile will then display different data fields on the screen.

Four different activity profiles and two different bike profiles, all nicely colour coded for easy identification.

Merida bike profile with Race activity profile, with red as my chosen colour 

The Merida is linked to the GSC-10 Garmin sensor, which has speed and cadence data as shown here. 

For the Merida Race profile, these are the info that I chose to display on the first page.

First page of the Merida Commute Mode, shown here in blue colour. Time of Day is important, while Heart Rate is not important while commuting.

Dahon bike profile with Commute activity profile is selected

On this bike, the sensors are the new Garmin speed sensor and the Di2 D-Fly sensor

 First page of the Dahon Commute activity profile. Di2 gears are clearly shown at the top of the screen. Also, shown here is the Night display mode, with a black background and lighted words.

Second page of the Dahon Commute profile. Di2 battery level is also shown here. This is the Day display mode, with a white background and black words for contrast under sunlight.

The data fields for each page is also fully customisable. Besides being able to choose the number of pages to display, the number of data fields to display on each page and the type of data to display can also be chosen.

Up to 10 data fields can be displayed on one page. However, displaying less data fields per page will allow each data field to be larger.  

With only 5 data fields on this page, the size of each field can be larger.     

For every data field box shown on screen, it can be changed to display the data that you want. Shown here are just three pages out of about six pages. 

Gears is a category that is only found if the Di2 D-Fly unit is connected 

More categories for those who love cycling data. Under each main category are more sub-categories.

I think that the Bike Profile and Activity Profile arrangement works really well, as this allows the Garmin to be used across different bikes, while still allowing full customisation of the sensors and data display to best match each bike and type of usage. It is easy to expand this to more bikes if desired.

There are also some other rather special features, such as Training Partner or Ride A Course. These can add a bit of excitement to an otherwise boring solo ride.

For Training Partner, what it does is to let you choose a previously ridden course, and then assign a virtual rider to pace you. For those who have played racing games before, this is similar to the Ghost Car mode, with a virtual car driving alongside you. In this case, you first choose the course to ride, and then adjust the speed of the training partner. The distance and time difference will then be displayed.

This mode is useful if you want to compare your average speed to the pre-set value. It encourages you to ride faster and put more distance between yourself and your virtual partner. The speed of the virtual partner can also be changed on the go, so you can increase the speed of your virtual partner if you find that you are pulling too far ahead, or vice versa.

Select the speed of your training partner, and start riding! The distance and time difference will then be displayed, to see how you match up against the selected speed. 

Another feature is the Ride A Course mode. This allows you to retrace a previously ridden route, and show you how far you are along the route. If you go off course, it will also inform you.

A selection of two different courses that I have saved and named. 

Rough map of the course. When activated, it will also show how far along the route you are.

The next major feature is LiveTracking, which allows your current location to be broadcast to selected viewers. Other than your location, selected parameters such as speed, distance, heart rate and etc can be seen by your selected viewers.

For this to work, the Garmin will need to be linked to your smartphone via Bluetooth. The data will then be transmitted from the Garmin to the smartphone, and then uploaded from the smartphone to the Internet. The Garmin Connect app will need to be downloaded on the smartphone.

Example of a ride that was tracked using LiveTracking. The default ride name is Johor Bahru Cycling, which is a bug with Garmin that has not been fixed yet.

To start LiveTracking, the ride needs to be first started on the Garmin. Then, you can send invitation emails (with the link to the ride map) to your selected viewers, or just upload it to Facebook or Twitter. After that, start LiveTrack on the phone and the ride will be live!

This is a fun feature that is useful if you want to let others know your location, or if you want to check where your friend is currently at. Not sure how much the lag is, but it is not too much to be unusable. Currently there is a bug with the automatic Facebook upload, which has not been fixed yet.

There are other features such as Navigation and such which I have not tried, so there is still some hidden potential in the Garmin Edge 510. Nevertheless, it already has a lot of features packed into it, many of which are quite useful.

Other than the features, here are some of my observations on the general function of the Garmin Edge 510.

Time Taken for GPS Lock
The first time I turned on the Garmin and tried to connect it to the GPS, it took more than five minutes before it was connected. The good news is, that was only for the first time. Subsequent locking of the GPS signal was very fast, taking less than thirty seconds, as long as you are in the open. If you are under shelter, it tends to take a while more, but still acceptable. Overall, connecting to the GPS is quick and reliable, so no problem there.

Battery Life
The battery life of the Garmin is very good, as I can easily go more than two weeks before needing to charge it, despite using it for commuting to and from work a few days a week. I never had a problem with the Garmin running out of battery, so I am very pleased with the battery life, with respect to my type of usage.

Using the Garmin Edge 510 without external sensors
It is possible to use the Garmin Edge 510 on its own, without connecting to any ANT+ sensors. I did try this when I tested the Garmin on the Dahon MuEX, which does not have any ANT+ sensors on it. If there are no sensors, the Garmin will estimate the speed and distance based on GPS data. This is of course not as accurate as having sensors on the bike, but it is good enough for most purposes. The overall distance and average speed will be reasonably accurate, but not the current speed as it cannot respond quickly enough to changes.

With that, my in depth review of the Garmin Edge 510 is complete! Definitely not as in depth as those by DC Rainmaker (which is super detailed), but probably useful enough to learn more about the Garmin. I think it is a good cycling computer, and is also a worthwhile investment if you have multiple bikes.

Introduction to Shimano Road Hydraulic Brakes + Shifters: ST-R785 & ST-RS685

$
0
0
The most interesting and controversial development for road bikes in recent years has been the push towards disc brake systems. Current road bikes use caliper brakes, which has worked well for many years. So why is there a move towards disc brakes for road bikes, as can be seen from top cycling teams trying out disc brake road bikes in competitions?

Disc brakes for bicycles is not new. Mountain bikes have been using mechanical and hydraulic disc brakes for over 20 years, and it is already well accepted, almost compulsory in fact. Even entry level mountain bikes use hydraulic disc brakes, not just high end trail or downhill bikes.

Typical hardtail mountain bike with hydraulic disc brakes

Road bikes have not transitioned to using disc brakes, because of two main reasons. The first is because disc brake systems are currently heavier than caliper brake systems. This is true, but with recent developments in component technologies, the weight difference is getting smaller. As most road cyclists would understand, getting the road bike as lightweight as practically possible is important. Whether or not it really improves your speed is another matter altogether.

The second reason is because there is usually no need for the higher braking power of disc brakes. For many years, caliper brakes have provided sufficient braking power in most situations. However, when the weather turns wet, or when the terrain gets steep, caliper brakes are no longer able to provide sufficient braking power, especially when it is a wet downhill route. Disc brakes are able to cover this deficiency by providing good braking power in all weather conditions.

For a more detailed comparison of the pros and cons of different brake systems, refer to this link for more information.

Now, for road bikes, it is not as easy to change over from a caliper brake system to a disc brake system. First of all, the frame needs to be different, as disc brake mounts are required for mounting the disc brake calipers. Then, the brake levers might need to be different, especially when hydraulic disc brakes are to be used. Lastly, the wheel hubs also need to have disc brake rotor mounting.

Hydraulic disc brake on a road bike. Note the disc brake mounts required on the fork, and the brake rotor mounting required on the wheel hub.

Road bikes have been using brake/shifter lever combos for many years. These are also called road shifters, where the brake levers and shifters are integrated into one unit. The braking system has always been using steel brake inner cables, which can be connected to caliper brakes or in certain cases, mechanical disc brakes.

However, mechanical disc brakes have long suffered from poor braking power and a mushy lever feel, and is vastly underpowered compared to hydraulic disc brakes. In my opinion, if a disc brake system is used, it should be a hydraulic disc brake system.

The tricky part for implementing hydraulic brake levers on road bikes has been the challenge of integrating the hydraulic master cylinder into the road shifters. There is simply no space to fit both the master cylinder and the shifting mechanism into the road shifter, without making it too big and bulky.

This problem was solved with the introduction of Di2 electronic shifting systems, where the shifting mechanism is no longer required in the shifters. The Di2 road shifters have been slimmed down, and the complex shifting mechanism has been replaced by electronic shift buttons and a simple circuit board. With this breakthrough, there is now space for the hydraulic master cylinder to be placed in a Di2 road shifter!

As the first generation of road Di2 shifter with integrated hydraulic brake lever, the Shimano ST-R785 is a non series road shifter designed for Di2 equipped road bikes with a hydraulic disc brake system. It is being marketed as a Ultegra grade Di2 road shifter with hydraulic brakes. Let's take a closer look at this road shifter and see how the integration is done!

Shimano ST-R785, a Di2 road shifter with hydraulic brakes. Slightly taller at the front of the hood as compared to mechanical road shifters.

Being a Di2 shifter, what you get are two buttons instead of shifting levers. The buttons are textured differently for easy identification.

The bracket cover removed from the main bracket. Note the multiple protrusions from the rubber, designed to hold the cover securely to the bracket.

Side view of the bracket, which is cast out of aluminium, unlike the engineering composite used for mechanical road shifters. The hydraulic brake hose will connect to the rear of the bracket, above the clamp band.

Clamp band is still tightened to the handlebar in the same way, accessible from the side.

The Di2 electronics, which is just a little box with a wire that connects to the buttons. The other end of the box has one port for plugging in a Di2 wire.

The pivots for the hydraulic brake lever is located higher up than on mechanical road shifters. This gives a different braking feel due to the different movement arc of the brake levers. The free stroke adjustment screw is also shown here.

To bleed the hydraulic master cylinder, the chrome cover needs to be removed first. The master cylinder is integrated within the aluminium bracket.

Bleeding port is located way up on the bracket. The brake lever reach adjustment screw is also shown here.

Hydraulic piston located inside the bracket, which pushes the hydraulic fluid out of the bracket and towards the brake caliper.

Similar weight to the Shimano 105 ST-5800 mechanical road shifters, despite having no shifting mechanism. This is mainly due to the large aluminium bracket which is heavier than engineering composite material.

As shown above, that was the non series ST-R785 Di2 road shifter for hydraulic disc brakes. The master cylinder is able to fit into the bracket without making the entire shifter too big.

The thing is, not every rider is able to afford Di2 shifting components, and so there needs to be a way to integrate mechanical shifting with hydraulic brake levers. This is where it gets really challenging, which is to fit the shifting mechanism plus the hydraulic master cylinder into a road shifter, without making the road shifter too bulky. Amazingly, it has been done, and the result is the non series Shimano ST-RS685 road shifter, which has mechanical shifting and hydraulic brake levers.

Shimano ST-RS685 road shifter, with mechanical shifting and hydraulic brake levers.

Still looks similar to a normal mechanical road shifter, just that it has a longer bracket and a taller hood. Quite amazing that everything fits into the bracket!

Front view of this non series road shifter

Taller hood, but not as large as the size found on SRAM road shifters with hydraulic brakes

Once the rubber cover is removed, the full layout can be seen! There is a metal pipe that links the master cylinder at the front of the bracket to the hose connector at the rear.


The hydraulic hose will be plugged into the connector located at the rear of the bracket.

Triangular shaped master cylinder located at the top of the hoods


This hydraulic brake lever design also incorporates Servo-Wave technology, as shown here with the use of a cam mechanism.

Shifting mechanism is located well within the bracket. Shown here is the inner cable insertion point, similar to Shimano 11 speed mechanical road shifters.

The shifter inner cable passes through the bracket and leads here, then turns 90 degrees to exit from the back of the bracket.


With the bottom cover removed, the complex shifting mechanism can be seen, ingeniously squeezed into the bracket.

Weight of one side of the road shifter is 322 grams, which is quite heavy. Once again, this is due to the combined weight of the aluminium bracket, shifting mechanism and the master cylinder assembly.

With that, a brief introduction to Shimano road hydraulic brakes + shifters is complete! It is a feat of engineering to be able to fit all the mechanisms into the road shifter, without making it look too bulky or affecting the gripping ergonomics.

If you are buying a new road bike, it is worth considering hydraulic disc brake options, as that is the trend that road bikes are moving towards. With a disc brake compatible frame, you can be sure that you will be able to install the latest innovations in road disc brake technologies, and have a future proof bike.

Road bikes with hydraulic disc brakes are the next wave of new technology, and it is already here, as can be seen from major bike brands all offering disc brake road bike options. Professional cyclists are still using caliper brakes, as the UCI has not approved disc brakes for road cycling competitions yet. However, that is just a matter of time, as seen by the on-going disc brake trials going on in some road cycling competitions. Once disc brakes are approved for top tier road cycling competitions, you can be sure that things will move and change very fast. That said, traditional road bikes with caliper brakes are here to stay, and will not be phased out anytime soon, as they still have their own charm and advantages.

Wheelsport Fantasy Flat Handlebar 2x10 Speed: Part 1 - Original Bike Components

$
0
0
Ever since I started this blog in January 2011, I have written over 250 blog posts over these 4+ years, and upgraded countless components on all my bikes. However, one curious thing that I realised is that of all the bikes that I have upgraded, none of them is a mini velo. In my definition, a mini velo is a bike with 20" wheels and a non-folding frame.

Now, I have a chance to upgrade a mini velo! The bike that is shown here is a friend's bike that was bought second hand from another bike owner. Although this bike is not mine, I took up the project to upgrade this mini velo with some better components. As can be seen from the title, the target is to upgrade this bike to a 2x10 speed bike.

The bike that we have here is a Wheelsport Fantasy 2.0 mini velo, sold exclusively by MyBikeShop locally. It seems that all the components on this bike are stock components, which means that it has not been upgraded before. In any case, this Wheelsport Fantasy mini velo can be bought as a complete bike or just as a frameset.

Before upgrading this bike, let us take a look at the stock setup on this mini velo. As a start, the complete bike weight is 9.5kg, including the kickstand and the pedals. Excluding the kickstand and pedals, this bike would weigh only 8.9kg! Pretty decent for a stock mini velo.

This is a lightweight bike, and is already lighter than high end folding bikes, such as the Tern Verge X10 (9.6kg without pedals). The reason is due to the absence of folding joints which will add quite a bit of weight to the bike frame.

Full view of the stock Wheelsport Fantasy 2.0 mini velo

Looking pretty good, especially with the nice red rims

The shifter cables run externally, along the bottom side of the downtube

The rear brake cable runs externally along the bottom side of the top tube

This model has a folding handlepost, with a knob for tightening the joint, much like a Brompton

Wheelsport Sunny 451 wheelset, with Kenda Kontender 23-451 tires

Alhonga road caliper brakes

A Sturmey-Archer crankset? Never seen it before...

Square taper BB, in a standard English threaded 68mm BB shell

The FD mount is already welded onto the frame, allowing a front double drivetrain to be installed easily.

SRAM DualDrive RD? Another unusual component here...

The stock drivetrain is a 1x9 speed system

The RD hanger seems to be bent slightly inward, which may have contributed to the non-ideal shifting on the stock drivetrain

SRAM 11-32T 9 speed cassette found on the stock drivetrain

Original FSA aluminium stem

V-Drive aluminium flat handlebar

Avid FR-5 brake levers, with SRAM DualDrive rear shifter to match with the rear derailleur

9 speed Optical Gear Display found on the gear shifter, similar to the SRAM Attack shifter that I had on the Dahon Boardwalk long ago

Simple and lightweight LitePro foam lock-on grips

FSA Energy aluminium seatpost and a rather generic saddle

Finally, the Wellgo QRD M111 Quick Release pedals. The pedals can be removed easily for more compact storage, just by pulling up on the red release button.

In the next part of this project, I will be disassembling all the components from this stock bike, and seeing which components are worth keeping, and which will be upgraded.

Part 2 coming up next...

Wheelsport Fantasy Flat Handlebar 2x10 Speed: Part 2 - Bike Disassembly and Component Weight

$
0
0
After documenting the stock components on the Wheelsport Fantasy 2.0 flat handlebar bike, it is now time to give it an upgrade! First, I will be removing all the components from the bike, and also clean up the frame. At the same time, I can weigh all the components. This will enable me to give an accurate part-by-part summation of the weight of the full bike. Another thing to note is that I only weighed the parts which I plan to use on the upgraded bike. Those components which I am not using again will not be weighed.

I started with removing the wheels from the bike frame. I did not remove the tires and tubes from the wheelset as I will be using the same tires and tubes. As such, the weight of the wheels are inclusive of the tire and tube.

Front wheel + tire + tube: 866 grams
Rear wheel + tire + tube: 1054 grams

Assuming a tire weight of 250 grams each, and a inner tube weight of 100 grams each, the weight of these 451 wheels can be estimated to be 516 grams for the front wheel, and 704 grams for the rear wheel. This gives a wheelset weight of 1220 grams which is a good weight. Compared to the 406 sized Wheelsport Sunny wheelset on the Dahon MuEX (484 grams for front, 709 for rear), the weight is quite similar.

Nice set of Wheelsport Sunny 451 wheelset with Kenda tires

Weight of the Wheelsport QR axles. Comparatively heavy compared to the more lightweight titanium QR axles

After removing the cassette, I took the chance to clean and lubricate the freehub mechanism. The construction is slightly different from the earlier Wheelsport hubs, as can be seen from this maintenance guide.

Close up look of the folding handlepost. It is similar in design to Dahon/Fnhon/Tern handleposts, with a centre compression bolt and 2 side clamp bolts.

Not too heavy at 401 grams

However, the fork is rather heavy, as it is aluminium with a steel steerer tube

Feels solid but is rather heavy at almost 700 grams

External type of headset bearings, different from Dahon/Tern internal type design

Close up look at the sealed bearings of the headset. The bearing size and angle can be found marked on the bearing.

The headset parts from left to right: Crown race, lower bearing, upper bearing, compression ring, shim, headset cover

Together, they weigh 54 grams (excluding the top cap and bolt which are not shown)

FSA aluminium stem with a decent weight of 134 grams

Stock aluminium handlebar, 235 grams

LitePro foam grips, lightweight at only 77 grams

Wellgo QRD M111 Quick Release Pedals

Original aluminium kickstand. Quite heavy at 100 grams more than the one I have on the Dahon Boardwalk

Original saddle, also quite heavy at over 300 grams

FSA Energy aluminium seatpost, with an OK weight of 275 grams

This frame can accept a seatpost of diameter 27.2mm

Finally, the bare frame with every component removed!

After removing all the components, the bare frame can now be weighed. Inclusive of all the hardware such as the seatpost clamp, RD hanger, headset cups, BB guide and cable adjust bolts, the frame weighs about 1.8kg. Adding the fork (697 grams) and handlepost (401 grams), the total Wheelsport Fantasy 2.0 frameset weight (folding handlepost version) is about 2.9kg.

For comparison, the Tyrell FX frame weighs 2.2kg, with a fork weight of 909 grams, giving a total frameset weight of around 3.1 kg. The difference is, the Tyrell FX comes with additional folding capabilities, which accounts for the higher weight due to the folding joints. Non-folding Tyrell frames such as the aluminium-carbon CSi or the titanium PKZ would be lighter in weight.

In the next part, I will be reassembling the bike with some of the original components and also some new components.

OCBC Cycle 2015: 42km Sportive Ride

$
0
0
This is my fourth time joining the OCBC Cycle ride, and each time gives a different experience. There is something special about cycling on closed roads which cannot be done on normal days in Singapore.

My first OCBC Cycle was in 2011, and I rented a mountain bike for the 20+ km community ride. At that time, I did not use my Dahon Boardwalk for the ride. The second ride was in 2012, and I used my upgraded Dahon Boardwalk to complete the 2012 39km Challenge route, with a respectable timing. That was the first time I used my own bike for the OCBC Cycle.

Route Data in OCBC Cycle 2012

I skipped the 2013 edition, and joined the 2014 OCBC Cycle. In 2014, I also used the Dahon Boardwalk to complete the 40km Challenge route. However, I felt that the 2014 edition was not well organised, with narrow lanes and too many riders. Along the way, I had also witnessed a few accidents. After that time, I had decided not to join anymore OCBC Cycle rides as it was too dangerous.

However, in 2015, OCBC has found a new event organiser to take over, and it has also pledged to implement many improvements to enhance safety and give a better ride experience. With that, I decided to give it another try. This time, the OCBC Cycle ride was held in August, instead of the usual March-April timing.

This would be the first time that I am riding in the OCBC Cycle event with a road bike! With my new Merida Scultura 5000 road bike, I am looking forward to having a good fast ride with friends. Also, this ride would be well documented, with a front Shimano Sport Camera, a Cyclic Fly6 rear camera, and also the Garmin Edge 510 cycle computer that will log all the ride data.

As recorded from the front and rear cameras, together with the data from the Garmin, an edited video can be seen here, showing my ride from the ECP expressway into the ECP Service Road area. Enjoy!


Video highlights of my OCBC Cycle 2015 Ride! Click HD version for a sharper video.

Also, here is a chronological pictorial highlight of my OCBC Cycle 2015 ride. Due to the pictures coming from screen captures of the video, and also low lighting conditions, some of the pictures are blurry and grainy. I used pictures from both the front and rear camera.

Riding from the meeting point outside Kallang Wave Mall to the start point. This was at about 515am.

However, we found that we were near the back of the long long queue to the start point. The queue goes very far, as can be seen from the waiting riders on the other side of the road.

I only passed the start point at 630am, more than an hour after the planned flag off time of 515am. The first wave only moved off at 545am. This meant that I was standing or walking for an hour in the queue while waiting for the ride to start.

First highlight, riding on the smooth F1 racing track! 

First climb of the day, up Bayfront Avenue. This was where many riders started to go faster.

On the Bayfront Avenue, with a good view of the lighted skyline 

Turning into Shenton Way at the Lau Pa Sat junction. I was still warming up, after standing around for one hour in the queue.

Going up to the Keppel Viaduct

Slight slope up the viaduct

Route on top of the Keppel Viaduct was narrow, with only one car lane's width in each direction

Passing by Vivocity on the way to the first water point. By this time the sky was getting nice and bright.  

At the first water point! We only stopped to take a look before moving on.

At the first water point. Distance at this point is about 10.5km.

After making a U-turn at the first water point, the route goes back along Keppel Viaduct, past Vivocity again 

Still narrow lanes, so not much chance to go faster or overtake 

Finally, the roads opened up and there was space to go fast! This was where I started pushing harder and going over 30km/h. 

Entering the MCE tunnel, an interesting experience! 

The journey through the tunnel was a short one 

Exiting the MCE tunnel! The wind blowing into the tunnel was really strong, probably driven by the powerful ventilation system. This resulted in a feeling of riding in a wind tunnel! Strong winds together with an upslope made it a challenge for many riders.

Heading towards the Benjamin Sheares bridge, the first major climb of the day.

Riding up the Sheares bridge slope, enjoying the climb. Still going strong with fresh legs!

Pulling away from other riders. The Merida bike climbs well!  

Rolling down the other end of the Sheares bridge! Can reach 50+ km/h even without pedaling, and is more stable with a road bike than a folding bike.

Rolling downslope at Sheares bridge, going fast even without pedaling. Distance is about 20km at this point, which is the halfway mark.

Entering the ECP stretch of flat expressway

Near the second water point, with cheerleaders! 

Grabbing a much needed bottle of cold 100 Plus from the volunteers 

After resting for a few minutes and regrouping, it was time to continue! At this point the distance was about 22km. 

Forming a paceline to go fast together 

Weaving through the other riders. Not much difficulty as the expressway was really wide. Note the road marshal standing on the single wheel electric scooter!

U-turn into the ECP Service Road near the East Coast Park lagoon. 

Distance at U-turn point into ECP service road is about 27km.

Picking up more friends along the way with our paceline 

Join the train!

On the right side of the picture, a newly set up U-turn point has been created, and the ECP blocked off. This is at Tanjong Rhu area, and is for those who did not manage to reach the cutoff point by the required timing.

Going over the Fort Road flyover  

We had this powerful rider with a single speed bike joining our paceline since ECP. His gearing is quite high as he is able to keep up with us without a particularly high cadence.

Powering ahead up the Fort Road flyover! 

However, I could see that he was suffering up the Sheares bridge slope, due to the high gearing.

Respect his determination for riding up the long and steep slope without stopping, unlike many other riders with multi-geared bikes.

Beautiful climb with a view of the Singapore skyline 

Rolling down the Rochor road exit! Last downslope for the day.

Heading back to the end point, with the stadium in the background 

Final stretch of the route, heading towards the stadium! 

Quite a wonderful experience to ride into the huge stadium 

End point! Kind of an anti climax, without any fanfare or photographers. 

Final distance clocked was about 41km, with a moving time of just under 1 hr 27 mins.

Overall route and distance for this ride. About 41km, with a comfortable average speed.

It was fun to join this OCBC ride with friends, as we could ride in a group and encourage each other during the ride. Riding in a paceline is also more efficient as we could take turns to pull at the front, allowing us to go faster together than it is possible riding alone.

Overall, the organisation of the ride was quite good. Apart from the delayed start time, the route was well demarcated with sufficient road marshals stationed at turning points and critical areas. There was also plenty of cold drinks for riders. Some parts of the route were quite narrow, but I guess there are limitations to the routes that are available.

Wheelsport Fantasy Flat Handlebar 2x10 Speed: Part 3 - Installation of New Components

$
0
0
After disassembling the bike, what we have here is now the bare frame of the Wheelsport Fantasy 2.0 mini velo bike. Before installing the new components, this is the best chance to clean up the frame and make it look brand new again!

With no components on the bike frame, it is easy to give the frame a good clean up, using some wet tissue and rags to wipe away the dirt and dust. Once that is done, the Hi Glaze 88 Car and Bike Polish was used to give the frame a really nice shine. Multiple layers of the polish can be applied to give the frame a high gloss finishing!

The very clean frame after polishing the bike twice

See how glossy the surface is!

I am very satisfied with how clean the frame is, as the shine of the frame as been restored and looks just as good as new. With that done, the next phase is to install all the components on the bike. Some of the components are the original ones that came with this bike, while most other upgrades are from the Dahon MuEX which was recently upgraded to Ultegra/XTR Di2.

BB cable guide reinstalled on the frame, under the BB shell. This low friction plastic part guides the externally routed shifter inner cables as they pass under the BB.

Here are the original bike components that will be going back onto the frame! The groupset is not shown here as it will be a completely new groupset, taken off from the Dahon MuEX.

Previously, while disassembling this bike from the stock condition, I found that the RD hanger seems to be a little bent. This would have a negative impact on the shifting performance, as the RD and the cassette will not be aligned properly. Now is the best chance to fix this issue once and for all. With a special RD hanger alignment tool, the offset of the RD hanger can be measured and also fixed with the tool. For a detailed guide on how to use this tool, refer to the Park Tool guide found here.

RD hanger alignment tool. The M10 x 1mm thread on the right side will be screwed into the RD hanger, while the ruler on the left will be used to measure the distance from the tool to the wheel rim.

First, align the ruler to a selected point on the rim. Usually the valve area is used for easy identification. Measure the distance at this position (6 o'clock).

Next, rotate the wheel and the tool to the opposite side, which is the 12 o'clock position. Again, measure the distance from the rim to the tool, at the same point on the rim. Using the same point on the rim ensures that the trueness of the rim does not affect the measurements.

Do the same for the other two positions (9 o'clock and 3 o'clock). The measurements at these 4 positions should ideally be the same for a perfectly aligned RD hanger, but practically, a difference of less than 4mm is good enough.

Once the measurements are done, here comes the tricky part. The way to adjust the RD hanger is actually to pull or push on the alignment tool to bend the RD hanger manually. It must be done gently and gradually, to prevent breaking or cracking the aluminium RD hanger. If the RD hanger is already too bent, it cannot be repaired safely and needs to be replaced.

The measurements confirmed my visual observation that the RD hanger is bent inwards slightly. This probably happened when the bike fell over onto the RD side, as I also found some scratches on the outside of the original RD. After manually and carefully bending the RD hanger, it is now straight.

With this repair completed, we can now continue to install the rest of the components. The new 10 speed cassette is first installed onto the rear hub. As this bike uses a 451 wheelset, with a wheel diameter of approximately 22 inches (instead of 20 inches on 406 wheelsets), a 12-30T Tiagra 4600 10 speed cassette is used to lower the gear range slightly for more practical usage. As a flat handlebar bike, the gearing does not need to be too high.

12-30T Tiagra 4600 10 speed cassette. Rather heavy at 329 grams, as compared to a more high end Shimano 105 or Ultegra cassette.

With the cassette installed on the Wheelsport Sunny 451 rear wheel!

Next, the headset, fork and handlepost can be reinstalled onto the bike frame. No change of parts here.

With the fork, handlepost, stem, handlebar and front wheel reinstalled!

It is always a good idea to tighten the bolts to the recommended torque, using a proper torque wrench. These are the two clamp bolts at the base of the handlepost.

Sora road caliper brakes, in glossy black colour to match the frame

Sora brake levers, with adjustable lever ratio to match with the road caliper brakes


New set of shifter outer casings for the bike. The two longer ones are used from the shifters to the stoppers on the frame, while the shorter one with the aluminium end cap is used from the RD to the stopper on the chainstay.

Plastic end caps with a long nose to improve sealing and prevent the polymer coating on the inner cables from wearing off.

Grips, brake levers and shifters installed

Original stem and handlebar, along with the Cateye Strada wireless cycle computer taken from the Dahon Boardwalk

View from the front. New brake and shifting components, in glossy black to match nicely with the frame.

The installation is now half complete! The remaining components would be the crankset, RD, FD and other miscellaneous components. To be continued in the final part of this bike upgrade.

Wheelsport Fantasy Flat Handlebar 2x10 Speed: Part 4 - Final Assembly and Comparison

$
0
0
Finally, this is the last part of the Wheelsport Fantasy 2x10 Speed Flat Handlebar bike upgrade! In the previous posts, the original bike components have been documented, and the stock bike disassembled. After that, the bike was rebuilt with a mixture of stock and new components.

In this post, I will finish up this bike upgrade, and compare it to the Dahon Boardwalk in terms of bike geometry.

Shimano 105 5700 10 Speed Crankset, 53/39T, taken from the Dahon MuEX

BB guide as shown mounted under the frame. The inner cable on the left leads upwards to the FD, while the inner cable on the right leads to the RD.

Rear shifter outer casing, shown here with a long nose end cap, to better protect the inner cable from wear and tear. Shimano 105 5700 10 Speed Rear Derailleur from the Dahon MuEX is used here.

Shimano 105 5700 Double FD as mounted onto the FD mount provided on the frame

With the full drivetrain mounted! All black to match well with the frame.

Gear range and ratios for this drivetrain setup, with 13 unique gears. 451 wheelset with 53/39T crankset and 12-30T cassette. This gear range should be good for any terrain.

Front brake calipers installed. Small clearance between tire and brake caliper, which means that wider tires (>25mm wide) cannot be used.

Rear brake calipers as installed on the bike. Once again, the small tire clearance limits the maximum tire size that can be used.

The length of the rear brake outer casing needs to be just right. Too short and it would stretch during braking, too long and there would be excessive friction.


Round 3M frame protection stickers have been pasted at strategic locations, to prevent the outer casing from rubbing away the paint on the frame.

With that, the upgrade from 1x9 speed to 2x10 speed is complete! Here is more info regarding the weight of the upgraded bike, and also some added accessories for the bike.

Full specs of the upgraded bike. Good weight of 8.8 kg without pedals! Just a little bit lighter than the original bike weight of 8.9 kg (excluding pedals and kickstand). This is despite adding around 300 grams with the addition of the front shifter, FD and cables.

The D-Light rear light fits perfectly on the seat tube, within the small triangle on the frame.

The D-Light front light also fits nicely on the handlepost, keeping the handlebar clutter-free. Mounted in a similar way to that on the Merida Scultura 5000.

Cateye Strada Wireless cycle computer mounted on the stem, in a very visible location

Side view of the upgraded bike

Looking pretty good!

With a folding handlepost, the handlebar can be folded down to make the bike really flat for storage, as seen here. This makes the bike a semi-folding bike?

When hanging the bike on the Minoura Bike Tower 10, the small frame does not really fit on the hooks properly

The front hook is OK, as it can grip the frame fully

However, the rear hook cannot hold the frame fully, as the frame top tube is too short. It will tend to touch the rear brake cable. Still, it is possible to hang the bike on this bike tower.

Lastly, the geometry of the Wheelsport Fantasy mini velo will be compared to the geometry of the Dahon Boardwalk. This will show the difference in geometry for this bike, as compared to the well established geometry of the Dahon folding bike. To compare the bikes, the BB is used as the datum and reference point. This means aligning the bikes such that the BB of the bikes are aligned beside each other.

The rear chainstay length of the bikes are slightly different. Dahon is 400mm, Wheelsport is 420mm. A longer chainstay contributes to a more stable bike at high speeds, but is also less agile.

Although the handlepost of the Wheelsport tilts much further backwards, unlike the vertical angle on the Dahon, the Wheelsport has a stem that brings the handlebar forward.

As seen here, the handlebar of the Wheelsport is located quite a bit higher and also rearwards. This creates a more upright riding position for the Wheelsport bike, which can be good or bad, depending on rider preference. Great for more leisurely rides, but not ideal for faster rides.

Side view of the bikes for comparison. Overall, the Dahon still has a longer wheelbase of 1020mm, while the Wheelsport mini velo has a wheelbase of 1000mm.

This upgrade is finally completed! I am glad to have had this chance to upgrade the Wheelsport Fantasy 2.0 mini velo, and I learnt quite a bit during the process. The bike has been nicely upgraded to a high performance 2x10 speed drivetrain, using mostly components taken from the Dahon MuEX (which has been upgraded to Ultegra/XTR Di2).


Wheelsport Ultegra Di2 2x11 Speed: Part 1 - Frame Design and Carbon Fork

$
0
0
My Dahon Boardwalk has served me well over these few years, from routine commuting purposes, to overseas touring trips, and is generally a very good all purpose bike. It had to fulfill a variety of purposes, as I could only have one bike due to limited space and cost. That explained the various upgrades and add-ons to the bike to allow multi-purpose usage.

With the addition of a few other more specialised bikes to my collection, such as the fast Merida Scultura 5000 road bike, the wet weather Avanti Inc 3 commuting bike, and the compact folding Dahon MuEX, the Dahon Boardwalk no longer needs to be a do-it-all bike. With the road bike being faster, the commuting bike being more weather resistant, and the Dahon MuEX having a more compact fold, the Dahon Boardwalk seems to be losing its relevance with respect to my usage.

With that in mind, my intention is to build a new bike that is different from the other bikes mentioned above. With the success story of upgrading the 2x10 speed flat handlebar Wheelsport Fantasy mini velo bike, I have come to realise that the Wheelsport Fantasy frame is actually a pretty good mini velo frameset. That gave me the idea to use this mini velo frame as the basis for a new bike project.

The overall plan is to transfer all the components from the Dahon Boardwalk to the new Wheelsport Fantasy mini velo frameset. This would create a new bike that is different from my other bikes. A fast and lightweight mini velo equipped with a Ultegra Di2 11 speed road groupset and fast rolling 20" wheels would differentiate it from my other bikes.

As a mini velo frame, this frame is not foldable. However, this is not a problem for me as I find that I hardly ever fold my Dahon Boardwalk nowadays. If I need a folding bike, I prefer to use the Dahon MuEX instead as it is more compact and lightweight.

Let's take a look at the new Wheelsport Fantasy 2.0 frameset!

Smart looking Wheelsport Fantasy 2.0 mini velo frameset in matte black

Designed for caliper brakes only, as can be seen from the brake mounting on the seatstays.

Welds on the aluminium frame have been sanded and polished, giving a very well finished look to the joining areas.

Nice and smooth welds look similar to those found on high end Tern and Tyrell frames.

Glossy black Wheelsport decal on the matte black frame for a very subtle look. Similar to that found on the Avanti Inc 3 frame.

Cable stoppers for shifter outer casings. Cable adjust bolts are included, but I removed them as they are not needed, since I am using Di2 shifting.

English threaded BB shell that is 68mm wide, which is the standard spec for road bikes.

Underside of the BB area on the frame. The cable guide has been removed as it is not required.

Overall weight of the frame alone (inclusive of headset cups, RD hanger and seatpost clamp) is about 1760 grams.

Compared to the Tyrell FX frameset weight (2.2kg for frame only), this Wheelsport Fantasy frame is lighter by about 400 grams, which is great. One difference is that the Tyrell frame has folding capabilities while this Wheelsport frame does not.

Next, let's look at the front fork of the Wheelsport Fantasy frameset. There are two types of forks available. The first is the aluminium type with a steel steerer tube, which is meant for use with a folding handlepost. Then, there is the more lightweight version, which is a carbon fork with a long aluminium steerer tube. This carbon fork is designed to be used with a long carbon spacer, and thus does not have a folding handlepost. For maximum weight savings, the carbon fork is the one to use.

Wheelsport Fantasy carbon fork with long aluminium steerer tube

Carbon fibre weaving on the fork can be seen through the clear coat.

The fork weighs 605 grams, not really lightweight. This is due to the long steerer tube required. However, it is still lighter than the Tyrell FX folding fork which is 900 grams.

Carbon spacer that will be used together with the carbon fork. Usage will be shown in the subsequent posts.

Weight of headset bearings and top cap is 70 grams.

With this, the total frameset weight is slightly over 2.5kg. Not really lightweight, as average road bike carbon framesets are usually 1.6kg or below. Still, the weight of this Wheelsport Fantasy frameset with carbon fork is lighter than the Tyrell FX frameset weight of 3.1kg. Also, it is cheaper than the Tyrell FX frameset.

Now that the new frameset is ready, it is time to move the components from the Dahon Boardwalk over to this new frame! However, due to me using some non-recommended components and setup, I will first need to check the compatibility of the wheelset and brakes.

To be continued in Part 2!

Wheelsport Ultegra Di2 2x11 Speed: Part 2 - Compatibility Check for Wheelset and Brake Calipers

$
0
0
After introducing the Wheelsport Fantasy 2.0 mini velo frame and carbon fork in Part 1 of this upgrade series, it is now time to check the other components for compatibility with this frame. As I will be moving over most of the components from the Dahon Boardwalk folding bike, some of the components may not be compatible due to the different frame design.

Two areas which are critical would be the wheelset and brake caliper compatibility. The Dahon Boardwalk folding bike uses a front hub with a 74mm Over Locknut Dimension (OLD), while the Wheelsport Fantasy frame has a standard 100mm front OLD. Both the frames can accept a standard road rear hub of 130mm OLD.

Therefore, I will need to convert the width of the front hub from 74mm to 100mm, in order to continue using the same Chris King/Novatec wheelset on the Wheelsport frame. There are adapters available that can be used to extend the front hub from 74mm to 100mm. Some of them are the screw on type, which is meant to replace the current end cap on the front hub, while others are merely fitted onto the existing end cap and secured with the QR axle.

The first choice is of course to use screw on adapters that will be more secure and also stronger, but since different brands of hubs have different hub dimensions, it is difficult to find a suitable adapter. I tried the Wheelsport front hub adapter, but it does not fit as the thread size of the screw on end cap is different from the Novatec front hub end cap.

The longer Wheelsport end cap on the left (to convert 74mm to 100mm), and the original Novatec end cap (74mm). However, it cannot be used as the thread size is different.

Since the screw on type of adapter cannot be used, the alternative is to use a simple adapter that is just fitted onto the end of the existing front hub. This will increase the front OLD from 74mm to 100mm. This adapter can fit practically all QR front hubs as the cylindrical area that slots into the front fork ends are the same dimension for QR front hubs.

Elosix front hub adapter to convert the OLD from 74mm to 100mm

It fits onto the end of the existing front hub end cap, and once installed in the frame, it will be secured by the compression of the front fork and the QR axle.

Now that the front hub OLD issue has been solved, the next compatibility check would be the braking system. The Wheelsport Fantasy frame is designed for caliper brakes and 451 wheels (around 22 inch in diameter), but the current wheelset that I plan to use is a 406 wheelset (around 20 inch in diameter). As the wheel is smaller, using standard road caliper brakes will result in the brake pads being unable to reach the rims on the 406 wheels.

For the front fork, I first tried to install the Elosix Front Brake Adapter, which will move the mounting point of the caliper brake downwards. This might enable me to use standard road caliper brakes.

Elosix Front Brake Adapter, originally designed for Dahon bikes

Installation of this Elosix front brake adapter is successful, but now the front brake mounting point is too low and too close to the tire. When I tried installing the brake caliper, the brake arm will rub against the tire.

Using the Elosix Front Brake Adapter will move the mounting point too close to the tire. Not suitable for use.

In this case, I will have to use extra long reach caliper brakes, such as the Tektro R559 brake caliper that was previously used on the Dahon Boardwalk and Dahon Vitesse. The distance from the front brake mounting point to the wheel rim is about 70mm, so it should be possible as the Tektro R559 brakes has a maximum reach of 73mm.

Reach of 70mm is required for the front caliper brake, due to the large distance between the brake mounting point and the rim.

As for the rear brake, I measured the reach required to be 62mm. This also means that I will need to use the Extra Long Reach Tektro R559 for the rear brakes, as standard road caliper brakes have a reach of only 39-49mm.

Reach of 62mm is required for the rear brake.

In order to confirm these theoretical calculations, I moved the Tektro R559 brake calipers from the Dahon Boardwalk to the Wheelsport Fantasy frame. Before that, I took the opportunity to re-install some gold hardware onto the Tektro R559 brakes, such as the gold coloured cable adjust bolt and brake pad holders.

Tektro R559 caliper brakes with gold cable adjust bolts and brake pad holders

Overall weight of 350 grams for this pair of Tektro R559 caliper brakes

Tektro R559 installed on the front fork, and is able to reach the rim with no problem. Wheelsport Fantasy carbon fork with 406 wheels and Kojak tires.

One advantage of using 406 wheels in this fork (originally designed for 451 wheels) is that I can use wider tires. Seen here is the Schwalbe Kojak 20x1.35" tires which are 35mm wide.

Also plenty of tire clearance for the rear, and thus is able to run these 35mm wide Kojak tires with no issue. If a 451 wheelset is used, it can take a maximum tire size of about 25-28mm.

A standard bolt and nut fixing is used for the rear brake caliper due to the length of the axle on the brake caliper.

Seems that there is no problem with using 406 wheels and wide Kojak tires in this frame! There is plenty of tire clearance with the frame and brake calipers, and the extra long reach brake calipers is also able to reach the smaller 406 wheels.

While checking the compatibility of the wheelset and brakes, I also found that the rear derailleur hanger is a bit bent. Having a bent RD hanger will make it difficult to get good rear shifting performance, as the RD cannot be properly aligned to the cassette gears.

RD hanger is slightly bent, and now is the best time to fix it before installing more components.

RD hanger alignment tool

As described in an earlier post about the other Wheelsport Fantasy mini velo (2x10 speed, flat handlebar), the RD hanger alignment tool can be used to check the alignment of the RD hanger, and also make minor adjustments to the RD hanger to achieve good alignment with the cassette.

With that, this frame is now ready to accept the other components! Wheelset and brake compatibility issues have been studied and solved, and there should not be other major issues for this bike upgrade.

In the next part of this upgrade series, the components that have been selected for this Wheelsport Fantasy mini velo will be shown.

Wheelsport Ultegra Di2 2x11 Speed: Part 3 - Component Selection

$
0
0
Part 1: Frame Design and Carbon Fork
Part 2: Compatibility Check for Wheelset and Brake Calipers

Now that the compatibility issues have been solved, the next step is to dismantle all the components from the Dahon Boardwalk and transfer them to the new Wheelsport Fantasy mini velo. Along the way, I also decided to change some of the components to more suitable ones.

For example, I was previously using a compact 50/34T Ultegra 6800 crankset on the Dahon Boardwalk, when I upgraded to 11 speed. Even though it was a compact crankset on a small wheeled bike, the small 11-25T cassette enabled a sufficiently high gearing to be achieved for my needs.

However, I believe that once I change from the Dahon Boardwalk folding bike to the Wheelsport Fantasy mini velo, the top gear with the same components (50T front and 11T rear) will not be high enough. This is because the mini velo has a stiffer frame, as it does not have any folding joints. As a result, I will be able to push harder and go faster without experiencing as much frame flex. A higher top gear is thus warranted based on my experience and expectations.

Therefore, I decided to increase the top gear by changing from a compact 50/34T crankset to a mid-compact 52/36T crankset. It is called a mid-compact as it has a gearing setup that is somewhere between a compact 50/34T and a standard 53/39T crankset.

The 52T large chainring will enable a high gearing, almost similar to that of a standard 53T chainring. On the other hand, the 36T small chainring will maintain a sufficiently low gear for hill climbing, much better than the 39T of a standard crankset. This 52/36T mid-compact is thus very versatile as it gives a nice wide range of gears that is suitable for going fast or climbing hills.
.
The new Ultegra 6800 52/36T mid-compact crankset

52/36T crankset as printed on the outer chainring

I found that the difference between this 52T chainring and the 50T chainring is only the size of the outer aluminium teeth. The bonded composite material at the back of the chainring is the same size.

Comparing the 50T chainring with the 52T chainring shows that the only difference is the amount of chainring that sticks out from the hollow outer shell. The 52T chainring has teeth that sticks out further due to the two extra teeth.

Weight of the right side of the 52/36T mid-compact crankset


With this new 52/36T crankset, the overall gearing table is as shown, for 20" (406) wheels. 15 unique gears are available for this 2x11 speed drivetrain.


A graphical illustration comparing the gear range of my older setup (53/39T crankset with 12-27T cassette) and this new setup (52/36T crankset with 11-25T cassette). Click for a larger picture.

Gearing table for the older 2x10 speed setup. It has 13 unique gears

With this change, I can get a wider total gear range (higher top gear), while maintaining the same low gears. This can be seen from the bar chart above. Also, with the switch to this drivetrain setup (2x11 speed, 52/36T crankset, 11-25T cassette), I get 15 unique gears to use, instead of the previous 13 gears. In conclusion, this new setup gives a wider gear range with more unique gears in between, which is a really good result!

Along the way, there are also some components that cannot be transferred from the Dahon Boardwalk to the Wheelsport Fantasy mini velo. This is mainly due to compatibility and sizing issues.

A long Di2 battery mount is required, as I plan to mount the battery using the bottle cage screw holes. This means that the previous short Di2 battery mount cannot be used.

I also got a new saddle, seatpost, stem and handlebar for this new mini velo. These are mostly high end components for lighter weight and better function.


The lightweight and yet comfortable Selle Italia SLR Kit Carbonio Flow saddle. The same as the one found on the Merida Scultura 5000.


Lightweight saddle!

A new seatpost was also required as the seatpost diameter required for the Wheelsport Fantasy mini velo is much smaller (27.2mm) than the large Dahon seatpost diameter (33.9mm).

FSA SL-K ITC Zero Setback Carbon Seatpost

Diameter of 27.2mm, 400mm length, which is rather long

Weighs 239 grams, which is a low weight, but definitely not the lightest available. I chose this seatpost partly because the subtle graphics would match the frame.

ITC stands for Independent Top Clamp, which allows the saddle fore-aft setting to be adjusted independent of the tilt angle. As shown here, there are separate bolts which adjust the fore-aft setting and tilt angle independently.

As the Selle Italia SLR Kit Carbonio Flow Saddle requires a top down clamp for the carbon rails, I had to choose the clamp type carefully.

Although this clamp is tilted at a slight angle, it is still able to clamp the carbon rails properly without any unusual gaps. These carbon rails are also oval shaped, being 9mm tall and 7mm wide.


A little addition to the seatpost is a Fizik rubber seatpost ring to seal the gap between the seatpost and the top of the seat tube

With the new saddle and seatpost assembled onto the bike

Fizik Cyrano R1 stem, 100mm length

Chosen mainly for the appearance, with a glossy black logo on a matte black base, similar to the design on the Wheelsport Fantasy frame

Uses Torx head bolts instead of the more common Allen key bolts

Considered lightweight at only 126 grams

Lastly, this is the new carbon handlebar that will be used on this mini velo. This FSA carbon handlebar is the same as the one found on the Merida Scultura 5000. I had actually bought two of these handlebars during a sale, and now is a good chance to make use of the second one.

FSA K-Force Compact Road Carbon Handlebar. Lightweight at only 204 grams.

With the same Ultegra ST-6770 Di2 shifters installed on the FSA handlebar. All ready to be mounted on the bike!

All other components, such as the drivetrain components will be taken from the Dahon Boardwalk. In the next part of this upgrade series, the assembly of the Wheelsport Fantasy mini velo will begin!

Wheelsport Ultegra Di2 2x11 Speed: Part 4 - Installation Issues and Solutions

$
0
0
Part 1: Frame Design and Carbon Fork
Part 2: Compatibility Check for Wheelset and Brake Calipers
Part 3: Component Selection

With all the required components gathered, it is now time to assemble the bike! The headset bearing cups had already been pressed into the head tube by the bike shop, and this makes it easy for me to assemble everything else without needing any special headset tools.

Before assembling the carbon fork to the Wheelsport Fantasy mini velo frame, the crown race needs to be first installed onto the steerer tube. Being a slotted type of crown race with an open end, this makes it easy to install without needing to press fit it onto the steerer tube. It is a good idea to apply some grease here to prevent creaking.

Installing the crown race onto the steerer tube, after applying some grease onto the contact areas.

After inserting the sealed bearings into the top and bottom of the head tube, the fork can be installed! The compression ring goes on top of the top bearing.

The carbon spacer as shown in Part 1 goes onto the outside of the steerer tube. The stem will then rest on top of it and press down on the headset bearings.

However, the carbon spacer is too long, and the stem protrudes too far above the steerer tube. The solution would be to shorten the carbon spacer by cutting off the excess length.

I had previously shortened a handlebar before by using a pipe cutter, and also shortened the steerer tube of the Tern fork using the same pipe cutter. However, I realised that the maximum diameter that the pipe cutter can accomodate is 30mm. This works well for flat handlebars (22.2mm diameter at the ends) or steerer tubes (28.6mm diameter), but not this carbon spacer (35mm diameter).

Issue number 1:
The solution is to get a saw guide, or a larger pipe cutter. I could not find a saw guide at such short notice, but managed to find a larger pipe cutter at a nearby hardware store. Hopefully this will work!

Using the larger pipe cutter which fits the large diameter carbon spacer

Roll the blade round and round the carbon spacer, tightening the knob after every couple of rounds to eventually cut through the tube. About 13mm of the spacer was eventually cut off.

However, I soon found that a pipe cutter is not really suitable for cutting through a carbon tube. A carbon tube is tougher than aluminium tubes, and it took much longer to cut through this carbon tube. Also, the final cut surface was quite uneven, and was not perpendicular to the tube. This would not allow the carbon spacer to sit flat against the stem or the headset.

More work had to be done, as I had to file the end of the carbon spacer to ensure a flat surface. All these took a lot of work and time, and it would be much better to use a saw guide to cut through the tube for a flat and smooth surface.

Final surface condition of the cut after much filing to create a flat surface. Still acceptable.

Finally, the headset, fork and stem have been installed! It was more troublesome that I thought it would be, due to the tough cutting work required for the carbon spacer.

Next, I decided to install the gold coloured Aerozine ceramic BB onto the frame first.

Gold coloured Aerozine ceramic BB, gives a strong contrast to the matte black frame

After installing the BB, the next step I wanted to do was to confirm the position of the Di2 battery. My preferred position for the Di2 battery is to mount it behind the bottle cage, using the long Di2 battery mount. This would protect the battery from dirt or water kicked up by the front or rear tires.

Location of the bottle cage, and the remaining space available for the Di2 battery

Issue number 2:
Yet another issue has cropped up! Given the location of the bottle cage screw bosses, there is insufficient space left for the Di2 battery. It would not be possible to remove the battery for charging, without first removing the bottle cage.

The solution here is to move the screw location for the bottle cage. Shimano does make a bottle cage adapter to move the screw holes, in an event that the bottle cage interferes with the Di2 battery or the FD.

Shimano bottle cage adapter, SM-BA01. This will allow the screw holes for the bottle cage to be offset by between 32mm to 50mm.

Here is how it works. Fasten the metal plate to the original screw holes. On the metal plate itself, there are two new M5 screw holes for the new bottle cage location. The slots allow adjustment of the offset distance. All these will be covered by the plastic cover as shown.

After much trial and error, this is the final setup of the bottle cage adapter. The bottle cage position has been moved forward and upwards.

I decided to use the Monkii Clip bottle cage, which allows the water bottle to be removed together with the bottle cage when in use. This is necessary as it will be difficult to remove the water bottle from a standard bottle cage, due to frame interference with the water bottle. There is also sufficient space to remove the battery when the Monkii bottle cage is installed.

Ultegra 6800 52/36T mid-compact crankset and Ultegra 6870 Di2 FD installed!

Ultegra 6870 Di2 Short Cage RD installed

Issue number 3:
Unfortunately, another issue was discovered once I tried to tune the gears for the front and rear derailleurs. I found that when the chain is in the front low position (36T chainring), the chain will touch the bottom of the FD chain guide when the higher gears on the cassette are selected.

Chain touching issue when set to front low (36T) and rear top (11T). The chain will drag across the end of the chain guide when pedaling, which creates a lot of noise and friction.

In fact, this chain touching issue will occur if the RD is set to the higher 9 gears (11T to 21T sprockets), and the chain only just manages to clear the chain guide when in the lower two gears (23T and 25T) on the cassette. This problem only occurs when in the small 36T chainring, and not in the large 52T chainring.

Chain position when set to front low (36T) and rear low (25T). The chain is almost touching the end of the FD chain guide.

After much thinking and research, I found that this is mainly due to the geometry of small wheeled bikes as compared to standard large wheeled bikes. On standard 700C wheeled road bikes, the rear cassette position is above the BB, whereas on small wheeled bikes, the rear cassette position is below the BB. This is why this FD will fit nicely on standard road bikes, but will have chain touching issue when used on this particular mini velo frame.

On the road bike, the chain runs upwards from the BB to the rear cassette, while on the mini velo, the chain runs downwards from the BB to the rear cassette. If the FD mounting position is not correct, it will cause shifting and interference issues.

One curious thing is that when I previously installed the Shimano 105 5700 FD on the other Wheelsport Fantasy bike, it did not have the same issue. After checking it out, I found that this is because the length of the FD chain guide is different. The chain guide of the older 5700 FD is longer than the new generation of FD (9000/6800/5800/9070/6870 series), which prevented the chain touching issue.

If the older 105 5700 FD is used, it does not have chain touching issue even when in the front low and rear top gear.

There is a small clearance between the FD chain guide and the chain. This clearance is available due to the longer chain guide on the older 105 5700 FD, as compared to the shorter chain guide on my Ultegra 6870 Di2 FD.

Comparing the length of the FD chain guide. 105 5700 FD on top, 105 5800 FD at the bottom. The new generation of Shimano FD (9000/6800/5800/9070/6870 series) has a chain guide that is quite a bit shorter than the previous generation, which means possible incompatibility with small wheeled bikes.

The preferred position of the FD mounting, to prevent chain touching issue. Offset behind the original mounting, and rotated to be concentric with the chainring.

Similar designs can be found on the FD adapter used by Tyrell bikes, with the FD position offset backwards by the FD adapter instead of being fixed to the seat tube.

It would be better to have a separate FD adapter, so that the FD position can be optimised, as shown here on a Tyrell frame.

Fortunately, all is not lost! With some inventiveness and a DIY spirit, I managed to move the FD to a more suitable position with a custom mount. The idea is to offset the FD rearwards, and then rotate the FD such that the chain guide is concentric with the chainring. This would put the FD in a position similar to that on a Tyrell bike, which is correctly designed for small wheeled bikes.

First, a block is needed to shift the FD rearwards. I got this FD adapter from Taobao, which is originally designed for Java folding bikes. What I need is only the silver block.

Next, a Ridea wedge type shim is required to rotate the FD on the adapter. The shim is thick at one end and thin at the other end, which will rotate the FD on the mounting. Each of this shim will rotate the FD by 4 degrees.

Part List: Spacer Block, 2 x Ridea 4 degree Shim, 1 set of Concave/Convex Washers and a M5x45mm Bolt.

The aluminium block plus two Ridea shims (8 degrees in total) will move the FD to the desired position. Due to the angle of the wedges, I needed to use the concave/convex washers from V-brake pads to allow the longer bolt to be tightened properly.

Final setup of the FD! Looks ugly with the large block visible, but this is required to put the FD in the correct position.

With the custom FD adapter parts in place, there is no more chain touching issue even when in the front low and rear top gear. Also, the chain guide is nicely concentric to the chainring. As for the shifting performance, it works surprisingly well on the workstand, even though the support bolt on the FD is not in use. The actual shifting performance will be tested once the full bike is assembled and goes for a test ride.

For this Wheelsport Fantasy mini velo bike, the FD mounting position needs to be improved, to place the FD in the position as shown above. This is important to ensure that future FD will be compatible with this bike frame, especially for newer FD designed for 11 speed systems. It can be done by either improving the position of the FD braze on mounting, or removing the mounting and providing a separate clamp on FD adapter instead.

Up till now, there have been more installation issues that I had expected. For the first issue with the cutting of the carbon spacer, the solution was obvious, which is to shorten the carbon spacer, although it was not an easy job.

As for the second issue with the interference between the bottle cage and the Di2 battery mount, it was because I decided to place the Di2 battery there. If a normal mechanical shifting setup is used, or if the battery is placed elsewhere, there would not be such an issue.

Finally, for the FD chain touching issue, it was partly due to the frame design, where the FD mounting is located at the wrong place. It is also partly caused by the FD, where the chain guide has been shortened from the previous generation, creating this interference problem that will not occur if an older FD is used.

I am glad that I managed to find a suitable solution for each of these problems, and now the assembly of this Wheelsport Fantasy Ultegra Di2 2x11 Speed mini velo can continue!

Wheelsport Ultegra Di2 2x11 Speed: Part 5 - Final Assembly

$
0
0
Part 1: Frame Design and Carbon Fork
Part 2: Compatibility Check for Wheelset and Brake Calipers
Part 3: Component Selection
Part 4: Installation Issues and Solutions

Finally, with all the unexpected installation issues solved, I can continue the assembly of the Wheelsport Fantasy mini velo! Those issues put the assembly of this bike on hold for two weeks as I had to wait for the parts of the custom FD mount to arrive from Taobao.

As planned earlier, I will be moving most of the components from the Dahon Boardwalk over to this new frame. This includes the Chris King custom wheelset and the Ultegra Di2 2x11 speed drivetrain.

In the previous post, I was about one-third of the way through this bike assembly, and today, I will complete the full bike assembly and also show the full component list for this mini velo. The drivetrain components (RD, FD, Cassette, Crankset, Chain) have already been installed, and the next step is to move on to the handlebar area.

Using the aluminium Fizik Cyrano R1 stem, the FSA K-Force Compact Carbon Road Handlebar was installed with no problem. These are considered lightweight components with a combined stem plus handlebar weight of only 330 grams.

FSA handlebar on Fizik stem. Subtle black decals on the Fizik stem.

With the Ultegra Di2 shifters already installed, but before connecting the brake cables and the shifter Di2 wires

To minimise friction from the brake inner cable rubbing against the hole edges of the metal cable end caps, I used the type of end cap with a plastic tube at the end. Polymer coated brake inner cables were also used to minimise friction.

Not very visible, but the black plastic tube just manages to poke out of the end of the cable adjust bolt. This ensures that there is no metal to metal rubbing between the brake inner cable and other parts of the brake system.

With the brake cable routing determined by the stoppers on the frame, it is simple to just follow the stoppers when installing the brake cables. However, this frame is designed for mechanical shifting, which means using steel inner cables to connect the shifters to the RD and FD. There are cable stoppers for the shifter cables, but since I am using Di2 shifting, I will not need to use those cable stoppers.

The challenge now is to find the best route for running the Di2 wires along the frame, with the objective of making it look clean and neat. Also, areas which will be touched by the hand or bike stand should be avoided to prevent damage to the Di2 wires.

Once again, it is time to use my creativity and experience from setting up two previous Di2 bikes (Dahon Boardwalk and Dahon MuEX) to find the best wire routing along this Wheelsport Fantasy mini velo frame. Each frame may require a different setup, as the frame design, type of usage and components used may be different.

In this case, it may be easier than the previous two bikes, as this is a non-folding bike, which means that I do not need to worry about how the Di2 wires will be affected by the fold.

The shifter inner cables are designed to run under the downtube of this frame, but I did not want to run the Di2 wires the same way. The disadvantage of running the cables or wires under the downtube is being exposed to all the dirt and water kicked up by the front wheel. Also, it will then have to pass under and behind the BB, which requires extra cable or wire length.

With the freedom of setting my own wire routing for the Di2 wires, I determined that the best way is to run the Di2 wires along the top tube, just beside the rear brake cable. This would keep the rest of the frame looking as neat as possible.

From Junction A, the Di2 wire runs along the rear brake outer casing, before reaching the top tube. Here, the Di2 wire runs along the top tube, secured in place by the special Di2 wire sticker guide.

At the other end, the Di2 wire rejoins the rear brake outer casing...

...before running down the back of the seat tube to Junction B.

Junction B is pasted and cable tied to the rear of the seat tube, same as how it is done on the Dahon Boardwalk and Dahon MuEX. The D-Fly wireless unit is fixed to the left chainstay using the supplied rubber band.

The D-Fly wireless unit is located in between the rear derailleur and Junction B. A black chainstay cover is used to help secure the Di2 wire and also protect the chainstay.

Final Di2 wiring layout on this Wheelsport mini velo. Same components as on the Dahon Boardwalk, but with a different wiring layout and some different wire lengths.

View of the Ultegra Di2 6870 FD and 6800 52/36T Crankset

Overall view of the Ultegra 2x11 speed drivetrain

Putting the lightweight Selle Italia saddle and the FSA SL-K seatpost in the frame

This seatpost has a unique clamp that can be reversed, such that it gives either 0mm offset or 15mm offset. Shown here is the 0mm offset condition, which is perfect for my usage.

With my favourite Lizard Skins bar tape wrapped and all ready to go!

No accessories installed on the bike yet

View from the front. A very clean handlebar area, with neat cabling. Junction A of the Di2 system is fixed to the rear brake cable.

View of the completed bike! I like the gold accents throughout the bike

With the full Ultegra Di2 groupset on this Wheelsport Fantasy mini velo.

It is as lightweight as it looks, weighing only 8.2kg including pedals.

Full part list of this bike. Lightweight at only 7.8kg without pedals! Barely 500 grams heavier than the upgraded Merida Scultura 5000 which is also equipped with Ultegra components.

Outdoor shot of the Ultegra Di2 2x11 speed drivetrain

Full view of the completed bike! On a test ride to check the function and position of the saddle.

The assembly of this mini velo is complete! However, there is still some more work to be done, which is to install the accessories, such as the lights and the extra bottle cage. If you look at the two pictures above, you will see an extra bottle cage attached to the seat tube. On the original frame, there are no screw bosses on the seat tube. To find out how it is done, wait for the next post in Part 6!

Wheelsport Ultegra Di2 2x11 Speed: Part 6 - Accessories and Geometry Comparison

$
0
0
Part 1: Frame Design and Carbon Fork
Part 2: Compatibility Check for Wheelset and Brake Calipers
Part 3: Component Selection
Part 4: Installation Issues and Solutions
Part 5: Final Assembly

With the successful assembly of the Wheelsport Fantasy Ultegra Di2 2x11 Speed Mini Velo, I now have a new bike to ride! This bike replaces the Dahon Boardwalk which has served me extremely well these few years. It was the bike that kick started all these bike upgrading, and helped me learnt so much about bicycles.

Now, on my daily commute to work, I generally rotate between three bikes. The Merida Scultura 5000 road bike, this new Wheelsport Fantasy mini velo, and the Avanti Inc 3 wet weather bike. If the weather is dry and good, I will use the Merida road bike or the Wheelsport mini velo. Occasionally, I will ride the Dahon MuEX Di2 folding bike. Otherwise, if there is wet weather, I will use the all weather Avanti Inc 3 as my commuting bike.

I like to have some accessories on all my bikes, such as lights or mounts for a cycle computer. Also, I find it important to bring along spares and tools, which means the use of a saddle bag or a tool bottle. On this Wheelsport mini velo, I will also need to bring along spares and tools, but I don't want to use a saddle bag as it will spoil the look of the bike for me. Another reason for eliminating the saddle bag is so that I can mount the Fly 6 rear light + camera on the seat post. In this case, the elegant way is to use a tool bottle to carry the stuff, like how it is done on the Merida road bike.

The problem is, the Wheelsport Fantasy frame only comes with one set of bottle cage mounting holes, which is located on the downtube. This is where the water bottle will be mounted, so I need to find somewhere else for the tool bottle. My solution for this is to create an extra set of mounting holes on the seat tube.

Only one set of bottle cage mounting holes on the downtube as shown, no bottle cage mounting anywhere else.

Using this add-on bottle cage mounting, extra bottle cage mounting holes can be strapped onto almost any part of the bike frame

Turning the red plastic piece will miraculously tighten the cable tie, through the ingenious use of a special spiral gear that works like a worm gear.

One set weighs only 29 grams, very simple and effective

Installed on the seat tube of the Wheelsport frame. The challenge is to put it as low as possible, but also not interfere with the FD or the Di2 battery.

With the new mount, a Merida bottle cage was used to hold the PRO tool bottle and the Lezyne Pressure Drive hand pump

Managed to fit everything I wanted into the compact triangle of the frame!

I am glad that I managed to make this work, so that I can use a tool bottle to carry the spares and tools. However, it must be noted that due to the limited space, it is quite impossible to use a water bottle here, unless it is a really short water bottle, or if the bottle cage allows sideways access.

Next, I would also like to mount the Garmin Edge 510 cycle computer and the Shimano Sport Camera on this bike. To mount these two accessories on the bike, I had previously used the K-Edge Aero mount on the Merida road bike. However, the K-Edge mount was expensive, and I did not want to spend so much again on a K-Edge mount. Luckily, I managed to find a similar one on Taobao which is half the price.

Garmin plus GoPro combo mount from Taobao, works similarly to the K-Edge design

Bottom side of the mount. The mount can be pushed further outwards as required to accommodate the larger Garmin Edge 1000.

A bit heavier than the K-Edge mount, as more material is used on this mount

Seen as mounted on the bike, with the Garmin on top and the Shimano camera below

As neat as possible, without taking up too much space on the handlebar

The most important accessories are the lights, which is necessary for safety, especially when riding in the dark. My current favourite lights are the D-Light USB rechargeable front and rear lights, as they are so small and lightweight, and yet bright enough for on road riding usage.

D-Light rear light, fits perfectly into the small triangle formed by the top tube, seat tube and seat stays. This is the perfect place for a rear light.

Pair of D-Light front lights, mounted the same way as on the Merida road bike.

All the accessories have been installed on the bike! Now, I would like to compare the geometries of this new Wheelsport mini velo with the Merida road bike. Both are built to go fast, and the riding geometry should be similar for me. As always, I use the bottom bracket of both the bikes as the datum for alignment, before comparing them. I had previously compared the Dahon Boardwalk to the Merida Scultura 5000, and now it will be the Wheelsport Fantasy Mini Velo against the Merida road bike.

Aligning the bottom bracket of the bikes to each other

One concern that I have is the ground clearance for the crankarm when cornering. This Wheelsport mini velo frame is designed for 451 wheels, but I have installed 406 wheels which are smaller. This will put the crankarm and pedals closer to the ground during cornering. For comparison, I have measured the BB to ground distance for my other bikes. This distance is somewhat affected by the type of tires used, as wider tires are also taller than narrower tires.

BB to Ground Height:
Wheelsport Fantasy Ultegra Di2 2x11 Speed: 267mm
Dahon MuEX and Dahon Vitesse: 284mm
Merida Scultura 5000: 275mm
Avanti Inc 3: 274mm

Based on the measurements, Dahon folding bikes actually have a pretty high BB to ground distance. The Merida road bike has a BB to ground distance that is almost the same as the Avanti Inc 3, so I guess this is pretty much the standard for a bike meant to be ridden on road. I expect off-road mountain bikes to have more clearance with the ground, to clear obstacles and also to allow for suspension sag.

This leaves the BB to ground distance for the Wheelsport mini velo as the lowest of the lot. It is about 7mm lower than the next lowest. Will this cause pedal strike when I corner more with the Wheelsport mini velo? It is hard to tell until I try it. That said, I have never had pedal strike issues with any of the bikes mentioned above.

Merida bike has a 405mm chainstay length (from the website), while the Wheelsport frame has a 420mm chainstay length (measured). Will this give the mini velo more stability at high speed compared to the road bike?

Wheelsport frame has a BB to front hub length of 580mm, about the same as the Merida road bike

Saddle on the Wheelsport mini velo is set slightly lower than that on the Merida, as the BB height is also lower. Reach from the saddle to the pedals should be similar.

Saddle on the Wheelsport mini velo is set slightly further back, to give sufficient space between the stem and the nose of the saddle for me to stand in.

Handlebar on the Wheelsport mini velo is at about the same reach as the Merida, but is located about 30mm higher.

Slightly higher and nearer reach for the Wheelsport mini velo as compared to the Merida road bike

With this geometry comparison, it can be seen that the geometry of the Wheelsport Fantasy mini velo is quite similar to the Merida road bike. Apart from the slighter shorter reach on the mini velo (with a less aggressive riding posture), most other distances are similar. This also means that this mini velo will feel much like a road bike in terms of riding posture. The only thing left to do now is to ride the bike and enjoy it!

Merida Scultura 5000: Dura-Ace 9000 Front Derailleur and Rear Derailleur

$
0
0
The fastest bike that I have in my collection is no doubt the Merida Scultura 5000 road bike. If I want to go for a fast ride, this is the bike that I will choose. In this year's OCBC Cycle, I rode this Merida road bike for the 42km route, and it felt very good!

Previously, this road bike had already been upgraded to a full Ultegra 6800 groupset, up from the stock components. In fact, some components are already at Dura-Ace level, such as the bottom bracket and the 11 speed chain. As a predominantly Ultegra bike, it already performs very well, and for most riders, it is already good enough for everyday use. Unless you are a pro rider or very familiar with the components, it is difficult to tell the difference between an Ultegra groupset and a Dura-Ace groupset.

I recently had the chance to upgrade some components from Ultegra to Dura-Ace, and I took the opportunity to change out the components. Apart from some reduction in weight, I expect the performance of the Dura-Ace components to be similar to that of Ultegra.

The first components that I changed are the front derailleur and the rear derailleur. Going from Ultegra to Dura-Ace will yield some small weight savings, and perhaps give lighter shifting due to a more mechanically efficient FD and RD construction.

For the Dura-Ace 9000 FD that I have, it is a braze on type of FD, unlike the original Ultegra 6800 FD which is a clamp band type. This also means that there is no FD mount on this Merida frame.

I have read that it is more versatile to get a braze on FD, as it means that you can move it from bike to bike easily, regardless of the seat tube size, and whether it uses a built in braze on FD mount or does not have one. If the bike does not have a FD mount, you can always get a separate FD clamp of the suitable size to mount the braze on FD onto the frame. That is exactly what I did, using a separate FD adapter to install the braze on FD.

Official Shimano FD adapter, for mounting braze on FD onto frames with no FD mounting

Originally designed for the Dura-Ace Di2 7970 FD, this will also work for most other FD. I got the M sized clamp band which has a clamp diameter of 31.8mm.

Dura-Ace 9000 Front Derailleur, which is the first FD with the revolutionary long arm design that greatly reduces the shifting force required.

Rear view of the FD, with the support bolt visible in the middle, which helps to stiffen up the FD when mounted on the frame. High quality hardware for maximum corrosion resistance.

Hollow rivets and large cutout on the arm for maximum weight savings

Weighs only 65 grams on its own! A lot of the weight savings is from the aluminium chain guide

To use this braze on FD on the Merida frame, I need to mount the FD onto the FD adapter first as shown here

The support bolt can still be used, but it will touch the FD adapter instead of the frame

Together with the FD adapter, the whole FD assembly weighs 85 grams

For comparison, the original Ultegra 6800 FD weighs 105 grams (M size 31.8mm clamp band)

Seen as mounted on the frame! The bottle cage had to be removed first for FD installation

With the vertical gap between the chain guide and the chainring teeth maintained at 1-3mm, this Dura-Ace FD has been properly set up!

After setting up the new front derailleur, the next component to change would be the rear derailleur. Let's take a look at the new Dura-Ace 9000 RD.

Two tone silver and black anodising. Hollow B axle bolt for weight savings.

Inside view of the RD. Cutouts are made wherever possible for maximum weight savings.

Cable adjust bolt with a plastic nose to prevent damage to the inner cable during usage. Also present on the other new RD of lower grades.

Carbon outer and inner plates for more weight savings! However, this might be more prone to damage as compared to aluminium plates.

This Dura-Ace 9000 short cage rear derailleur weighs only 160 grams!

The original Ultegra 6800 short cage RD weighs 197 grams, which is actually also pretty lightweight.

As mounted on the bike!

Upgrading the FD and RD from Ultegra to Dura-Ace grade has saved about 50 grams, which is actually quite little. This difference cannot be felt at all when riding or even carrying the bike.

So far, the RD, FD, BB and chain are of Dura-Ace grade, while the brake calipers, crankset, shifters and cassette are of Ultegra grade. This mixing of the groupset is acceptable as they are compatible with each other, since they are from the same generation and have the same number of speeds.

In the next part of this upgrade, more components will be changed from Ultegra to Dura-Ace grade!

Merida Scultura 5000: Dura-Ace 9000 Crankset and Brake Calipers

$
0
0
After upgrading the rear derailleur and front derailleur on the Merida Scultura 5000 from Ultegra 6800 to Dura-Ace 9000, the next components that I want to upgrade would be the crankset and the brake calipers. Once again, I would like to emphasize that the Ultegra components are working perfectly fine, and the only reason that I changed to Dura-Ace components is to find out if there is a difference in terms of performance. There will definitely be some weight savings, but that is not the key purpose here.

On a full sized road bike with 700C wheels, most riders would be well suited to a compact 50/34T crankset, as it gives a gear range that is suitable for most road bike rides. Only the strongest riders such as the super-enthusiasts or professionals need the higher gearing of a standard 53/39T crankset. Most people will never max out the 50T front/11T rear gear combination on a 700C road bike, except on downslopes.

As such, a suitable gearing for the new Dura-Ace 9000 crankset would be the 50/34T compact crankset, which replaces the Ultegra 6800 50/34T compact crankset. Same gearing, just with a different design, weight and probably similar performance.

Dura-Ace 9000 crankset for 11 speed drivetrains, 50/34T compact chainrings

Silver and black anodised Hollowglide chainrings. Surprisingly few shifting ramps and pins.

Inner chainring is also marked, and it even has a machined groove under the gear teeth for maximum weight savings.

Smart looking silver/black appearance on this 4 arm crankset! This design is such that you will either love it or hate it.

Complete Dura-Ace 9000 crankset weighs only 615 grams, which is really lightweight for an aluminium crankset that is stiff and shifts well.

For comparison, the Ultegra 6800 crankset is about 60 grams heavier, at 677 grams. Still considered pretty lightweight, and has a good weight to price ratio.

Using a torque wrench on the crank arm clamp bolts to ensure a proper tightening torque, so that the crank arms don't drop off while riding.

The PD-A530 pedals don't really match the crankset, but they are so versatile and are in use on many of my other bikes, such as the Wheelsport Fantasy mini velo, Avanti Inc 3 and Dahon MuEX.

Looking good with the Dura-Ace 9000 Front Derailleur as installed previously

Almost a full Dura-Ace 9000 drivetrain, with the exception of the Ultegra 6800 cassette.

After upgrading the crankset from Ultegra to Dura-Ace, the next component to upgrade would be the brake calipers. Let's see if there is any difference compared to Ultegra brake calipers.

Dura-Ace 9000 Brake Calipers. Supposedly the most powerful road brake calipers available.

Nice shiny hardware, polished and anodised. Magnesium brake pad holders.

Torx bolt heads, and I think they are made of titanium. The cable fixing bolt shown at the bottom is also made of titanium.

Spring tension adjustment bolt and centering adjustment bolt

A pair weighs 298 grams. Not the lightest available, but the additional power should be worth the extra weight.

Ultegra 6800 brake calipers, weighing more at 341 grams for the pair

Rear brake calipers installed!

Good clearance between the rear brake calipers and the Schwalbe One 25C tires

Front brake calipers installed

A bit lesser clearance as compared to the rear. Probably cannot use wider tires without causing interference.  

Merida Scultura 5000 upgraded with Dura-Ace/Ultegra components!

Looking good with high end components

Previously, when the RD and FD were upgraded from Ultegra to Dura-Ace, 50 grams were saved. This time, changing the crankset and brake calipers from Ultegra to Dura-Ace saved another 100 grams, giving a total weight saving of 150 grams.

Is it worth paying twice the price of Ultegra to get Dura-Ace components? Common sense says no, as the performance of Ultegra is almost the same as Dura-Ace, but at half the price. The weight savings are not that much for individual components, but they do add up, and you can save about 300 grams when upgrading a full Ultegra groupset to a full Dura-Ace groupset.

That is another reason why Ultegra components are so popular, as they offer great value and performance at a reasonable price. I have used both Ultegra components and now Dura-Ace components on the same bike, and so I can tell whether there is any noticeable difference between the two groupsets. The answer is, the functional and performance differences between Dura-Ace and Ultegra is so small that unless you are a pro rider or deal with road bikes everyday, you will not be able to tell the difference.

Finally, the full bike weight (without accessories such as lights, bottle cages, etc) is now 7.2 kg without pedals, and 7.6 kg inclusive of the PD-A530 pedals. This is a pretty good weight, but not featherlight. Looking back at the stock weight of this road bike, which was 8.2 kg (without pedals), it takes quite a lot of effort to remove 1 kg from the bike!

In my next blog post, I will estimate the frameset weight of the Merida Scultura 5000, using the full bike weight and deducting the weight of every single component on the bike. Since I have upgraded practically all the components on this Merida road bike, I know the weight of each component in detail.

To be continued!

Bike Components Sale!

$
0
0
1) LitePro Stem, Silver Colour
Brand new, authentic LitePro Stem, 25.4mm clamp diameter on both ends. Extends your handlebar for better reach and comfort. Fits practically all Tern or Dahon folding bikes, and also some bikes from other brands.
$30 firm.


2) GoPro/Shimano Camera Handlebar Mount, Gold Colour
Inspired by the K-Edge handlebar mount, but at a fraction of the cost. GoPro style of mounting, can be fitted to GoPro cameras or Shimano Sport Cameras. Comes with knobs of two different lengths, and adapters to mount to either 31.8mm or 25.4mm handlebars.
$30 firm.


3) Gates Carbon Belt Drive Parts
Carbon CenterTrack CDX Front Sprocket, 50T, 5 arm 130mm BCD.
Carbon CenterTrack CDX Rear Sprocket, 24T for Nexus/Alfine internal hubs.

Carbon CenterTrack CDX Belt, 118T
Carbon CenterTrack CDX Belt, 115T (older design)

All parts are brand new/almost new, in excellent condition.
Note that a belt drive system needs a special frame. It is not possible to convert a traditional frame to use a belt drive system, unless it has a special geometry or frame design.
If you already have a belt drive bike, these parts may help you to adjust the gear ratio to get the gearing that you want.
Feel free to check with me if you have questions regarding compatibility.
$30 firm for each item


4) Topeak Wedge DryBag, Large, with Strap Mount
Rarely used saddle bag, completely weather proof, mounts to saddle rails with straps. Large space for keeping tools, spares and even a rain jacket. More info here.
$30 firm.


5) FSA Vero Aluminium Compact Drop Bar
400mm width, 125mm drop, 80mm reach compact drop bar. Center clamp diameter of 31.8mm. Used but still in excellent condition.
$30 firm

Merida Scultura 5000: Frameset Weight

$
0
0
After completing the latest upgrade on the Merida Scultura 5000 road bike, I have changed almost all the components on the bike. Only a few components have not been changed, such as the Ultegra 6800 road shifters, the stock Merida stem and seatpost and also the bar tape. Even so, I have also weighed those parts, and now I have a complete list of the components with their individual weights.

With that info in hand, I can then calculate the weight of the Merida Scultura frameset, by deducting the total component weight from the full bike weight.

View of the upgraded Merida Scultura 5000!

Mostly Dura-Ace 9000 components on the bike

As shown below, the weight of each of the components have been listed down.

Full component list and the weight of each of them

The full bike weighs 7.6 kg (7.2 kg without the pedals), which is a really nice weight for a road bike. It is not a super light bike that is less than the UCI standard 6.8 kg, but is definitely not a heavy road bike that is more than 9 kg.

After deducting the weight of all the components from the full bike weight, the remaining weight is around 1635 grams. This weight is inclusive of the frame, front fork, seatpost clamp, RD hanger, headset cups and bearings, stem spacers and lastly the stem top cap. To get the pure weight of the frameset alone, some estimation is required here. This amount will be deducted from the calculated value above to get the pure frameset weight.

Seatpost Clamp + RD Hanger: Around 50 grams
Headset Cups + Bearings: Around 70 grams
Stem Spacers + Stem Top Cap: Around 50 grams

This gives a frameset weight (frame + fork) of around 1465 grams, which is a decent weight for a mid range carbon frame. High end super lightweight carbon framesets can weigh less than 1000 grams, but they cost a lot more than this. If I estimate the front fork weight to be around 450 grams, this gives a frame-only weight of about 1000 grams.

All these are estimations, with some assumptions made along the way. They may not be very accurate, but it gives a rough estimate of the frameset weight and how it compares with other road frames.

From what I see, the only areas where there can be further significant weight reductions (>50 grams) would be the shifters, wheelset, QR axles, tires & tubes, cassette and pedals. The other components are pretty much as lightweight as possible, without sacrificing function.

Change to Dura-Ace ST-9001 Road Shifters: Save 60 grams
Change to lightweight tubular wheelset with titanium QR Axles: Save 500 grams
Change to tubular tires (no inner tubes): Save 200 grams
Change to Dura-Ace 9000 cassette: Save 50 grams
Change to lightweight pedals: Save 140 grams

If all these changes are implemented, there is further potential for weight savings, reducing another 950 grams, and cutting the full bike weight down to around 6.7 kg with pedals, or 6.5 kg without pedals. This would make it a really lightweight bike, but also very expensive.

Dura-Ace 9000 vs Ultegra 6800: Rear Derailleur and Front Derailleur

$
0
0
During the upgrading of the components on the Merida Scultura 5000 from Ultegra 6800 to Dura-Ace 9000, I found that it was the perfect chance to compare the components from these two groupsets. After removing the Ultegra components from the bike, and before installing the Dura-Ace components, I could compare each of the components in detail.

Starting with the Rear Derailleur and the Front Derailleur in this blog post, I will mainly be highlighting the physical differences found between Ultegra 6800 and Dura-Ace 9000. This should give a good idea on whether it is worth paying the price difference to upgrade from Ultegra to Dura-Ace.

Dura-Ace 9000 RD and Ultegra 6800 RD. Both are short cage versions.

Similar construction, with an aluminium outer link and inner link.

Carbon pulley cage on the Dura-Ace RD for weight savings, as compared to aluminium cage on the Ultegra RD.

Full hollow titanium B Axle on the Dura-Ace RD, as compared to the Ultegra RD which only has a small hole on the stainless steel B axle.

Both the pulleys on the Dura-Ace RD uses sealed bearings, while the Ultegra RD uses bushing for the upper pulley, and sealed bearing for the lower pulley.

197 grams for the Ultegra 6800 Short Cage RD, which is a nice low weight

The Dura-Ace 9000 RD goes one step further and is even more lightweight, at only 160 grams for the short cage version!

Moving on to the Front Derailleur, let's compare the Dura-Ace 9000 FD with the Ultegra 6800 FD. In this case, I am comparing the braze on version of the Dura-Ace FD with the clamp band version of the Ultegra FD, so the weight comparison will not be accurate.

Dura-Ace 9000 FD on the left, Ultegra 6800 FD on the right. Similar construction.

The surface finishing on the Dura-Ace FD is smoother than on the Ultegra FD. Both have the plastic skid plate on the inside of the chain guide.

Similar rear view. Dura-Ace FD on the left has an aluminium chain guide for weight savings.

Different cable fixing bolt design. Dura-Ace FD on the left has a special notched spacer to clip onto the two cable fixing positions, while the Ultegra FD uses a standard round spacer under the cable fixing bolt.

Dura-Ace FD on the top, with a screw linking the outside and inside of the chain guide. This screw is to allow the FD chain guide to be opened up, which will allow the chain to be removed or installed on the bike without breaking the chain to pass through the FD.

Clamp band type of Ultegra 6800 FD, weighs 105 grams.

To get a more accurate weight comparison of the Dura-Ace 9000 FD, this clamp band adapter should be fixed to the Dura-Ace braze on FD. This adapter weighs about 20 grams.

Weight of Dura-Ace 9000 braze on FD + clamp band adapter is 85 grams, still lighter than the Ultegra FD

My conclusion is that the main differences between Dura-Ace and Ultegra RD and FD are the weight and surface finishing. Dura-Ace components are more lightweight and also look better with top grade anodizing. However, Ultegra components cost only half of Dura-Ace, and yet has almost the same performance as Dura-Ace. The sensible and logical choice is Ultegra, but if you can afford it, go ahead and get Dura-Ace if that is what makes you happy.

Next up, the crankset of Dura-Ace 9000 and Ultegra 6800 will be compared.

Journey of the Boardwalk: Part 41 - Components for 11 Speed Ultegra Di2

$
0
0
Why 11 speed? For Shimano Di2, shifting feels the same for 10 speed or 11 speed systems. This is because the shifters can be the same, as they are just buttons that activate the derailleurs. Therefore, there is actually no real need or incentive to upgrade my 10 speed Ultegra Di2 system on the Dahon Boardwalk to 11 speed.

My original objective is to set up another bike with flat handlebar Di2 shifters. That would mean that I need another set of Di2 components, such as the derailleurs, battery, junctions and etc. One way is to buy another complete set of Di2 components for the other flat handlebar bike. However, the other bike can only accommodate up to 10 speeds due to the freehub on the rear wheel. It would not make sense to buy the older 10 speed Di2 components, when the 11 speed Di2 components are already available and at the same price as 10 speed Di2 components.

Some time ago, I had changed the rear hub on the Dahon Boardwalk to a Chris King R45 11 speed rear hub. However, the drivetrain remained at 10 speed Ultegra Di2. Now, I can finally make use of the 11 speed capability of the rear hub and upgrade to 11 speed!

The plan is to get the new 11 speed Di2 components for the Dahon Boardwalk, and then transfer the 10 speed Di2 components to the flat handlebar bike. This would be the easiest way as I don't need to get any new wheelsets for the bikes. At the same time, I would also be able to compare the 10 and 11 speed components in more detail. The components to transfer over would mainly be the 10 speed Di2 RD and FD only.

As shown below, here are the new components for upgrading the Dahon Boardwalk from 10 speed to 11 speed. I chose the 11 speed Ultegra 6870 Di2 components, as they are much cheaper than Dura-Ace Di2 components and work just as well.

Ultegra 6870 Di2 Front Derailleur for 11 speed system

Quite lightweight at only 138 grams, considering that it houses a servo motor inside. Much smaller size than the previous Ultegra 6770 FD

Same locations for the High, Low adjustment bolts and the support bolt.  

New plastic clip at the rear of the FD for holding a stray Di2 wire

Di2 wire connection point has been changed from the top-front to the rear-bottom of the FD, probably for better appearance.

Ultegra 6870 Di2 11 speed Rear Derailleur, short cage version

Healthy weight of 256 grams for the Ultegra 6870 Di2 RD, approximately the weight of a Tiagra RD

Much more compact size than the previous Ultegra 6770 RD! Great glossy surface finishing too.

Crash protection arm at the bottom of the RD will give way and allow the RD to be disconnected from the servo motor, in order to prevent damage to the servo.  

Rear view of the RD. Compact design that is very similar in size to the Dura-Ace Di2 RD.

I will also be writing a detailed comparison of the 10 speed Ultegra Di2 6770 components vs the new 11 speed Ultegra Di2 6870 components in a separate post. Do watch out for it soon!

Other than the 11 speed RD and FD, the whole drivetrain also needs to be changed to 11 speeds. The remaining components that needs to be changed are the cassette, chain and crankset. The previous Ultegra 6770 Di2 shifters can still be used, the firmware just needs to be updated to recognise the new 11 speed components.


Titanium is used for the largest sprockets for weight savings

As for the chain, any 11 speed Shimano chain will be compatible. In fact, for this generation of 11 speed Shimano components (Dura-Ace 9000, Ultegra 6800, 105 5800, XTR M9000 and XT M8000), they can all use the same 11 speed chains. The different grades of chains mostly differ in surface treatment, but the chain compatibility is the same.


The reason for using this Ultegra 6800 crankset is because the appearance matches nicely with the new Ultegra 6870 Di2 RD and FD.

Lightweight at only 677 grams for the crankset

The best part about upgrading a Di2 system is that not all the components need to be changed. The current Ultegra 6770 shifters can still be used, as well as all the wiring and the battery for the system. However, all these components will need to be updated with the latest firmware so that the old and new components can all communicate and work with each other.

Since the shifters and wiring will be the same, there is no need to remove or reinstall the bar tape or the cables. This means that a lot of time is saved, as I only need to do a direct swap of the 10 speed components for the 11 speed components, which is quite straightforward.

In order to update Di2 firmware and customize the system, the PC Linkage Device SM-PCE1 is required to connect the PC to the Di2 system. Previously, I borrowed the PCE1 to use when I was customizing the 10 speed Ultegra Di2 system. However, as I will be setting up and customizing 2 separate Di2 bikes, it would be more convenient if I were to get my own PCE1 device.

PC Linkage Device, SM-PCE1 for updating and customizing the Shimano E-Tube Di2 system.

It comes with all the necessary wires to connect to the Di2 system

Connect the USB cable on the left side to the PC, while the other end has 2 Di2 wires. Just link up any 2 components of the Di2 system with these 2 wires and start the E-Tube software on the PC to start the configuration.

Now, you may have noticed that I am using a compact 50/34T crankset on the Dahon Boardwalk. Usually I would not advise using a compact crankset on a small wheeled bike, such as this 20" wheel bike, as the gearing may be too low for faster riding. A standard 53/39T crankset is usually more suitable.

However, in this case, I am also changing the cassette from the original 12-27T cassette to a 11-25T cassette. This cassette combination will compensate for the lower gearing of the crankset.

Before change: 53/39T crankset with 12-27T cassette
After change: 50/34T crankset with 11-25T cassette

What this affects is the overall gear range of the bike, and how close the ratios are between the gears. As shown by the graph and table below, the overall gear range of this new setup has increased slightly, both at the top end and the bottom end of the gear range. A 50T front/11T rear actually gives a higher gear ratio than a 53T front/12T rear gear combination. Together with the additional gears by going from 2x10 to 2x11 speeds, the spacing between the gears is maintained at a comfortable difference.

Graph comparing the gear range of the old vs the new drivetrain setup

Also, from the table below, the number of unique gears (after removing overlapping gear ratios) has been increased from 13 to 15 (shown by the blue and green highlighted boxes). These additional gears will allow better cadence control as I will always be able to find and select the preferred gearing for comfortable and efficient pedaling.

Table showing the difference between the old and new drivetrain setup.

Lastly, the highest gear ratio should still enable me to maintain a good speed of around 36km/h on the Dahon Boardwalk. As shown from the cadence vs speed table below, I can reach 36km/h when I use the highest gear (50T front/11T rear) and pedal at 90 RPM which is easily achievable. Whether or not a higher gear ratio is needed will be determined after test riding.

Comparing cadence vs speed for the different gear ratios

In short, this new setup is better as I have a slightly wider gear range and more unique gears to use. As a side benefit, this compact setup is slightly more lightweight as the chainrings are smaller, the cassette is smaller and a shorter chain can be used.

Therefore, it can be feasible to use a compact crankset (50/34T) on a small wheeled bike, provided these conditions below are satisfied.

1) A small cassette (with 11T as the smallest sprocket) is used to give a sufficiently high top gear.
2) Pedaling style should be a high cadence, smooth spinner type, instead of hard mashers who push high gears at low cadence.
3) Leisurely style of riding, with a top speed of below 40km/h. Higher speeds are possible only if you increase your cadence to beyond 90 RPM.

Picture of the new components that will be going onto the Dahon Boardwalk. The cassette had already been mounted on the rear hub.

Click here to continue reading about the installation!

Viewing all 697 articles
Browse latest View live