Quantcast
Channel: Hands On Bike
Viewing all 697 articles
Browse latest View live

Dura-Ace 9000 vs Ultegra 6800: Crankset

$
0
0
Looking to get a brand new crankset for your road bike? Can't decide if you should go for the top of the range Dura-Ace, or the second grade Ultegra? In this post, I will compare these two cranksets in detail, and you can decide for yourself whether the differences are worth saving up for.

I recently upgraded the crankset on the Merida Scultura 5000 road bike from Ultegra 6800 to Dura-Ace 9000, and I took the chance to compare these two cranksets. Here are the details!

Ultegra 6800 50/34T Compact Crankset, 170mm length

Dura-Ace 9000 50/34T Compact Crankset, 170mm length

11 speed chainring on the Ultegra crankset, 50/34T

Same chainring size on the Dura-Ace crankset, with a unique two-tone anodising surface treatment

Chain pick up pins and ramps can be found on the composite shell bonded to the back of the Ultegra Hollowglide chainring

Cleaner looking pick up ramps and pins on the Dura-Ace chainring. The design looks deceptively simple but it shifts really well. There is a lot of know-how regarding the placement, shape, angle and height of the pins, and also the individual teeth shape.

Ultegra 34T inner chainring, with the specs stamped onto the aluminium chainring

Laser marked 34T indication on the Dura-Ace inner chainring, with a grooved cutout to save weight

The Ultegra crank arm is 170mm in length

Same 170mm length for the Dura-Ace crank arm


Slightly different crank arm shape, with rounded edges on the Ultegra crank arm, while the Dura-Ace crank arm looks slightly wider and edgier. The glossy finish on the Dura-Ace crank arm is also more prone to fingerprint or grease marks.


Rounded edges on the Ultegra crank arm, while the Dura-Ace crank arm has sharper edges.

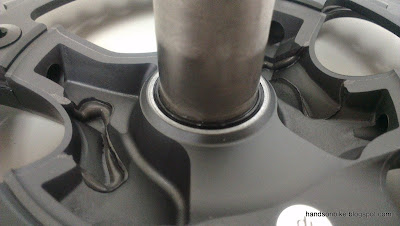
Here is where the difference is more obvious. The rear of the Ultegra crank arm is an open hollow shell, with the 4-arm rear layer glued to the front piece with epoxy, as can be seen here.

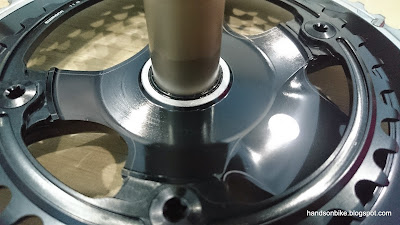
The Dura-Ace crank arm looks more well refined, with a closed hollow crankarm, cleanly bonded without any excess epoxy visible.

After comparing the appearance of the crankset, we can move on to compare the weight of the cranksets. With the same chainring sizes and also the same crank arm lengths, it will give an accurate weight comparison.

Left Ultegra 6800 170mm crank arm with crank arm fixing bolt, 197 grams.

Left Dura-Ace 9000 170mm crank arm with crank arm fixing bolt, 176 grams. About 20 grams lighter.

Right Ultegra 6800 170mm crank arm with 50/34T chainrings, 480 grams

Right Dura-Ace 9000 170mm crank arm with 50/34T chainrings, 440 grams. 40 grams lighter.

Weight of Ultegra 6800 50/34T crankset is 677 grams. A very good weight for an aluminum 2x11 speed crankset.

Dura-Ace 9000 50/34T crankset is only 615 grams, pushing the limits on aluminium cold forging technology!

View of the rear of the cranksets, showing the differences in the crank arms and the chainrings

Overall view of the Ultegra 6800 and Dura-Ace 9000 cranksets side by side

After using both of these cranksets for a few months each, my conclusion is that there is no difference in performance. Both of them shift very well, and are also very stiff for optimal power transfer. The only factor affecting your choice should be the price (Ultegra is half the price of Dura-Ace), the weight (Dura-Ace is 60 grams lighter), or the appearance (personal preference).

The value choice would be Ultegra, as it is more affordable, and the dark grey appearance matches most bike frames. The extra 60 grams of weight is probably not significant at all. If I were to choose, the Ultegra crankset is my choice. Of course, if your budget allows, go ahead and get the Dura-Ace crankset if that is your preference!

Dura-Ace 9000 vs Ultegra 6800: Road Brake Calipers

$
0
0
Finally, after comparing the many different components of Dura-Ace vs Ultegra on the Merida Scultura 5000, the next component to compare would be the brake calipers. Prior to this, the rear derailleur, front derailleur and crankset were compared.

I had also previously compared the Ultegra 6800 brake calipers against the 105 5800 brake calipers. This time, the Dura-Ace 9000 brake calipers will be compared against the Ultegra 6800 brake calipers. Let's find out what are the differences and similarities!
  
Dura-Ace 9000 brake calipers, only 298 grams per pair!

Ultegra 6800 brake calipers are heavier at 341 grams per pair

More similarities than differences, especially in terms of construction and design. The surface finishing is of course different.

Slightly different design of the center brake arm. The Dura-Ace design is slimmer.

Titanium pivot bolts on the Dura-Ace brake caliper, as compared to normal stainless steel on the Ultegra brake caliper

Different brake arm design. The Dura-Ace design has the bolt and connecting parts going through the middle of the brake arm, while the Ultegra design is reversed, with the connecting parts going around the outside of the brake arm.

Black finishing on the Dura-Ace main axle, and a different anti-loosening washer design.

The quick release lever for the Dura-Ace brake caliper is actually behind the brake arm, together with the cable fixing bolt, while the Ultegra design has the QR lever at the front.

Titanium cable fixing bolt and magnesium brake pad holders on the Dura-Ace brake caliper, as compared to stainless steel and aluminium on the Ultegra

Similar resin cable adjust bolt used

Design of the rivets and axles looks more high end on the Dura-Ace brake caliper

More standard looking bolt and axle design on the Ultegra brake caliper, but still looks better than the 105 brake caliper with external bolts and axles.

What I found is that there are actually more similarities than differences between these brake calipers. Most differences are cosmetic, and do not actually affect the function. The Dura-Ace brake caliper uses expensive titanium, magnesium and other specially designed hardware that are more costly, which is why it has a much higher price and also lower weight. The tire clearance is similar for both models.

The Dura-Ace brake calipers feels just a little bit smoother than the Ultegra brake calipers, but I am not sure if it is really the case, or is it just because the Dura-Ace brake caliper is newer than the Ultegra brake caliper. In any case, the difference in performance is very small. I would recommend the Ultegra brake caliper as the cost effective choice, as it is half the price of the Dura-Ace brake caliper, and yet has practically the full function of Dura-Ace.

Wheelsport Ultegra Di2 2x11 Speed: Part 7 - Wheelsport Smart 1.0 451 Wheelset + Schwalbe One 451 Tires

$
0
0
Part 1: Frame Design and Carbon Fork
Part 2: Compatibility Check for Wheelset and Brake Calipers
Part 3: Component Selection
Part 4: Installation Issues and Solutions
Part 5: Final Assembly
Part 6: Accessories and Geometry Comparison

After riding the Wheelsport Fantasy Ultegra Di2 2x11 Speed mini velo for a while, I realised that the bike rode very well, but the braking performance was not good enough for me. To recap, this bike was built using a set of 406 wheels, and this required using the Tektro R559 Extra Long Reach caliper brakes. This was because the frame was originally designed for 451 wheels and standard caliper brakes. Using a smaller rim would require longer reach brakes. Although these brakes work, the leverage and braking power suffered due to the extra long reach.

I have changed the brake pads to the better SwissStop brake pads, but the braking performance was still not good enough. The only way to get more braking power is to use better caliper brakes, which are all of standard reach. An example would be Shimano 105 or Ultegra caliper brakes.

In order to use standard reach caliper brakes, it would be necessary to use the larger 451 wheels. I have been resisting changing to 451 wheels, as I still want to use my custom wheelset with gold rims and Chris King rear hub. It will also allow me to have common sized inner tubes across three different bikes (the other two being Dahon MuEX and Dahon Vitesse).

However, it seems that I have no choice this time, if I want to improve the braking performance on this bike. The decision was thus made to change to 451 wheels, so that I can use better caliper brakes to improve braking performance.

As previously reviewed, the Wheelsport wheelsets are actually good value for money, and so I decided to get a new set of Wheelsport 451 wheels for use on this mini velo. Note that there are many specifications for a wheelset, such as rim size, hub width, 11 speed compatibility, etc. In this case, I would require a 451 wheelset, with 100mm/130mm hub width, 11 speed compatibility, and in black colour.

The specific wheelset has been found! 451 wheels, 100mm/130mm to fit this frame, and 11 speed compatibility for the Ultegra Di2 2x11 speed drivetrain.

Sweet pair of new Wheelsport Smart 1.0 451 wheels! Black and white matches the frame perfectly.

11 speed compatible free hub body

QR axles are included, but I will use my own QR axles that are better.

Stock plastic rim tape that came with the wheelset. Will change it out to cloth rim tape which is better for high pressure tires.

Velox cloth rim tape, best for high pressure tires. Prevents mysterious inner tube punctures.

793 grams for the 451 rear wheel with rim tape

584 grams for the 451 front wheel with rim tape

This gives a total of 1377 grams for the pair of 451 wheels, which is more than 200 grams heavier than the 1152 grams of the custom 406 wheelset. This change of wheelset would add 200 grams of rotating weight to the bike, which is not ideal for acceleration. Nevertheless, it is necessary to improve the braking performance.

Before installing the cassette, I decided to clean and regrease the ratchet mechanism in the free hub as it usually comes with very little lubrication. What I found was yet another free hub construction that differs slightly from the other two Wheelsport freehubs that I had previously seen.

Ratchet design is the same.

6 pawls are held down by 1 circular spring. I actually prefer to have 3 pawls with individual springs, as there would then be less freewheeling resistance and also redundancy design.

Regreasing the ratchet with fresh free hub grease

A new 451 wheelset also requires new tires! However, I was told that there are limitations as to what tires I can use on 451 wheels, as there is limited frame clearance for tires. When I was previously using 406 wheels, I could put on wider and taller tires as there is plenty of clearance. With 451 wheels, I can only use narrow and slim tires, which is why I decided to get the 23mm wide Schwalbe One tires. I am also using Schwalbe One tires on my Merida Scultura 5000 road bike, which works really well.

Pair of folding Schwalbe One tires for 451 wheels

23-451 means 23mm wide, or about 0.9 inches wide. These tires are even narrower than the 25mm tires I am using on my road bike!

These tires are lightweight at only 323 grams for a pair (about 162 grams each).

451 sized inner tubes are required too

A pair of Schwalbe SV7B inner tubes weigh 156 grams (78 grams each).

Recommended tire pressure is 100 to 160 PSI! That is quite high, and is only achievable using a floor pump. The advice given to me is to pump it to 120 PSI for a fast and comfortable ride.

With the Schwalbe One tires installed on the Wheelsport Smart 1.0 451 wheelset! Once again, a black and white design theme can be seen.

Comparing the 23mm wide, 451 sized Schwalbe One tire against the 35mm wide, 406 sized Kojak tire.

The Kojak tire bulges out quite a lot from the rim, creating a light bulb shape

The slim Schwalbe One tire is flush against the rim, making it more aerodynamic too.

Comparing the front wheels. 406 wheels with Kojak tires vs 451 wheels with Schwalbe One tires. The overall wheel diameter is actually quite similar!

New 451 wheel on the left vs old 406 wheel on the right

Changing from 406 wheels to 451 wheels also causes the overall gear ratio to increase, as the wheel size is now increased from 20 inch to effectively 22 inch. This is an increase of 10% which is quite significant. The tables and graph below will give you a better picture of how the gear ratio (in gear inches) is affected.

Gear ratio is increased by 10% across the board, which translates to bigger gaps at the higher gears as compared to the lower gears.

Entire gear range is pushed up by 10%.

Increasing the overall gear range would make the top end gear range higher than was previously intended, but I believe that this higher top gear will still be utilized as the faster 451 wheels would allow a higher speed to be achieved. The gear range has been increased from 65.7 gear inches (94.5 - 28.8) to 72.3 gear inches (104 - 31.7).

Now that the wheels have been upsized from 406 wheels to 451 wheels, the next step is to change to standard reach caliper brakes for better braking performance! To be continued in the next post.

Click here for Part 8

Wheelsport Ultegra Di2 2x11 Speed: Part 8 - 451 Wheelset Installation + Ultegra 6800 Brake Calipers

$
0
0
Part 1: Frame Design and Carbon Fork
Part 2: Compatibility Check for Wheelset and Brake Calipers
Part 3: Component Selection
Part 4: Installation Issues and Solutions
Part 5: Final Assembly
Part 6: Accessories and Geometry Comparison
Part 7: Wheelsport Smart 1.0 451 Wheelset + Schwalbe One 451 Tires

Continuing from the previous post where I changed the wheelset from the custom 406 gold coloured wheelset to the Wheelsport Smart 1.0 451 wheelset, it is now time to upgrade to better caliper brakes! That was the primary objective of changing from 406 to 451 wheelset on this Wheelsport Fantasy mini velo. This frame was originally designed for 451 wheels anyway.

By changing to 451 wheels as originally designed, it will allow the use of standard reach caliper brakes, which have better braking power than long reach caliper brakes. Why is this so? It can be explained by using the brake ratio of the caliper brakes.

For caliper brakes or V brakes, the brake ratio is defined as the distance between the pivot and the cable fixing bolt area, divided by the distance between the pivot and the brake pads. The higher the brake ratio, the higher the clamping force applied to the brake pads, and hence a higher braking power. This assumes that all other factors (such as activation force at brake lever) remain the same.

Brake Ratio = Distance from Pivot to Cable Fixing Bolt / Distance from Pivot to Brake Pad

Graphic showing the dimensions for determining brake ratio and hence brake power

The brake ratio of the brakes must be compatible with the brake ratio of the brake levers, in order for optimum braking performance and feel. If there is any mismatch, there will be insufficient or excessive braking power, either of which can be unsafe. To find out more about brake lever and brake caliper compatibility, check out this article for the details.

Measuring the dimensions of the brake calipers will give us some theoretical values regarding the brake ratio. The standard reach brake caliper that I decided to use is the Ultegra 6800 brake calipers, as this would match the Ultegra groupset on the bike perfectly. Comparing the Tektro R559 Extra Long Reach brake calipers to the Ultegra 6800 brake calipers, here are the dimensions.

Tektro R559 Extra Long Reach Brake Caliper
Distance from Pivot to Cable Fixing Bolt: 84mm
Distance from Pivot to Brake Pad: 55mm
Brake Ratio: 84/55 = 1.5

Ultegra 6800 Brake Caliper
Distance from Pivot to Cable Fixing Bolt: 70mm
Distance from Pivot to Brake Pad: 33mm
Brake Ratio: 84/55 = 2.1

From the calculations, the Ultegra brake caliper has a brake ratio of 2.1, which is 40% higher than the brake ratio on the Tektro brake caliper. The longer arm Tektro brake caliper will probably also flex more during hard braking, causing some loss of braking force. Also, the Ultegra brake caliper has a new cam mechanism that improves the braking power. This means that the increase in braking power is likely to be more than 40% when the brakes are changed from Tektro R559 to Ultegra 6800. This is a big jump in performance that can definitely be felt.

That was all theoretical calculations, it is time to upgrade the actual brake calipers to try it out for myself!

Tektro R559 Extra Long Reach brake calipers on the rear of the Wheelsport Fantasy mini velo, with 406 sized Kojak tires.

Tektro R559 on the front fork, with 406 sized Kojak tires. The large gap between the brake caliper and the tire is due to this frame being designed for 451 wheels instead of 406 wheels.

Swapping the brake calipers is straightforward, as there is no need to remove the brake cable from the shifter or outer casing. At the same time, the SwissStop brake pads were also transferred over from the Tektro brakes to the Ultegra brakes. Also, more work is required to change the wheelset, as the cassette also needs to be transferred over from the 406 wheelset to the 451 wheelset. Finally, the most time consuming job is aligning the brake pads nicely with the rims to ensure optimum braking performance and good braking feel.

Ultegra 6800 rear brake caliper

Small clearance with the Schwalbe One 23-451 tires! Not possible to use wider and taller Durano tires (28-451).

Ultegra 6800 front brake caliper

More clearance at the front, and it may be possible to use a wider tire at the front if necessary.

The black and white design of the wheels match well with the matte black frame with white decals

No more gold coloured wheelset or gold bling on the brake calipers. Black, white and silver is the new look

Ultegra Di2 6870 2x11 speed drivetrain, with the new Wheelsport 451 wheels

Other than allowing the use of standard reach brake calipers, the larger wheels will also raise the height of the bike slightly, as the centre of the wheelset is now higher off the ground due to the larger wheel radius. This also increases the BB to ground height, which will improve the pedal clearance when cornering with the bike.

Previously, when this bike was using 406 wheels, the BB to ground height is 267mm. With the new wheelset and tires, the BB to ground height is now 277mm. Comparing to the other bikes that I have:

BB to Ground Height:
Wheelsport Fantasy Ultegra Di2 2x11 Speed (406 wheels, Kojak tires): 267mm
Wheelsport Fantasy Ultegra Di2 2x11 Speed (451 wheels, Schwalbe One tires): 277mm
Dahon MuEX and Dahon Vitesse: 284mm

Merida Scultura 5000: 275mm
Avanti Inc 3: 274mm

This new BB to ground height of 277mm is similar to that of the Merida Scultura 5000 road bike. Not that I had any issues with pedal strike when cornering, but this shows that the original design of the frame is such that it will have the geometry of a road bike when using 451 wheels.

As a recap, this latest modification to change wheelset and brake calipers is to improve the braking performance of the bike, by allowing the use of a standard reach brake caliper that is more powerful. It is not about more speed or lighter weight, but about improving braking performance. In fact, this modification added about 50 grams overall to the bike due to the larger and heavier 451 wheelset, although this increase is partially offset by the lightweight Schwalbe One tires.

During the test ride of this bike, the improvement in braking performance can be felt immediately. Previously, it took quite a bit of effort to pull hard enough on the brake levers to stop the bike quickly. Both brakes needed to be used at the same time to generate sufficient braking power for strong braking.

With the new Ultegra 6800 brakes on the 451 wheelset, the braking power has been increased by quite a lot. It is now possible to apply only one brake to get sufficient braking force. Also, the return springs on the Ultegra 6800 brake calipers are lighter than the Tektro R559, and together with the smoother mechanism, it takes much lesser effort to apply the brakes. Being able to stop quickly and confidently is what I look for in my bikes, and this latest modification has made this possible.

Here is the component list for this Wheelsport Fantasy mini velo after the latest upgrade.

Component list for this mini velo after the latest upgrade

This is still a lightweight mini velo that weighs only 7.9 kg without pedals, which is significantly lower than other mini velos such as the Tyrell FSX (8.6 kg) or Tern Verge X18 (10.4 kg), both of which are small wheeled drop bar bikes.

View of the mini velo with Wheelsport Smart 1.0 451 wheelset, Schwalbe One tires and Ultegra 6800 brake calipers

All ready to go! Very little gold bling left on the bike except at the BB area. The colour theme for this mini velo is now black and white.

With this upgrade, the objective to improve braking performance has been achieved! In the next blog post, I will summarize all the things that I have learnt from building this mini velo, and how I overcame all the challenges and issues that occurred along the way.

Wheelsport Ultegra Di2 2x11 Speed: Part 9 - Summary of Challenges and Solutions

$
0
0
After writing many posts about the Wheelsport Fantasy mini velo, I feel that it is time that I write a summary of all the challenges that I encountered while building up this bike from scratch. At the same time, I will also show how I managed to work around each of the issues or solve them. This will be helpful for those who are also thinking of building their own bike up from scratch.

I have built two Wheelsport Fantasy mini velos. The first is the red and black themed, 2x10 speed mini velo that belongs to my friend, while the second one is the 2x11 speed matte black mini velo that is my own. The details of the builds can all be found at this page here.

All together, I have identified eight main issues that I encountered during the building of the bike. Most of the issues are not a problem with the design of the bike or the components, but with the challenges of building something less common, such as a mini velo with Di2 components.

--------------------------------------------------------------------------------

1) Using a 406 wheelset in a bike frame designed for 451 wheels, and 74mm front hub width in a frame designed for 100mm front hub width.
The Wheelsport Fantasy mini velo is designed for 451 wheels, which are about 22 inches in diameter, as compared to about 20 inches for 406 wheels. The reasons for me deciding to use 406 wheels instead of 451 wheels are;
i) Can use current custom 406 wheelset, transferred over from Dahon Boardwalk
ii) Common inner tube size with my other folding bikes, the Dahon Vitesse and Dahon MuEX
iii) Gold coloured rims and hubs for a more unique look

Another issue with this is that the custom gold wheelset has a front hub width of 74mm (for Dahon and Tern folding bikes), while the Wheelsport frame requires a more standard 100mm front hub width. To solve this, a 74mm to 100mm front hub adapter is used to fit the wheelset to the frame.

Using the Elosix front hub adapter, to convert the 74mm front hub to a 100mm width to fit the Wheelsport Fantasy front fork.

Although having the adapters is not as good or strong as having a proper 100mm wide front hub, I did not detect any flex or play while riding the bike, which is good. This can be a viable solution for those who need to install a 74mm wide front hub in a frame for 100mm front hubs.

--------------------------------------------------------------------------------

2) Extra Long Reach brake calipers required
Another effect of using 406 sized wheels in a frame designed for 451 wheels is that the wheel rims are further away from the brake mounting points. Extra long reach Tektro R559 caliper brakes are thus required to let the brake pad reach the rims.

Tektro R559 Extra Long Reach brake calipers are required to bridge the large distance to the rim

With these extra long reach brake calipers, it is possible to use 406 sized wheels in a frame designed for 451 wheels. This is not an ideal case, but it will work if you want to continue using your 406 wheels.

--------------------------------------------------------------------------------

3) Cutting carbon spacer
During installation of the stem to the top of the fork steerer tube, the long carbon spacer is needed to let the stem press down on the headset. I found that the stock length of the carbon spacer is too long, and thus I needed to cut short the carbon spacer.

Using pipe cutter to cut the carbon spacer

However, I found that using a pipe cutter to cut the carbon spacer is difficult, as the carbon spacer has thick walls. Also, the final edge is not smooth, and needs to be filed to be flat. On hindsight, I should have used a proper cutting jig and a carbon saw to cut the carbon spacer.

--------------------------------------------------------------------------------

4) Moving the location of the bottle cage, to make space for the Di2 battery
As I installed the Ultegra 6870 Di2 groupset onto this bike, there is a need to install a Di2 battery on the frame. I considered getting an internal Di2 battery to fit inside the seatpost, but due to the lack of wire access holes on the frame, it would be very difficult to run the wires properly. Therefore I used a standard external Di2 battery for the system. The challenge is to find a suitable place to install and fix the battery and battery mount.

After some trial and error, a neat place to install the Di2 battery would be near the BB area, below the bottle cage. However, there is no space to fit both the Di2 battery and the bottle cage, unless the bottle cage is moved upwards. The solution is to get a Shimano bottle cage adapter to move the bottle cage upwards to make space for the Di2 battery.

Final location of the bottle cage and Di2 battery, after using the bottle cage adapter

By moving the bottle cage mounting point upwards, it makes space for the Di2 battery, and also for a second bottle cage mounting on the seat tube.

--------------------------------------------------------------------------------

5) Extra bottle cage mounting on seat tube
With the use of a special bottle cage mount, a new bottle cage mounting point can be created on almost any part of the bike, provided there is sufficient space. This will be used on the seat tube to create a second bottle cage mounting area.

Special bottle cage mount installed on seat tube, above the Di2 battery

Just enough clearance within the triangle of the frame to fit a water bottle, a Di2 battery and a tool bottle.

With this second bottle cage, a tool bottle can be used to carry the spares and tools for the bike, eliminating the need to have a saddle bag. This gives a neater look at the seat post area, and also frees up the seat post to use the Fly 6 rear camera + rear light.

--------------------------------------------------------------------------------

6) Front derailleur mounting point not ideal
During the installation of the front derailleur (FD), I found that the chain would rub against the bottom of the FD chain guide in certain gear combinations. Upon further investigation, it was found that the FD mounting bracket was not designed to accommodate the different chain stay angle of this mini velo frame. For more details check out this link.

My solution for this is to use a series of spacer and angled shims to move the FD backwards, and also tilt it to the correct angle.

Using the spacer and angled shims to move the FD to the correct location relative to the rear cassette

With this setup, the FD shifts well with no chain interference issues. I have seen the latest 2016 Wheelsport Fantasy mini velo frames, and the FD mounting bracket has been moved to the correct location after receiving customer feedback, which is good to see.

--------------------------------------------------------------------------------

7) Lower than usual BB height
Another side effect of using 406 wheels in a frame designed for 451 wheels is that the overall ground clearance will be lowered, due to the smaller radius from the wheel axles to the outer circumference of the tires. The worry is that during cornering, we may experience pedal strike if the crankarms are not positioned properly to avoid touching the ground.

BB to Ground Height:
Wheelsport Fantasy Ultegra Di2 2x11 Speed (406 wheels): 267mm
Dahon MuEX and Dahon Vitesse: 284mm
Merida Scultura 5000: 275mm
Avanti Inc 3: 274mm


Lesser clearance between pedals/crankarms and the ground

From the comparison, the Wheelsport mini velo with 406 wheels has the least ground clearance. The good news is, during my rides, I have tried to initiate pedal strike by cornering and also pedaling at certain critical areas, but it did not happen. This means that even with the lower ground clearance on this mini velo, pedal strike is not an issue to worry about.

--------------------------------------------------------------------------------


8) Insufficient braking power, solution is to change to 451 wheelset and Ultegra brake calipers
Finally, after testing out the bike for a few weeks, I realised that the braking performance is not good enough for me. This is mostly due to the extra long reach brake calipers which have less braking power than standard reach brake calipers. The only way to improve braking performance is to use standard reach brake calipers.

In order to do that, I would have to use 451 sized wheels, which is what I should have done in the first place, had I known that it would create so much extra work and compromises by using 406 wheels. It was a good learning experience, but for ideal performance, 451 wheels should be used for this Wheelsport Fantasy frame.

Therefore, I ended up changing to a Wheelsport Smart 1.0 451 wheelset, along with the excellent Ultegra 6800 caliper brakes. The tires and inner tubes also had to be changed to 451 sized.

Ultegra 6800 brake calipers and Wheelsport Smart 1.0 451 wheels

With this upgrade, the braking performance has improved greatly, and the whole bike rides and feels really good. Great shifting and braking performance, and is also lightweight and fast.

--------------------------------------------------------------------------------

Wheelsport Fantasy 2x10 Speed: Part 5 - Flat Bar to Drop Bar Conversion

$
0
0
Part 1: Original Bike Components
Part 2: Bike Disassembly and Component Weight
Part 3: Installation of New Components
Part 4: Final Assembly and Comparison


Remember the Wheelsport Fantasy 2x10 Speed flat handlebar mini velo that I built for my friend? It was previously using mostly Shimano 105 5700 components transferred over from my Dahon MuEX. It worked very well and it shifted much better than the stock 1x9 speed drivetrain that came stock with the bike.

However, it was unfortunate that the bike crashed and was damaged. Luckily the rider was OK, but there was some significant damage to a few of the components. At the same time, me and my friend thought that it would be a good idea to convert the Wheelsport Fantasy flat handlebar mini velo to a drop bar set up. This would enable the rider to get down into a more aerodynamic position for more speed.

Therefore, the plan is to repair the damage on the bike, and also convert it from a flat handlebar to a drop bar set up at the same time! First, let's take a look at the damage and see how it can be fixed.

The bike crashed on the right side, which meant that the damage was all on the right side of the bike. Other than the non-critical scratches on the pedal and the end of the handlebar grip, the most critical damage was found at the rear derailleur.

As seen below, there was great impact on the rear derailleur, causing lots of scratches, and most critically, a bent rear derailleur hanger. The rear derailleur itself would probably still work fine despite the scratches, but the bent RD hanger needs to be fixed.

Some deep scratches on the 105 5700 rear derailleur, but probably will not affect the function.

However, the RD hanger was quite badly bent, causing the gear shifting to be all wonky and not fixable. 

The RD hanger is usually designed such that it is soft and will bend during impact, so that the frame itself does not get damaged. A replacement of the RD hanger and maybe the rear derailleur (depending on extent of damage) will be able to fix this issue. As this Wheelsport Fantasy mini velo frame was from MyBikeShop, I went back there to get a replacement RD hanger for this frame. Luckily, they had it in stock and so I could quickly get a replacement.

Replacement RD hanger for the Wheelsport Fantasy mini velo frame!

Comparing the old and new RD hanger side by side, the damage is quite obvious.

With the RD hanger issue fixed, the next step is to gather all the components for converting to a drop bar set up. Normally, converting from a flat handlebar to a drop bar set up is relatively easy. All it takes is a drop bar, a road shifter for the drop bar, and some re-installation of the inner cables.

As the bike already has a 10 speed Shimano 105 5700 RD and a 5700 FD, along with a 10 speed chain and cassette, all it takes is a change of shifters. Compatible 10 speed road shifters would be either Dura-Ace 7900/Ultegra 6700/105 5700 or Tiagra 4600 shifters.

However, these are the previous generation of shifters, which are not as good as the latest generation of shifters (Dura-Ace 9000/Ultegra 6800/105 5800/Tiagra 4700). I would prefer to upgrade to the newest generation of road shifters if possible.

The problem is, the latest Dura-Ace, Ultegra and 105 are all 11 speed groupsets, which requires a totally new drivetrain. Using these 11 speed shifters would require a change of the RD, FD, chain, cassette and maybe the crankset. Also, I am limited by the rear hub on the wheelset, which can only support up to 10 speeds. Going to 11 speeds would require a new wheelset which is a costly investment.

The good news is, the latest Tiagra 4700 road shifters are still 10 speed. The bad news is, the cable pitch for the new Tiagra 4700 series is different from the previous Tiagra 4600 series. In other words, it is still 10 speed, but the RD, FD and shifters operate on a different cable pitch.

What does all these mean? The implication is that the 10 speed cassette, chain and crankset are still perfectly compatible across the old and new 10 speed drivetrains. There is no need to change out these components if I am changing from the current 105 5700 series to the new Tiagra 4700 series.

What I do need is the new Tiagra 4700 road shifters, and the new generation of RD and FD. All other drivetrain components on the bike can remain the same.


First of all, a drop bar is required. This FSA handlebar is either from the Merida Scultura 5000 or the Dahon Boardwalk, I can't remember which bike it came from.

Next, the new Tiagra 4700 2x10 speed road shifters! Construction is based on the latest generation of 11 speed shifters, with lighter shifting and better ergonomics.

Weighs 492 grams per pair, quite decent weight, although it is quite far off the 365 grams of the Dura-Ace 9000 shifters.

The ideal rear derailleur and front derailleur to go with these Tiagra 4700 road shifters would be the Tiagra 4700 RD and FD. However, these are currently (Sep 2015) quite difficult to get hold of as they have just been launched to the market recently, and are only found on OEM bikes for now. As such, I decided to use the 105 5800 RD and FD instead. These are actually 11 speed RD and FD, but I figured that since the construction of these components are similar to the Tiagra 4700 components, they should also work with the Tiagra 4700 shifters, although they may not work perfectly. Besides, the black colour of the 105 5800 RD and FD would better match the black Wheelsport Fantasy frame.

Shimano 105 5800 Double FD, for 11 speed drivetrains. Brazed on type. Similar in design to the higher end Ultegra and Dura-Ace FD.

Weighs 89 grams, which is actually similar in weight to the Ultegra FD.

Shimano 105 5800 11 Speed RD, short cage version. Also similar in construction to Ultegra and Dura-Ace.

Weighs 226 grams, a bit more than the Ultegra RD.

Polymer coated shifter inner cables on the left, normal stainless steel brake cables on the right.

Installing the shifter inner cable on these new shifters require a special nose cap on the shifter to prevent unwanted wear on the inner cable.

Shifters and drop bar installed on the bike. Stem has been lowered slightly for a more sporty riding posture.

After installing the shifters, the next step is to install the new RD and FD. Nothing special here, just remove the old RD and FD and install the new ones. After that, the cabling and the adjustment of the RD and FD can be done.

All inner cables and outer casings installed, including those for the brakes!

FD-5800 installed! Bolted on directly to the FD hanger.

Tucking in the inner cable for the FD through the FD hanger, to prevent the cable from touching the leg during pedaling.

RD-5800 installed! New RD on new RD hanger.

The installation is almost complete! Adjustment of the RD and FD went without any issues, it seems OK to use the 11 speed RD and FD with these 10 speed road shifters. The only thing left is to wrap the bar tape, and to compare it with the other Wheelsport Fantasy Ultegra Di2 mini velo that I have! To be continued in the next part...

Wheelsport Fantasy 2x10 Speed: Part 6 - Geometry Comparison

$
0
0
Part 1: Original Bike Components
Part 2: Bike Disassembly and Component Weight
Part 3: Installation of New Components
Part 4: Final Assembly and Comparison

Part 5: Flat Bar to Drop Bar Conversion

With the other Wheelsport Fantasy mini velo also converted to a 2x10 speed drop bar set up, it is now the perfect chance to compare it with my own matte black Wheelsport Fantasy mini velo. The wheelbase will of course be the same, since it is the same frame, but other geometries such as the handlebar reach will be different.

2x10 speed Tiagra/105 drivetrain on the bike with red hubs, and 2x11 speed Ultegra Di2 drivetrain on my own matte black frame

Both are using 451 wheelsets, but with different brand of tires

Looks very similar, since it is the same frame design and with similar setup

Pair of Wheelsport Fantasy mini velos!

My matte black mini velo has a longer reach to the handlebar, which gives a more aggressive riding posture

Also, my matte black bike has a shorter handlepost, which also gives a more aggressive riding posture. The stem on the other bike cannot be lowered any further due to limitation of the folding handlepost design.

Close up view of the different handlepost heights and handlebar positions

Even closer view at the reach of the two bikes. My bike with the Ultegra Di2 shifters has a lower and further reach.

Time to finish up the other bike with a good bar tape! I like Lizard Skins bar tape as it is super comfortable, and can be rewrapped many times without getting sticky.

Ta-da! Fresh bar tape on the Wheelsport Fantasy 2x10 speed drop bar mini velo.

Complete view of the Wheelsport Fantasy 2x10 Speed Drop Bar Mini Velo

Close up look at the drivetrain, with Shimano 105 components

Equipped with Tiagra 4700 2x10 speed road shifters, which has the same good shifting ergonomics and feeling of the new generation Dura-Ace/Ultegra/105 shifters.

All ready to roll!

Complete specifications of this upgraded Wheelsport Fantasy 2x10 Speed Drop Bar Mini Velo

With this conversion from flat handlebar to drop bar setup, it is easier to achieve a higher cruising speed as the more aggressive riding posture allows good power transfer to the pedals, and also puts the rider lower down for less air resistance.

We have tried riding our Wheelsport Fantasy mini velos with a group of road bikes at a rolling speed of about 32-35km/h, and this Wheelsport Fantasy mini velo is able to keep up, although it does take more effort compared to a full sized road bike. The setup on these two Wheelsport Fantasy mini velos are as good as it gets if you want to ride fast on a mini velo. Going to more high end components will not improve your speed any further as these components are not the limiting factor.

Wheelsport Fantasy 2x10 Speed: Part 7 - Solving Chain Interference at FD + Extra Bottle Cage

$
0
0
Part 1: Original Bike Components
Part 2: Bike Disassembly and Component Weight
Part 3: Installation of New Components
Part 4: Final Assembly and Comparison

Part 5: Flat Bar to Drop Bar Conversion
Part 6: Geometry Comparison

While upgrading my friend's Wheelsport Fantasy 2x10 speed drop bar mini velo, I noticed that it had the same front derailleur mounting issue as seen on my own Wheelsport Fantasy bike. The angle of the FD mount on the frame is not suited for this small wheeled bike design. As such, there will be interference between the chain and the FD chain guide when the chain is in the small chainring. Let's take a look at the issue here, find out how it happened, and how it can be solved on this frame.

No issue with chain interference when the chain is in the large chainring

However, when the chain is in the small chainring, the chain will rub against the bottom of the FD chain guide in most gears

Close up view of the chain interference with the bottom of the FD chain guide

Chain barely clears the FD chain guide when in the front low and rear gear 3 setting. At gears 4 or higher, the chain will rub the FD chain guide.

After studying the differences between the mini velo and my Merida road bike, I have found the reason why there would be chain interference. The main difference in frame geometry that causes this issue is the position of the rear axle relative to the bottom bracket. More specifically, whether the rear axle is higher or lower than the bottom bracket.

On almost every adult bike, the bottom bracket is around the same distance from the ground, no matter a small wheeled bike or a full sized road bike. This is to maintain sufficient crank arm clearance from the ground, and yet allow the rider to climb on the bike easily.

However, the rear axle's distance from the ground will differ greatly, depending on the size of the wheel. A road bike with large 700C wheels will have the rear axle higher off the ground as compared to that of a 20" wheel folding bike. This affects the angle of the chain relative to the FD chain guide. If the FD mount is located on the mini velo seat tube with the same orientation as that on a road bike, it will cause FD compatibility issues for small wheeled bikes.


On the road bike, the rear axle is much higher than the bottom bracket. As such, the chain slopes more steeply upwards from the small chainring to the cassette. This ensures that the chain does not touch the FD chain guide even when in the front low/rear top gear combination as shown here.

On small wheeled bikes, the rear axle is lower than the BB. The chain is almost straight when in the front low/rear top gear combination. As such, the chain will touch the FD chain guide if the FD mount is not placed correctly on the frame. In the case of this Wheelsport Fantasy mini velo, the chain will touch the bottom of the FD chain guide in the top 7 gears of the cassette. Only when the cassette gear is set at gear 1, 2 or 3 will there be no interference.

Comparing the angle of the chain between road bike and mini velo. See how different the chain angle is, and the different height of the cassette.

For small wheeled bikes, the proper way to locate the FD mount on the frame is to place it behind the seat tube, and tilted to follow the curvature of the chain ring. However, on the Wheelsport Fantasy frame, the FD mount is parallel to the seat tube, and is located along the seat tube and not behind it. This means the FD will be fixed at the wrong position for proper operation.

On the Wheelsport Fantasy frame, the FD mount is placed parallel to the seat tube and right in the middle of it, which is not the correct position.

The correct way is to place it behind the seat tube, and to tilt it so that the FD chain guide can follow the curvature of the chain ring. Example shown here is from a Tyrell mini velo.

As can be seen from the Tyrell bike shown above, the FD mount is placed behind the seat tube and also tilted. This ensures that the FD is angled correctly relative to the chain and the rear axle position. To solve this issue on the Wheelsport Fantasy mini velo, I will need to move the FD to the correct position. As previously done on my own mini velo, I will use the same spacer and angled shims to move the FD position.

Using the spacer and the angled Ridea 4 degree shims

Together with a long bolt and some spherical washers, the new FD mount is created

New position of the FD with the custom mount. The FD has been moved rearwards and also tilted to follow the curvature of the chain ring.

Now, even when the chain is in the front low and rear top position, there is clearance between the chain and the bottom of the FD chain guide

Inner cable fixed up with the FD in the new position

FD support bolt is unable to push against the frame, but the FD is still rigid enough, and front shifting still works well

With the custom FD mount created, there is no more chain interference with the FD chain guide. In fact, the custom FD mount works much better than the stock bike condition. After giving feedback to the bike shop and the frame maker, I am glad to see that Wheelsport has improved their FD mounting on the mini velo for the model year 2016 frames. The FD mount has been moved rearwards on the seat tube, and it should now work without requiring the custom FD mount.

Another small issue with the Wheelsport Fantasy mini velo frame is that there is only one bottle cage mount. Having just one bottle cage mount is quite standard on most mini velo or folding bikes, so it is not really a problem with frame design. However, it is useful to have an extra water bottle when riding long distance, and so I found a way to add an extra bottle cage to the Wheelsport Fantasy mini velo frame, while keeping it neat and unobtrusive.

It is not possible to add an extra bottle cage mount for a standard water bottle within the frame triangle, as there is not enough space. Adding a small tool bottle is possible though, as already done previously on my own mini velo.

To have an extra bottle cage mount, I decided to use the Monkii Cage water bottle mount, which clamps on a round part of the frame and creates an extra bottle cage mounting point. The round clips are not used. Instead, a standard bottle cage is bolted to the Monkii Cage mount.

Monkii Cage mount. The two round clips are not required for this set up.

The Monkii Cage mount fits perfectly in this little triangle on the frame. Without this design element on the frame, it would not be possible to fit the bottle cage mount here.

A second water bottle fits nicely at this location. Although it is difficult to access the water bottle while riding, it is still acceptable as it is much better than having just one water bottle on the bike.

With that, the latest modification to this Wheelsport Fantasy mini velo is complete. The FD mounting issue has been solved, and a second bottle cage has also been fixed to the frame.

Shimano 105 5800 vs 5700: Rear Derailleur and Front Derailleur

$
0
0
During the recent conversion of the Wheelsport Fantasy mini velo from flat handlebar to drop bar setup, I had the chance to compare the rear derailleurs and front derailleurs before and after the upgrade.

When it was a 2x10 speed flat handlebar setup, the rear and front derailleur were from the Shimano 105 5700 series. After upgrading, the rear and front derailleurs have been upgraded to the latest 105 5800 series. One thing to note is that the 105 5800 series components are designed for 11 speed, but I am using it for a 10 speed set up on this mini velo. Not recommended, but it still works.

105 5700 series components are 10 speed components, while the latest 105 5800 components are 11 speed components. As they are one generation apart, the design and construction of the rear and front derailleurs from these two groupsets are very different. The latest 105 5800 components are modeled after the Dura-Ace 9000 and Ultegra 6800 series, and are targeted at bikes with a lower price point.

Let's start by comparing the rear derailleurs and see the similarities and differences. Both are black in colour (also available in silver) and are short cage versions (also available in mid cage versions for larger cassettes).

Upon first look, there does not seem to be any big differences between the 105 5700 RD on the left and 105 5800 RD on the right...

...however, the cable fixing point is much further towards the front for the new 5800 RD on the right side. This is due to the change from 10 to 11 speed construction. The cable fixing bolt is also flatter for the new RD.

Bottom view. Notice the different guide spring hooking points between the 5700 RD at the top and the 5800 RD at the bottom. This gives a more consistent spring force across the gears. The inner link of the new RD is also black instead of silver colour for the older RD.

The cable adjust bolt area is also quite different. There is an extra sleeve on the new 5800 RD to minimise the rubbing on the polymer coating of the new low friction polymer-coated inner cables. All black cage set for the new 5800 RD, unlike the 5700 RD which still has some silver coloured parts.

From the back view, both of them look quite similar

The short cage 105 5700 RD weighs about 223 grams

The new short cage 105 5800 RD weighs a little bit more at 226 grams

To tell the difference between the old 5700 RD and the new 5800 RD, look at the colour of the inner link and the cage set. The new 105 5800 has an all black colour construction, which is different from the 105 5700 RD.

Next, we will look at the 105 5700 FD and the new 105 5800 FD. It is very easy to tell the FD apart, as the look is very different.

105 5700 FD on the left, 105 5800 FD on the right. Both are brazed on type and not clamp band type. As shown here, they look very different.

The size of the outer link is very different. The new 5800 FD has a long arm construction which gives more leverage for a light shifting feeling. It is also hollow in the middle, both for reducing weight and also for adjusting the support bolt.

One of the downsides of having a long arm construction is the frame compatibility with some small wheeled bikes. For example, the long arm will interfere with the frame when installed on a Dahon Mu frame or Tern Verge frame, as the tall seat stays are very close to the FD mounts. This rules out the use of long arm FD on these frames.

I suspect this is one of the reason why there is only the Tern Verge X18 (2x9 speed, with old short arm design), instead of a high end 2x11 speed Tern Verge, as the new long arm FD is not compatible with the frame.


5700 FD has a sticker for the logo, while the new 5800 logo is embossed onto the chain guide. Not as nice in my opinion as it is not very visible and looks cheap. Also note the additional plastic skid plate on the chain guide which minimises chain rubbing noise when the trimming function on the shifter is not used correctly.

The difference in arm length is very evident here. Note the extra pin near the cable fixing bolt on the 5800 FD, which is used to adjust the path of the inner cable to suit different frames.

The guide spring on the 5800 FD has more coils, which will give a flatter spring force across the working range. There is also the support bolt sticking out from the middle of the 5800 FD. When adjusted from the other side, this bolt will contact the frame and make the whole FD more rigid for better shifting.

5700 FD on the left has a longer chain guide than the 5800 chain guide on the right.

This different length is partly due to the different bending design used, as shown here. It caused some chain rubbing issues on the Wheelsport frames when the FD mount is not designed correctly. For more details check out these two links below.

Wheelsport Ultegra Di2 2x11 Speed: Part 4 - Installation Issues and Solutions
Wheelsport Fantasy 2x10 Speed: Part 7 - Solving Chain Interference

Weight of 105 5700 FD, about 86 grams

Weight of new 105 5800 FD is slightly heavier at 89 grams

From these comparison pictures, it is obvious that the design of 5700 and 5800 are quite different, and is also quite easy to differentiate by eye. So next time when you check out a road bike, you can tell easily whether it is using the older 105 5700 groupset (2x10 speed) or is using the latest 105 5800 (2x11 speed) components.

Wheelsport Sunny vs Wheelsport Smart 1.0 Wheelset

$
0
0
Many people have asked me what is the difference between the Wheelsport Sunny and the Wheelsport Smart 1.0 wheelset? Upon first look, those two wheelsets look quite similar. However, upon closer look, there are actually a few differences that separate these two wheelsets.

The Wheelsport Sunny is a more budget version compared to the Smart 1.0 wheelset, with a retail price that is usually $100 less than the Smart 1.0 wheelset. Let's see what are the differences!

Note that these observations are my own, and are not the official specifications made by Wheelsport. Especially since different generations or batches of wheelsets can have some differences, such as a slightly different hub or rim design. As discussed in the Wheelsport Rear Hub Maintenance Guide, hubs made in different years or for different OEM customers can have different specifications such as the type of rear hub used.

What I would highlight are the differences that can be seen from the outside, and also a bit about the rear hub design. The red wheelset shown below is the Wheelsport Sunny 451 wheelset from the Wheelsport Fantasy 2x10 speed mini velo, while the black Wheelsport Smart 1.0 451 wheelset is from the Wheelsport Fantasy 2x11 speed mini velo.

Ratchet design of the rear hubs, after the freehub body is removed. Both have similar rear hub ratchet designs.

Freehub body of the Wheelsport Sunny wheelset. 3 pawls with 3 individual springs.

Freehub body of the Wheelsport Smart 1.0 wheelset. 6 pawls with 1 large spring for all 6 pawls.

Are 3 pawls or 6 pawls better for a freehub design? It depends on what you want in your freehub.

Advantages of 6 pawls over 3 pawls:
1) In theory, twice as much engagement between ratchet and pawls
2) Less stress on each pawl, since the force is divided across 6 instead of 3 pawls

Advantages of 3 pawls over 6 pawls:
1) Less drag during freewheeling, as there are less pawls to compress during freewheeling
2) For the hub manufacturer, 3 pawls are cheaper to produce than 6

To the layman, 6 pawls may seem better as it will be stronger with more points of engagement. However during actual riding, it is unlikely that all 6 pawls will be fully engaged simultaneously due to manufacturing tolerances. In fact, if the ratchet and pawls are sufficiently strong, 1 or 2 pawls are already sufficient. 6 is actually overkill and can create more drag during freewheeling.

In this case, I actually prefer the 3 pawl design of the Wheelsport Sunny rear hub with 3 individual pawl springs. If one of the pawl springs break, there are still 2 more working pawls to support the load. Compared to the Wheelsport Smart 1.0 rear hub with 6 pawls and 1 spring, if the spring breaks, all 6 pawls will not function and the hub will not work. In terms of reliability, the 3 pawl design with 3 individual springs is actually more fail safe. In any case, pawl spring failure is rare and should not be something that you need to worry about.

These are the internal differences that will not matter to most riders, as they are not able to feel it during cycling anyway. The other difference is the freehub design.

For Wheelsport Sunny, it is only available in 10 speed freehub designs (correct as of end 2015). This means that if you want to install an 11 speed drivetrain, you cannot use the Wheelsport Sunny wheelset. Instead, you need to get the Wheelsport Smart 1.0 wheelset which comes with 11 speed compatible freehubs. 11 speed freehub bodies are 1.85mm longer than 8/9/10 speed freehub bodies.

Freehub body on the Wheelsport Smart 1.0 wheelset, with the 11 speed compatibility clearly labeled.

The other difference between Wheelsport Sunny and Smart 1.0 is the rim height. The Wheelsport Sunny has a low rim profile of around 19mm, while the Wheelsport Smart 1.0 has a 30mm rim profile. This difference is not obvious unless you put the two wheelsets side by side for comparison.

A higher profile rim is usually seen to be more aggressive and more aerodynamic, as seen by 50mm rim heights used by most road bikes. However, on small wheeled bikes, the speed is usually not fast enough to make a noticeable difference in aerodynamics. Also, a high profile rim can be more prone to side winds that will make the bike unstable, as experienced on the Dahon Boardwalk in Taiwan.

Another problem for higher profile rims is that the valve length of the inner tubes used need to be long enough, in order for sufficient protruding length for pumping the inner tubes. This is usually not a big issue, just something to take note of when buying inner tubes for high profile rims. Otherwise, you can always use a valve extender to extend the valve length.


19mm rim height on the Wheelsport Sunny rim on the left, 30mm rim height on the Wheelsport Smart 1.0 rim on the right. Also notice the different types of spokes used.

Lastly, the spokes used are also different. Wheelsport Sunny uses the more ordinary round spokes, while the Wheelsport Smart 1.0 uses the supposedly more aerodynamic bladed spokes. Bladed spokes on the Wheelsport Smart 1.0 look good and differentiates it from the lower cost Wheelsport Sunny.

The tire height also affects the overall rim profile. As seen below, a 406 sized Wheelsport Sunny with large Kojak tires has almost the same tire circumference as a 451 Wheelsport Smart 1.0 with low profile Schwalbe One tires.

A higher rim profile is usually also heavier in weight, as more material is used to produce the taller rim profile. In this case, if the same hub is used, the Wheelsport Sunny may actually be lighter than the more expensive Wheelsport Smart 1.0, given the different rim height. I am not able to give accurate numbers for the weight of the Wheelsport wheelsets, as they differ quite a bit from year to year. This variation is caused by the different rear hub used, different rim profile and different wheel size (406 or 451). The only accurate way to get the weight of the wheelset is to weigh the actual set that you are buying.

Similar overall tire circumference, despite the different rim size (406 vs 451) and different tires

In summary, the main differences that I noticed between Wheelsport Sunny and Wheelsport Smart 1.0 wheelsets are:
1) Rear hub pawl design (3 vs 6 pawls)
2) Freehub body design (10 vs 11 speed)
3) Rim height (19mm vs 30mm)
4) Spokes (round vs bladed)

If you are going for a no frills wheelset that works well, the Wheelsport Sunny is an excellent choice at a very reasonable price. That is why I chose the Wheelsport Sunny wheelset when I built the Dahon MuEX, in order to hit a certain price point.

On the other hand, if you are going for the latest 11 speed drivetrain, or want a wheelset that looks more sporty with a slightly higher rim profile and bladed spokes, the Wheelsport Smart 1.0 does the job. Both are good wheelsets that are mainly differentiated by the features listed above.

Shimano SM-CB90 Brake Cable Adjuster

$
0
0
Did you know that most road brake calipers come with a quick release lever? This quick release lever is used to open up the brake caliper temporarily, allowing the wider tire to pass between the brake pads. With this feature, a quick wheel change or removal is possible without deflating the tire or inner tube.

However, there are some cases whereby even with the quick release lever opened up, the brake caliper still does not open wide enough for the tire to pass through. This usually happens when the tires are wider than normal, or if the brake pad clearance to the rim is small. In this case, it will be very troublesome to remove the wheel as the tire will need to be deflated and then re-inflated.

Also, with the introduction of the Shimano direct mount road brake calipers, there is no quick release lever on the rear brake caliper which mounts under the bottom bracket. In this case, it is necessary to install a separate quick release if the wheel needs to be removed quickly.

Shimano Ultegra Direct Mount Rear Caliper Brake BR-6810. No quick release lever on the brake.

In my case, the front wheel of the Merida Scultura 5000 road bike cannot be removed quickly as the brake caliper does not open up wide enough to clear the 25C Schwalbe One tires on Ultegra 6800 wheels. Curiously, there is no such issue with the rear wheel as it can come out easily when the rear brake caliper is opened.

Front tire cannot clear the brake pads even when the quick release lever on the brake caliper is opened

To solve this issue, I decided to install a separate brake caliper adjuster, which is originally designed for use with Direct Mount brakes. This is the Shimano SM-CB90 Brake Cable Adjuster, which opens up to give more slack to the brake cable, allowing the brake pads to open up wider. Note that this device was actually installed before I changed to Dura-Ace brake calipers, hence the Ultegra brake calipers shown in the pictures.

Shimano SM-CB90 Brake Cable Adjuster. Comes with a lever to lock or loosen the brake cable, and also a barrel adjuster.

It works by allowing the brake outer casing to move inwards when the lever is opened, creating more slack in the brake cable and thus brake caliper.

This brake cable adjuster is installed inline with the brake cable outer casing. This also means that the outer casing needs to be split at some point, and the brake cable adjuster installed in between. The brake cable is still the same and passes through the brake cable adjuster.

By flipping the lever to the closed position, the brake outer casing will be locked at the end during normal operation. Flipping it to the open position will allow the brake outer casing to move inwards and create slack in the brake inner cable.

In the locked position, with the lever flipped downwards to lock the brake outer casing at the end for normal operation. 

In the opened position, with the lever flipped upwards to give some slack to the brake inner cable. The quick release lever on the brake caliper is also opened up. Now there is sufficient clearance between the tire and brake pads!

By opening up both the quick release on the brake caliper and also the lever on the brake cable adjuster, the total slack in the brake cable is sufficient for the front wheel to be removed easily. Installation of this device is quick and easy, and it makes it more convenient to remove the wheel during transportation of the bike.

It does not really affect the braking feeling as it is very rigid, and acts just like another section of outer casing. During installation, it is necessary to find a suitable section of the outer casing to install on, for convenient usage and also to prevent the device from hitting and scratching the frame over bumpy roads.

What is a Side Swing Front Derailleur? Shimano SLX Side Swing FD-M672

$
0
0
In the new 11 speed Shimano XTR series, a new type of front derailleur (FD) was introduced. This is the side swing FD that is different from all FD before this. Previously, FD design was either by top swing or down swing type, depending on the frame design.

For a comprehensive list of FD types and mountings, check out this excellent article by Bike Radar.
Front Derailleur Types and Mounts Explained

With this new Side Swing technology, the FD swings sideways during activation, and it has some advantages over traditional top swing or down swing types of FD.

Main Advantages:
1) More efficient cable routing
2) Improved tire clearance
3) 100% more powerful outward shifting
4) Multiple mounting style

More efficient cable routing refers to the path that the inner cable and outer casing takes when running from the front shifter to the FD. By taking a shorter or straighter path, it reduces the friction loss at bending areas. It is said to be 15% more efficient when used together with the new polymer coated inner cable.
More direct cable path from the front shifter to the side swing FD improves efficiency


One big reason a side swing FD was created is to provide more tire clearance, especially for bikes that have a larger wheel (Eg. 29" bikes), a special rear suspension frame design, and yet need a shorter chain stay to maintain agility. Previously, the limiting factor was that the tire would touch the FD mechanism. The workaround was to have longer chain stays or do away with the FD totally with a front single setup. With this side swing FD, tire clearance is improved, allowing bike frame designers to incorporate an FD without compromising on other frame geometry.
15mm more tire clearance when using side swing FD compared to previous top swing FD 


As for the claim of more powerful outward shifting, it comes from the new design, where the link axle of the chain guide is closer to the chain touching point. This gives more leverage and provides a more direct force to push the chain onto the larger chainring.
Shorter distance between link axle and chain touching point improves the outward shifting performance 


Lastly, the side swing FD is designed to be mounted in 4 different ways, in order to fit all sorts of frames. This means that there is a suitable FD to use regardless of what frame design you use.
Clockwise from top left: High Clamp, Direct Mount, E Type, Low Clamp

After learning about the side swing FD, I was interested to know how well it will actually work, and whether it is actually better than the current FD that I am using. Since side swing is now only available for MTB FD, the only bike that I can install a side swing FD on is my Polygon Cozmic CX 3.0 MTB.

For now, side swing is only advertised as for 11 speed MTB drivetrains, on XTR M9000 and Deore XT M8000. However, I found that 10 speed versions have also been quietly introduced. The SLX grade FD-M672 and Deore grade FD-M612 are 10 speed compatible side swing FD. I decided to get the low clamp type of SLX FD-M672 to replace the current FD on my MTB.


Mechanism and cable fixing bolt are located above the chain guide, instead of behind the seat tube

Top and low limit screws face forward at a 45 degree for easy accessibility. Also uses a very small alignment block (in white) to preset the FD for easy setup

Stopper for inner cable. A plastic end cap is required at the end of the shifter outer casing.

Axles and guide spring for the FD are located vertically due to the side swing construction.

Weighs 135 grams for the L sized (diameter 34.9mm clamp, without adapters) FD

This FD does come supplied with M sized (left side) and S sized (right side) for diameter 31.8mm and diameter 28.6mm seat tubes respectively.

Correct orientation for installing the adapters can be found in the user manual

Before installing the new side swing FD, let's take a look at how the cable routing and the FD looks when using the old top swing FD.

The stock Deore FD-M590-10 is activated from a top pull position, with the shifter inner cable coming in from the top as shown. The inner cable runs along the bottom of the top tube and behind the seat tube, down to the FD.

Since the FD mechanism is located behind the seat tube, it reduces the clearance to the tire. In this case there is still plenty of clearance though due to the hard tail frame design.

Installing the new FD is straightforward. Since my seat tube is 34.9mm in diameter, I don't need to use any adapters. Just clamp it on and adjust the FD vertical setting and parallelism setting. The only new part is the routing of the shifter inner cable. All adjustments are done the same way as traditional top swing or down swing FD.

Side swing FD mounted! Inner cable has also been clamped on.

Plenty of tire clearance, since only the FD clamp band is between the tire and the seat tube.

The front shifter cable will run along the bottom of the downtube, together with the cable for the RD and also the hydraulic hose for the rear brake. From there, it will join smoothly to the side swing FD.

Although this frame does not have any dedicated cable mount for side swing FD cable routing, it is easy to convert it for side swing FD use. The original FD cable routing is now left empty.

I was surprised at how easy it was to do the cable routing for the side swing FD, even though the frame does not have any dedicated cable mount for side swing FD routing. Also, the end result gives a rather clean routing of the cables which is nice to see.

As for shifting force, I measured the shifting force required at the left shifter before and after the change. The difference is between the old top swing Deore FD and the new side swing FD. There is a 10% decrease in shifting force when I changed to the side swing FD. This amount is not that significant as a 10% difference in shifting force is not that obvious. However, any decrease is always good as it means easier and lighter shifting.

Finally, for shifting performance, is it really 100% more powerful? Unfortunately, I am unable to confirm this as the original Deore FD already works very well, and so I cannot detect any improvement in performance when it is already near perfect. Perhaps there will be an improvement when I try to make an outward shift during high pedaling torque, but it is difficult to test it objectively, unless it is a controlled test using a standard testing machine.

In any case, this is a nice upgrade as I get a lighter front shifting force, as well as the chance to try the side swing FD. If you are having problems with tire clearance with your current FD, you might be able to solve it by changing to a side swing FD!

Wheelsport Ultegra 2x11 Speed: Part 10 - Ultegra 6800 Mechanical

$
0
0
The Wheelsport Fantasy 2x11 speed mini velo that I have is currently using the Ultegra 6870 2x11 speed Di2 groupset, which was inherited from the Dahon Boardwalk folding bike that I had previously. On the other hand, the Merida Scultura 5000 road bike is using the Ultegra 6800 2x11 speed mechanical groupset.

My plan is to swap the groupsets for these two bikes, so that the Di2 groupset goes onto the road bike, while the mechanical groupset goes onto the mini velo. I started with disassembling the mechanical Ultegra 6800 road shifters from the road bike. The Ultegra rear derailleur was already removed from the road bike previously, while the front derailleur was exchanged from a band type to a brazed on type.

With the Ultegra 6800 shifters, RD and FD ready, the building process for the mini velo can begin! First, the Di2 components were taken off the mini velo and put to one side. These Di2 components will be installed onto the Merida road bike later on.

Since the Wheelsport Fantasy mini velo is already using the Ultegra 6800 crankset, and an 11 speed cassette, it is actually not too difficult to disassemble and assemble the bike since it is already half done.

Started by removing the Di2 components from the mini velo 

Reinstalling the parts that are required for mechanical shifting. The cable guide that goes under the bottom bracket, and the cable adjust bolts for adjusting the cable tension for the shifter cables.

Cable guide goes under the bottom bracket...

...while the cable adjust bolts go onto the outer casing stoppers that are located under the downtube

New polymer coated shifter inner cables and outer casing for smooth and light shifting

Ultegra 6800 2x11 speed mechanical shifters from the Merida road bike!

Ultegra 6800 11 speed short cage RD also from the Merida road bike

Ultegra 6800 front derailleur installed onto the custom FD mount for best performance

Road shifters installed, bar tape wrapped!


Full Ultegra 6800 drivetrain (with Dura-Ace cassette and chain)

View of the full bike! Ultegra 6800 groupset looks really good on this mini velo

The hand pump and the tool bottle mounting was rearranged as the Di2 batter mount has also been removed

Simple graphical guide for trimming the front derailleur with the new road shifters

Yet another project has been completed! The Wheelsport Fantasy mini velo has been successfully converted from Ultegra 6870 Di2 to Ultegra 6800 mechanical shifting. It still rides and shifts beautifully, especially with this lightweight build. In fact, it rides better and faster than the Dahon Boardwalk folding bike that I previously had as this mini velo frame is much more rigid and does not flex when pushing the bike hard.

NTU Bike Rally 2016 98km

$
0
0
After taking a break from the NTU Bike Rally last year, I decided to join the NTU bike rally this year! For this year, they had two different distances, the 98km route and the 168km route. For me, the 98km route is a good distance as it is not too long to be torturous, and yet long enough to be a challenge.

Bike Rally 2014
Bike Rally 2012

This year, I decided to ride along with my friend who is taking part in the NTU bike rally for the first time. For a first timer, the 98km route should be a good distance that is doable, although it will still not be easy. It was held on 06 March 2016, starting at the F1 Pit.


For this year, the registration and the flag off timing for the 98km and the 168km are separate. This is good as it prevents riders going onto the wrong route like previous years. The 168km riders started off earlier at 6am, while the rest of the 98km riders will move off at 7am. I had prepared and packed breakfast to eat while waiting for the 98km flag off at 7am.

Both of us took our Wheelsport Fantasy mini velos for this ride. This mini velo rides very well and is a good choice for round island rides. Of course, if you want to go faster, a road bike is a better choice, although it can be less comfortable due to the more sporty riding posture.

Wheelsport Fantasy mini velos ready to go! Beautiful scenery too.

My friend's mini velo front wheel felt a bit under-pressured, and so I decided to pump it up using the Lezyne Micro Floor Drive. This hand pump is able to reach 100 PSI quite easily, so no issue there. However, when I was unscrewing the pump head from the valve, the removable Presta core of the valve came out! Seems that it was not tight enough, and it unscrewed together with the pump head.

Valve core of the Presta tube came out with the pump head.

This was a big issue as I can't pump up the tire without putting back the valve core. The last resort would be to change out the inner tube of course. I tried looking for an adjustable wrench to screw back the core properly, but could not find one even at the tool area of the organiser. In the end I had to use two Allen keys like a pair of chopsticks to screw back the core. Not sure if it is tight enough, but I think it will work OK.

After fixing the inner tube issue, it was almost time to go! We lined up at the start point just before 7am, and I was glad to see that the flag off timing was at 7am sharp! Great work by the organisers to be able to stick to the scheduled timing. At this time the sky was still dark and so our front and rear lights were on. This time, I am using the Garmin Edge 510 to track the route, so I will not need to plot the route manually.

7am, Set off from F1 Pit, 0 km
From start point to West Coast Highway

Since I have done the NTU Bike Rally a few times, the route would be pretty straightforward and predictable, even though the route is not disclosed before the ride. From the F1 Pits, we turned towards Shenton Way and went all the way to Keppel Road. After that, we carried on to West Coast Highway. From the start till this point, everyone was very energetic and rode rather fast. We were at 30km/h all the way along this stretch.

The danger area is near the Sentosa entrance, where there is a need to filter two lanes to the right to go straight, past Vivocity. There were a few Cisco outriders with us at this time and so it was not too chaotic.

As always, the first water point is at West Coast Park. We did not go in to rest as it was still early in the ride and we did not need to stop. Besides, it is a good idea to cover more distance early in the morning while it is still cool.

740am, Jalan Buroh Roundabout, 15.5km
Passing by Jalan Buroh roundabout

After West Coast Park, we went towards the Jalan Buroh roundabout (shown by the black dot). This is the point where the 168km and 98km route splits. Although the 168km riders are supposed to have left at 6am, there are still quite a large number of 168km riders at this point. It is easy to differentiate them from the 98km riders from the colour of the number tags.

The 168km riders went left towards Tuas, while 98km riders went straight towards Jurong Town Hall road. I was a bit surprised at this point as I thought everyone will turn left, and 98km route will turn turn at Pioneer Road North towards NTU.

As we went along Jurong Town Hall road, and passed Boon Lay Way onto Bukit Batok road, I realised that the 98km route will not be going to NTU! That was a surprise for me as I thought the NTU Bike Rally will always go through NTU...

805am, Choa Chu Kang Way, 26km
2nd water point on the 98km route

We we planning to go for the second water point, which would be a good time to refill our bottles and grab some bananas. As we went past ITE College West, there were some marshals indicating that the water point is nearby. However, as we turned left onto Choa Chu Kang Way, there were no signs or marshals indicating where the water point is. We thought it was further down the road, and so we went straight. It was only after some time that we realised we must have missed it as it was too far down the road. Later on, we found out from other riders that we had to turn in (at the black dot on the map) for the water point.

Now we had already missed two water points, but luckily we still had water and still felt fit enough to continue without resting. I wonder where the next water point will be...

845am, Start of Mandai Road, 38km
Going up Sungei Kadut Drive to Kranji Way, before coming down to Mandai Road

After passing through Choa Chu Kang, the route brought us northwards towards Kranji Way, before coming back down along Woodlands Road. From there, we turned left to travel along Mandai Road.

At this point, we still had not stopped for a water break or snacks, as we had skipped the previous two stop points. Luckily it was still early in the day and it was not too hot. Mandai road had some up and down slopes, but it was not a big issue for us as we still had energy. The key is to spin slowly and not to mash hard, as it is important to avoid getting leg cramps.

930am, Yishun Stadium, 47km
Stop point at Yishun Stadium

Finally, our first rest stop! This is the third stop point on the 98km route and we finally stopped for a break. We refilled our water bottles and had some bananas for energy. After about 2.5 hours, we covered about half the distance of 98km, which is a good timing. At this rate, we will finish just past noon!

After leaving Yishun Stadium, we continued eastwards towards the Yishun Dam, and onto the two islands named Punggol Barat and Punggol Timor. The sun was getting strong at this time and so I wore my armsleeves and put on some sunblock to protect against the hot sun.

Crossing the two islands towards Punggol

The next stop point was along Punggol Waterway (shown by black dot above), and it was rather well hidden and cannot be seen from the main road. Again, more water and bananas.

The official route would be to continue southwards towards Sengkang, and cross over to Tampines before going to Pasir Ris Drive 3. We decided to take the more scenic (and slightly shorter) route from Punggol to Pasir Ris, which is to go along the Punggol waterway PCN, cross the Lorong Halus bridge before appearing at Pasir Ris.

The more scenic route along the Punggol waterway, and crossing over to Pasir Ris to rejoin the route.

Stop point at Changi Beach, shown by the black dot

Next stop point is at Changi Beach, just after the SAF Ferry Terminal. By now the weather was getting really hot, although it did rain for a few minutes while we were passing by Changi Village. We had lots of water and also kept a couple of bananas for later use.

Route along Changi Coast Road

It was getting pretty tough for my friend as we had clocked plenty of distance by now, and the sun was really beating down on us. After what seemed like a really long time pedaling mindlessly along Changi Coast Road, we finally turned into East Coast Park. We had our own rest stop and had the banana, as there is no stop point from Changi Beach all the way to Tanjong Rhu.

Final stop point is under the Benjamin Sheares Flyover

After successfully navigating the crowded East Coast Park, we finally reached the final water point, which is located under the Benjamin Sheares Flyover. By this time we had already clocked over 98km! Bonus distance as usual...

At this time it was already past 12pm, as our pace slowed down significantly for the second half of this ride. Nevertheless, we were close to the finish point, with just a few more kilometres to go. I was still feeling pretty good even after clocking almost 100km.

1245pm, F1 Pit Finish, 102km
Overall route of 102km!

Final distance clocked is 102km! This was despite us saving a few kilometres at Punggol waterway. It was a really good ride for me, with a decent average speed.
Ride statistics. Average speed of 22.4 km/h, not fast or slow, but a good pace.

In summary, this was a good ride with a distance that I can handle. There was no confusion between those attempting the 168km route and the 98km route, as the flag off timings are different and the signs were clear at the splitting points (Jalan Buroh roundabout and Yishun area). Many thanks to the route marshals who braved the hot sun to direct the participants onto the correct route!

Merida Scultura 5000: Ultegra Di2 6870 Part 1

$
0
0
Back to tinkering around with the Merida Scultura 5000 road bike again! I had recently installed the Ultegra 6800 2x11 mechanical groupset on the Wheelsport Fantasy mini velo, and the Ultegra parts actually came from this Merida bike.

The Ultegra 6870 Di2 components were removed from the Wheelsport Fantasy mini velo, and now it will be installed onto the Merida road bike! The final setup would be Ultegra 6800 mechanical on the mini velo, and Ultegra 6870 Di2 on the road bike.

Prior to this latest upgrade, the Merida road bike was using a mixture of Dura-Ace and Ultegra components. I will be changing the shifting components (shifters, RD, FD) from mechanical to electronic shifting.

Before changing to Di2 components, the road bike is using Ultegra mechanical shifters and Dura-Ace RD and FD

This was the setup not too long ago. Di2 system was on the mini velo, while the mechanical system was on the road bike.

I have already gathered all the required Di2 components, and by now I am familiar with setting up a Di2 bike as I have already done it three times. On the Dahon Boardwalk, the Dahon MuEX, and the Wheelsport Fantasy mini velo. This time, it will be done for the fourth time on the Merida road bike.

Before I can install the Di2 components on the road bike, I have to remove the mechanical components on it. First to go would be the Ultegra 6800 road shifters. These were removed and installed on the Wheelsport Fantasy mini velo.

Ultegra 6800 road shifters removed from the handlebar, leaving the clamp band. Since the clamp band is the same for Ultegra 6800 or 6870 Di2 shifters, I left it on the handlebar as this saves me from unwrapping the whole bar tape to remove the clamp bands.

Next, the frame needs to be prepared for Di2 shifting. I started by identifying the parts that can be removed, as mechanical and electronic shifting has slightly different frame requirements. Before that, I removed the crankset too as this will allow me to access the bottom bracket and also the internal routing that goes past the bottom bracket.

Crankset removed. Notice the red plastic liner that appears under the down tube? This routes the inner cable for the front derailleur.

This stopper is at the head tube side, where the FD inner cable enters the frame and passes through the red liner.

The red liner can be removed as there is no shifter inner cable required for Di2 shifting.

One reason why I like threaded BB: It can be removed easily for servicing. This black piece of plastic is the cable guide for the FD inner cable, which can also be removed as it is not required.

The Ultegra 6870 Di2 components taken off from the Wheelsport mini velo, and now ready to install onto the Merida road bike!

The battery mount on the Wheelsport mini velo was using the long battery mount, but I changed it back to the previous short battery mount to use on the Merida road bike

Before I started this project to install Ultegra Di2 on the Merida road bike, I have already noticed that this frame is designed to allow Di2 internal wire routing. There are multiple holes on the frame to allow Di2 wires to be routed internally. Examples will be shown below.

The battery mount can be installed under the left chainstay, using the designated battery mount as shown by the two bolts here. The hole on the frame is for the Di2 wire to go into the frame.

Battery mount installed! Located unobtrusively under the left chainstay

Ultegra 6870 Di2 Rear Derailleur installed. The Di2 wire is routed through the right chainstay.

Ultegra 6870 Di2 Front Derailleur installed. The hole under the FD mount is for the Di2 wire to go into the frame.

As with most frame designs, the Junction B of the Di2 system will be located somewhere around the bottom bracket area. Therefore, all the 4 wires (from RD, FD, battery and Junction A) will meet Junction B at the bottom bracket area. Before connecting up all the components, I will run all the wires from the individual components to the bottom bracket area.

Di2 system layout will be the same as on the Wheelsport Fantasy mini velo, but with different lengths of wire between components due to the different frame geometry.

The right side hole on the frame will be closed off as it is no longer required.

On the left side, the Di2 wire that joins Junction A to Junction B will pass through the frame. However, the connector head is too big to fit through the original rubber grommet.

I made my own DIY rubber grommet using the rubber bellow from a V brake. This plugs into the hole on the frame and guides the Di2 wire through the frame along the downtube.

Di2 wire from the FD passes through the hole on the seat tube and downwards to the bottom bracket area

The D-Fly wireless unit is connected between the RD and Junction B. It will be mounted on the right side seatstay as recommended.

Finally, the Di2 wire from the battery will enter the frame from the hole at the bottom.

Now that all the wires have been routed from the components to the bottom bracket area, the next step is to join them to Junction B. This is not that easy as there is very limited space around the bottom bracket to connect and secure Junction B internally. To be continued!


Cycliq Fly 12 Front Camera + Front Light - First Impressions

$
0
0
After a long wait, the highly anticipated Cycliq Fly 12 is finally here! The Cycliq Fly 12 is a combined front camera plus front light, with some pretty impressive specifications. This follows the successful Cyclic Fly 6 rear camera plus rear light which I also ordered through Kickstarter.

As expected, the Fly 12 arrived later than planned after successfully being funded on Kickstarter. I already knew that this would happen, so I was not too worried that the product was being delayed. It was helped by the fact that I had previously received my Fly 6 successfully, and that there were frequent updates regarding the status of the Fly 12 production samples.

Here is a quick look at the Fly 12!

Unboxing the Cyclic Fly 12!

Key features include Full HD video recording, a powerful front light, long battery life, wireless connectivity, looping recording and rain proof construction.

Detailed specifications of the front camera plus front light

Contents of the box. What stunned me was the "Coming Soon" sticker on the Google Play app, which means that I would not be able to link it to my Android phone yet..

Large camera lens plus large front light dominate the front of the unit

Array of accessories and manual that comes with the Fly 12. Don't think I will need any of them...

Comes with a safety lanyard and a M5 bolt to replace the quick release knob on the GoPro-style mount

The different colours of the indicator light (at top of unit) and what they mean

Incident protection mode to prevent accidental overwriting of critical footage. Same concept as in the Fly 6.


The Fly 12 uses a GoPro type of mount, and is temporarily fixed to the packaging

To remove the Fly 12 from the packaging, first unscrew the bolt holding it from the bottom...

...then twist the whole unit and it detaches from the packaging! Doesn't this look familiar?

Yes, it is the Garmin quarter turn mount! What does this mean?

This means that I can either use the Garmin mount to hold the camera, or use the GoPro mount to fix the camera! The Garmin mounting is actually more convenient as I can quickly remove the camera for charging.

You can use the supplied mount to fix the Fly 12 onto your oversized (31.8mm) handlebar.

A rough size comparison. Looks quite big as it is one large unit...

Close up look of the front. Full HD camera with 400 lumen front light, very impressive!

Rear of the Fly 12 is where you plug in the Micro USB charging cable or insert the MicroSD card

This shows what the two buttons at the rear of the camera does

Weight of the Fly 12 without any mounting is 243 grams

I was going to replace the quick release knob on the mount with the M5 bolt, but I found that the M5 bolt does not work! The hexagon shape at the top of the bolt was not formed properly.

I found another suitable M5 bolt and changed the quick release knob to the bolt

Indicator light as shown at the top of the unit

The unboxing of the Fly 12 is complete, and the next step is to install it on the bike and test it out. Since this Fly 12 is quite big, I would prefer not to install it on the road bike as it would look out of place. Instead, I will install it on the Avanti Inc 3 commuting bike, and replace both the Lezyne front light and the Shimano Sport Camera.

To be continued!

Bike Components Sale!

$
0
0
1) LitePro Stem, Silver Colour
Brand new, authentic LitePro Stem, 25.4mm clamp diameter on both ends. Extends your handlebar for better reach and comfort. Fits practically all Tern or Dahon folding bikes, and also some bikes from other brands.
$30 firm.


2) Aerozine Ceramic BB, Hollowtech II, 68mm Road, Gold Colour
Hollowtech II type of BB, 68mm for road frames, ceramic bearings.
Very smooth and low rolling resistance. Weight is 90 grams.
In excellent condition. Original price is $100.
$50 firm. Reserved.


3) GoPro/Shimano Camera Handlebar Mount, Gold Colour
Inspired by the K-Edge handlebar mount, but at a fraction of the cost. GoPro style of mounting, can be fitted to GoPro cameras or Shimano Sport Cameras. Comes with knobs of two different lengths, and adapters to mount to either 31.8mm or 25.4mm handlebars.
$20 firm.


4) Ultegra 6800 Partial Groupset
Ultegra 6800 2x11 speed partial groupset. Includes left and right shifters, rear derailleur (short cage) and front derailleur in either clamp type (M Size, 31.8mm) or brazed on type. Taken off the Merida Scultura road bike.
ST-6800 L&R
RD-6800 (SS)
FD-6800 (M size clamp OR brazed on, choose one)
Low mileage, all components are in excellent condition.
$250 for the set. Reserved.


Choose either the clamp type or brazed on type of FD


5) Topeak Race Rocket Pump, Gold Colour
Rarely used hand pump for sale. Rated up to 120 PSI, and has an integrated Presta/Schrader pump head on the hose. Switch between the two pump heads just by twisting a knob. Comes with the bottle cage mounting bracket.
$25 firm. Reserved.
More info here.


6) Lezyne Pressure Drive Hand Pump
Rarely used hand pump for sale. Rated up to 120 PSI, and has a reversible hose for switching between Presta or Schrader valves. Comes with the bottle cage mounting bracket.
$30 firm
More info here.


7) Light & Motion Vis 180 Rear Light
Rarely used rear light. Very powerful rear light with excellent battery life. USB rechargeable, with quick mounting on the seat post via a rubber strap. Angle adjustable with a tool free bracket design. Also has orange side lights for added side visibility. Instead of having flashing modes, it has pulsating or steady modes that ensure that the rear light is visible at all times.
$50 firm. Reserved.
More info here.


8) Topeak Redlite Aero Rear Light
Small, sleek and lightweight rear light that can be fitted onto round seat posts or aero seat posts with a flat rear. Low profile design allows it to blend in well with the seat post, instead of sticking out from the back of the seat post.
Includes a custom rubber shim which I made myself to enable better fitting with flat seat posts. Can be mounted or removed quickly and easily just by using rubber straps. Uses 1 x AAA battery.
$20 firm.
More info here.


Merida Scultura 5000: Ultegra Di2 6870 Part 2

$
0
0
This continues on from Part 1 of this Ultegra Di2 upgrade project. In Part 1, the original mechanical shifting components were removed from the Merida Scultura road bike, and some of the Di2 components were installed. As this bike is internal routing compatible, the wires have already been passed through the frame and they now end at the bottom bracket area. Next step is to connect them up to Junction B!

The 4 wires (from RD, FD, battery, Junction A) all end at the bottom bracket area. This took some time as it was not easy to thread the wires through the frame.

All the 4 wires will be linked together with the small internal type Junction B. Now, I need to fit everything back into the frame.

The Junction B has been placed into the downtube area just in front of the bottom bracket. I left a loop of wire sticking out to make it easier to remove next time if there is a need to.

Once the wiring has been connected, I tested the system and was glad to find that everything is working properly. The next step is to put back the bottom bracket and crankset, and tidy up everything on the bike.

New cabling since there is no longer any shifter inner cables or shifter outer casings.

The Junction A is tied to the rear brake outer casing, and tidied up with some cable wrap.

The D-Fly wireless unit have been placed on the right side seat stay. It is connected between the rear derailleur and Junction B.

Bottom bracket, crankset and chain reinstalled onto the bike!

New Di2 drivetrain with electronic shifting components.

Ultegra 6770 Di2 shifters! Small and compact sized, it is more comfortable that the mechanical shifters.

I tried to tidy up the wires and cables we neatly as I can using cable wrap

View of the handlebar area.

Less cables running around the front of the handlebar compared to the mechanical shifting setup

View of the full bike with Ultegra 6870 Di2 setup. Not much difference in appearance.

From the right side, the main difference would be the electronic front and rear derailleurs. Other than that, it looks very similar to the mechanical shifting version.

With this component exchange project completed, the Merida road bike now has Ultegra 6870 Di2 components, while the Wheelsport Fantasy Mini Velo has the Ultegra 6800 mechanical shifting components. This is the 4th Di2 installation project that I have completed, after the Dahon Boardwalk, Dahon MuEX, Wheelsport Fantasy Mini Velo, and now the Merida Scultura 5000.

Wheelsport Ultegra Di2 2x11 Speed: Part 3 - Component Selection

$
0
0
Part 1: Frame Design and Carbon Fork
Part 2: Compatibility Check for Wheelset and Brake Calipers

Now that the compatibility issues have been solved, the next step is to dismantle all the components from the Dahon Boardwalk and transfer them to the new Wheelsport Fantasy mini velo. Along the way, I also decided to change some of the components to more suitable ones.

For example, I was previously using a compact 50/34T Ultegra 6800 crankset on the Dahon Boardwalk, when I upgraded to 11 speed. Even though it was a compact crankset on a small wheeled bike, the small 11-25T cassette enabled a sufficiently high gearing to be achieved for my needs.

However, I believe that once I change from the Dahon Boardwalk folding bike to the Wheelsport Fantasy mini velo, the top gear with the same components (50T front and 11T rear) will not be high enough. This is because the mini velo has a stiffer frame, as it does not have any folding joints. As a result, I will be able to push harder and go faster without experiencing as much frame flex. A higher top gear is thus warranted based on my experience and expectations.

Therefore, I decided to increase the top gear by changing from a compact 50/34T crankset to a mid-compact 52/36T crankset. It is called a mid-compact as it has a gearing setup that is somewhere between a compact 50/34T and a standard 53/39T crankset.

The 52T large chainring will enable a high gearing, almost similar to that of a standard 53T chainring. On the other hand, the 36T small chainring will maintain a sufficiently low gear for hill climbing, much better than the 39T of a standard crankset. This 52/36T mid-compact is thus very versatile as it gives a nice wide range of gears that is suitable for going fast or climbing hills.
.
The new Ultegra 6800 52/36T mid-compact crankset

52/36T crankset as printed on the outer chainring

I found that the difference between this 52T chainring and the 50T chainring is only the size of the outer aluminium teeth. The bonded composite material at the back of the chainring is the same size.

Comparing the 50T chainring with the 52T chainring shows that the only difference is the amount of chainring that sticks out from the hollow outer shell. The 52T chainring has teeth that sticks out further due to the two extra teeth.

Weight of the right side of the 52/36T mid-compact crankset


With this new 52/36T crankset, the overall gearing table is as shown, for 20" (406) wheels. 15 unique gears are available for this 2x11 speed drivetrain.


A graphical illustration comparing the gear range of my older setup (53/39T crankset with 12-27T cassette) and this new setup (52/36T crankset with 11-25T cassette). Click for a larger picture.

Gearing table for the older 2x10 speed setup. It has 13 unique gears

With this change, I can get a wider total gear range (higher top gear), while maintaining the same low gears. This can be seen from the bar chart above. Also, with the switch to this drivetrain setup (2x11 speed, 52/36T crankset, 11-25T cassette), I get 15 unique gears to use, instead of the previous 13 gears. In conclusion, this new setup gives a wider gear range with more unique gears in between, which is a really good result!

Along the way, there are also some components that cannot be transferred from the Dahon Boardwalk to the Wheelsport Fantasy mini velo. This is mainly due to compatibility and sizing issues.

A long Di2 battery mount is required, as I plan to mount the battery using the bottle cage screw holes. This means that the previous short Di2 battery mount cannot be used.

I also got a new saddle, seatpost, stem and handlebar for this new mini velo. These are mostly high end components for lighter weight and better function.


The lightweight and yet comfortable Selle Italia SLR Kit Carbonio Flow saddle. The same as the one found on the Merida Scultura 5000.


Lightweight saddle!

A new seatpost was also required as the seatpost diameter required for the Wheelsport Fantasy mini velo is much smaller (27.2mm) than the large Dahon seatpost diameter (33.9mm).

FSA SL-K ITC Zero Setback Carbon Seatpost

Diameter of 27.2mm, 400mm length, which is rather long

Weighs 239 grams, which is a low weight, but definitely not the lightest available. I chose this seatpost partly because the subtle graphics would match the frame.

ITC stands for Independent Top Clamp, which allows the saddle fore-aft setting to be adjusted independent of the tilt angle. As shown here, there are separate bolts which adjust the fore-aft setting and tilt angle independently.

As the Selle Italia SLR Kit Carbonio Flow Saddle requires a top down clamp for the carbon rails, I had to choose the clamp type carefully.

Although this clamp is tilted at a slight angle, it is still able to clamp the carbon rails properly without any unusual gaps. These carbon rails are also oval shaped, being 9mm tall and 7mm wide.


A little addition to the seatpost is a Fizik rubber seatpost ring to seal the gap between the seatpost and the top of the seat tube

With the new saddle and seatpost assembled onto the bike

Fizik Cyrano R1 stem, 100mm length

Chosen mainly for the appearance, with a glossy black logo on a matte black base, similar to the design on the Wheelsport Fantasy frame

Uses Torx head bolts instead of the more common Allen key bolts

Considered lightweight at only 126 grams

Lastly, this is the new carbon handlebar that will be used on this mini velo. This FSA carbon handlebar is the same as the one found on the Merida Scultura 5000. I had actually bought two of these handlebars during a sale, and now is a good chance to make use of the second one.

FSA K-Force Compact Road Carbon Handlebar. Lightweight at only 204 grams.

With the same Ultegra ST-6770 Di2 shifters installed on the FSA handlebar. All ready to be mounted on the bike!

All other components, such as the drivetrain components will be taken from the Dahon Boardwalk. In the next part of this upgrade series, the assembly of the Wheelsport Fantasy mini velo will begin!

Click here for Part 4!

Merida Scultura 5000: Ultegra Di2 6870 Part 3

$
0
0
With the Merida Scultura 5000 road bike upgraded to Ultegra 6870 Di2 components, this bike is pretty much a well upgraded bike that rides, shifts and brakes really well. Nothing much more that I can really ask for from this bike.

One thing that I noticed with the recent Di2 upgrade is that the D-Fly wireless unit is mounted on the right side seat stay, as recommended by Shimano. This unit can actually be mounted in between almost any two components, and it will still work to link up the Di2 system to a compatible ANT+ computer. The ANT+ computer that I am using is the Garmin Edge 510.
.
D-Fly wireless unit mounted on the right side seat stay. It is connected in between the rear derailleur and Junction B.

However, I find that this mounting position is not that neat, as it creates excess wiring around the rear drop out area that is messy. It would be best if this D-Fly unit can be relocated to a less conspicuous location.

I came across this blog from a bike mechanic that shows in detail how the D-Fly unit can be installed inside the head tube of a road bike. The details can be found at this link.

It would be very neat if the D-Fly can be mounted internally as shown, but it seems like a lot of work and I am not looking forward to removing the headset and fiddling around with internal wiring again.

The compromise would be to relocate the D-Fly to another external location on the bike, but in a less obvious location. Finally, I decided to mount the D-Fly around the bottom bracket area, similar to how it was set up on the Dahon Boardwalk and the Wheelsport Fantasy mini velo.

In this case, there is no space to mount the D-Fly unit behind the seat tube as there is very little clearance with the rear tire. After some trial and error, it was found that it is possible to mount the D-Fly unit in front of the seat tube, underneath the FD clamp. As this place is near the front derailleur and Junction B, it would be easy to run the wires along this area without being too messy.

Final location of the D-Fly unit, mounted on the seat tube, under the FD clamp.

In this configuration, the D-Fly wireless unit is connected in between the front derailleur and Junction B. It still works fine, which shows the flexibility of the E-Tube system for connecting all the Di2 components. With this arrangement, the D-Fly unit is nicely hidden along the seat tube, behind the crankset and under the tool bottle.

At the same time, the wiring at the rear derailleur area also becomes more tidy, as there is only a short section of wire that is visible. Due to the internal routing on this bike frame, the Di2 wire can run through the hollow right side chain stay, and straight into the rear derailleur.

Neat wiring at the Ultegra 6870 Di2 rear derailleur, with only a short section of Di2 wiring visible.

View of the full bike with the D-Fly unit hidden behind the crankset, and neat wiring at the rear derailleur area.

Full specifications of this Merida Scultura 5000 road bike. Weighs 7.3kg without pedals.


Viewing all 697 articles
Browse latest View live