Quantcast
Channel: Hands On Bike
Viewing all 668 articles
Browse latest View live

LCSG Taiwan Cycling 2012: Day 5

$
0
0
Our route for Day 5 will take us from 瑞穗 to 花莲, along the scenic Route 193. Once again, the weather in the morning was great, with cloudy skies and the occasional sun. Today's route will be even longer than the previous 2 days of 50 km and 60 km respectively, and it will test our endurance after a few continuous days of cycling.

 
Day 5 ride distance of over 70 km

The ride started off really easy, as it was a long, straight and gentle downslope all the way from our hotel. In fact, it got so cold descending in the chilly morning air that I stopped to put on my windbreaker.

Dedicated cycling paths even in small towns

Once out of the town, we were greeted by beautiful scenery all around us. Route 193 is nestled in between the central mountains and the east coast mountains of Taiwan. This means that there are gorgeous mountain views all along the route, on both the left and right side.

Cycling across the many bridges along the route

 
Breathtaking views along the way

Climbing up one of the many bridges along the way

The Bromptons doing a fine job!

Up yet another slope

Taiwoon getting a boost from Encik George

 Superb view of the mountains and the valleys

 Cycling along the narrower parts of the road

Lunch at 米栈

Before lunch, I was already feeling quite drained from the cycling. The nose was also leaking non-stop due to the cold wind blowing at us throughout the day. By the time I reached 米栈, I was even feeling a bit dizzy. Seems that I had not recovered fully from the flu. Thus I made the decision to stop riding and put the bike onto the lorry.

At that point we had cycled about 50 km from the start, and there was about 23 km to go to the end point in Central Hualien. I boarded the support van and helped to take some photos of the riders along the way.

One of the maps seen along the way, showing the route from 米栈 to Central Hualien

Some action shots of some of the riders! Couldn't get a shot of Encik George as he usually zoomed passed too fast...


Although I did not manage to complete the full route, I was glad I had the opportunity to ride most of the distance. There are very few shots of the actual route, as it was quite hilly and we were going up and downhill practically non-stop. The slopes were steep enough that it cannot be considered rolling hills, thus momentum cannot be used to roll down the slope and up the opposite side.

On the upslopes, it was just a case of putting the bike into the lowest gear and slowly spinning up the slopes, and then taking a brief rest during the downslopes. Fun but tiring!

Taiwoon's account of Day 5 here!

LCSG Taiwan Cycling 2012: Day 6-9

$
0
0
After 3 continuous days of cycling, clocking 188km (165km for me), most of the cyclists are pretty tired. For the serious and hardcore cyclists, cycling 188km over 3 days may be nothing. However, we are mostly recreational cyclists (although some are Wulin or Cambodia trained), and it is not an easy feat to do that distance all at once. Accounting for the fact that cycling in Taiwan is tougher than in Singapore, due to the strong winds and endless slopes, it is probably the equivalent of 200+ km in Singapore.

Luckily for us, Encik George could see that we were mostly tired out from the cycling. Also, the next day's cycling route was a little more risky, due to the even steeper terrain and narrower roads. Thus, the eventual decision was made to do away with the cycling, and take the vans on a touristy tour instead! In the end it rained on the morning of the 6th day, which would have prevented us from cycling anyway.

Planned cycling route for the 6th day. We ended up traveling on the same route by van.

We traveled to 慕谷慕鱼 by van, snaking up the many slopes along the way (just look at the winding road as seen on the map). This place is called a mini-Taroko gorge, and we can see why. It has similar scenery as the famous Taroko gorge, with green mountains, steep cliffs, landslides, clear rivers and huge boulders in the rivers. The difference is the road that leads to it. Taroko gorge has a wide road that allows huge busloads of tourists to visit it. On the other hand, 慕谷慕鱼 has narrow roads that can only fit small vehicles. This also meant that on the day we visited, there were practically no other tourists there! It was as if we had booked the entire place to ourselves.

 View of the gorge

Misty morning with a light drizzle

The 3 happy kids!

George and Wendy

Good food to be found at the 黑店, located somewhere in the hills

 Yummy wild boar sausages!
 
Glutinous rice in bamboo

Split the bamboo to get the rice!

Some more exotic food, such as this escargot, or snail meat

After our hearty lunch, we still had a whole afternoon's time to spare! Where else to go but to visit bike shops in Hualien?

Found this bike shop that has Bromptons!

A really nice blue Brompton

Cindy to George: I want this one!

A miniature Brompton. Actual size only slightly bigger than my hand. The detail is amazing!

 
New breed of road bikes. Giant AnyRoad, designed for a wide range of terrain. Comes in Shimano Tiagra and Sora specs.

Knobbly slim tires and mechanical disc brakes can handle moderate offroad terrain

The Giant bike shop that we visited in Central Hualien


Lots of accessories and bikes for everyone!

Even the kids have a fun time trying out helmets

The latest Shimano Dura-Ace 9000 groupset available!

Campagnolo also available. Cheaper than usual due to the weak Euro currency 

 
Giant TCR SL bikes. Cheap or not? You decide

Later in the evening, we went to walk around at the main shopping street of Hualien. Think it is called Zhongshan Road.

Bustling night life on a Thursday night

Dinner at a famous Japanese restaurant

 The menu as found on the wall

Everyone waiting patiently (and hungrily)

Gigantic slabs of Tuna!

This is how you enjoy gigantic pieces of Tuna sushi


We spent 2 nights in Hualien, and on the morning of the 7th day, we took a train from Hualien to Taipei.

 
 自强号 that travels along the eastern coast of Taiwan, with great views of the sea along the way

And with that, we conclude the grand tour of Taiwan! Using a combination of train, vans and cycling, we have practically gone on a round island tour of Taiwan.

 
Overall route from Day 1 to 7

We then stayed in Taipei for the 8th and 9th day.After checking into our hotel rooms at 2 plus pm, we then met at the lobby at 330pm to go visit the bike shops! As far as I know, the 2 must-go bike shops in Taipei are 城市绿洲 and 魔术方块. As I have been to those places the previous year, I then led everyone to visit those 2 bike shops! No pictures here as we were all busy looking at bike stuff all the time. I don't think anyone went back empty-handed...

Addresses and more details of the bike shops to be found here.

On our first night in Taipei, we went to Shilin night market to get our food goodies!

 
Yummy peanut candy, to be found at Shilin night market stall 168, 1st floor

Of course we did not forget the 豪大大鸡排

Good stuff to be found in the bookstores!

More food here. Baked potato with a whole lot of stuff on it.

More of the 山猪肉香肠

 A trip to Taipei would not be complete without having this!

Overall, it was a fantastic trip to Taiwan with the LCSG people. Plenty of food, cycling and good food, totally keeping with the LCSG spirit of Eat, Ride, Photo!

Journey of the Boardwalk: Part 25 - Ultegra Di2 (Part 1)

$
0
0
Hey! It has been quite a while since I have written about my Dahon Boardwalk. The reason is because I haven't been doing any modifications or upgrades to the Boardwalk. After "zhnging" the bike to 2x10 speeds, there isn't much more I can do. Or is there?

I recently went on an amazing cycling holiday in Taiwan with some LCSG folks, and it was super fun! You can read about it here. However, one of the discomforts I experienced in Taiwan was while we were cycling along the numerous slopes. The terrain at some places is such that you get upslopes followed closely by downslopes, then another upslope, and this repeats for many kilometres. However, the gradient and the distance, plus the strong headwinds, means that you cannot use momentum to help you out like on rolling hills (such as the Desaru slopes). As such, you will have to constantly change gears as you pedal up and down the slopes.

This repeated gear shifting, especially for the front shifting, makes your hands very tired from the constant operating of the gear levers. At that point, I thought that if we could utilize electronic shifting, it would be much easier!

This is a major project as I don't think I have seen anyone install a Shimano Ultegra Di2 electronic gear shifting system onto a folding bike before. I believe that very few folding bike frames can accommodate a Di2 system. So, is it possible to have a Dahon folding bike with Ultegra Di2?

Before I start the project, I first had to determine if my Dahon Boardwalk can be installed with the Ultegra Di2 system. From what I see, the major problem is the front derailleur (FD). Because of the bulbous size of the servo motor in the FD, the frame might interfere with the placement of the FD. I actually went to borrow an FD and installed it to see if it fits. I was glad to see that it fits (barely!).

The top of the FD just manages to clear the seat stay of the Boardwalk!

This small clearance also means that the Dahon Mu frames cannot install the FD due to the curved seat stay. Even the Vitesse frames cannot use this FD as the aluminium seatstay is larger in diameter. Having said that, the smaller Dura-Ace Di2 FD might fit, but it is hard to be sure without physically checking it.

In order to start this new project, I set out to read up more about the Ultegra Di2 system, and got the necessary parts. Let's take a look at the part list and the wiring diagram.

The part list for the Ultegra Di2 parts. These are only the electronic components (except the chain).

The sample wiring diagram. Internal and external routing uses slightly different components.

Let's take a closer look at the individual components.

Ultegra Di2 ST-6770 Shifters:

Each component comes in its own box!

The pair of Ultegra shifters

Textured rubber grip, with a smaller and improved hood shape

The two buttons for shifting. The button placement is similar to the current shifters, with the textured button (located on the brake lever) shifting to a lower gear, and the paddle at the back shifting to a higher gear. This can be reprogrammed if desired.

 Two electrical ports on the side of the shifter. One of it is used to connect to the handlebar wiring, the other is for auxillary shifters.

Ultegra Di2 RD-6770 Rear Derailleur:


The 2 limit screws at the bottom of the RD.

Ultegra Di2 FD-6770 Front Derailleur:


Two metal tabs that are provided, to be stuck onto the frame. These tabs are to help support the FD during shifting. Details to be shown during installation.

 Rear view of the FD

Ultegra Di2 Battery and Battery Mount:


Bottom of the battery, where it connects to the battery mount.

 
The short external battery mount. Originally designed to be mounted directly on frames with suitable M4 hole mounting point. I am using this as I have an idea how it can be mounted on my frame.


The battery mount comes in 3 different types: Internal (Long), for frames with internal routing. External (Long), designed to be mounted using the bottle cage holes. External (Short), as shown above, for frames with specially designed Di2 mounting point.

Ultegra Di2 Junction A (For Drop Bars):


This connects up the two L & R shifters and links it to the rest of the circuit. It also has a battery indicator and a button to initiate derailleur adjustments.

Ultegra Di2 Wires:

4 wires are needed to link up the system. The wires used are similar and interchangeable, with length as the only difference.

Comes in many different lengths! For my Boardwalk, I needed an extra long 1200mm wire to link up Junction A to Junction B.

The other wire lengths I got are 2 x 300mm, 1 x 500mm. These are standard lengths that come with the wiring set.

The wiring set includes standard wire lengths, Junction B, and battery mount. I did not get the package as I needed a mixture of internal and external parts, and different wire lengths. Thus I bought the wiring parts individually.

Ultegra Di2 Junction B:

 
Comes in two types. JC41 for internal routing, JC40 for external. The internal type is designed to fit inside the frame. The external type is mounted under the BB, and secured using the bolt hole for the BB guide.


 I got the internal type, as it is smaller and easier for me to find a place to mount. I cannot use the standard JC40 junction as my bike does not have the mounting.

 Junction B links up all the wires from the RD, FD, shifters and battery.

Ultegra Di2 Satellite Shifters (SW-R600), Optional:

This is an optional part, not necessary for the Di2 system. However, it is a very useful add on. This shifters can be mounted on the flat part of the drop bar. This gives a secondary shifting position even when I am holding the top of the handlebar.

 
The two buttons for up and down shifting. By default, the right button shifts to a lower gear. This can be changed by reprogramming the shifters.

The rear of the button, where it will be fixed onto the handlebar by cable ties.

Overall Parts for Ultegra Di2:

There are a lot of individual parts for the Ultegra Di2 system! All (except the optional satellite shifters) are required to make the entire system work.

In the next part of the article, you can see how I installed the Ultegra Di2 system onto my Dahon Boardwalk! It is not as straightforward as on a standard road bike, as there are many restrictions and limitations. Nevertheless, it is possible, and I like challenges! Stay tuned for the project updates.

Part 2 of the Ultegra Di2 upgrade is now up! Click here to continue reading.

Journey of the Boardwalk: Part 26 - Ultegra Di2 (Part 2)

$
0
0
This is part 2 of the Ultegra Di2 upgrade for my Dahon Boardwalk! In part 1, I posted about the components required for this project. In this second part, I will show you exactly how everything is wired up.

Most people would not know what are the full components required for the Di2 system, and how to connect everything together. This is understandable as electronic shifting is a relatively new technology, and most people would not even have tried it before. At first, I was also not sure how the entire system works. I only knew roughly what are the components, but had no idea how everything is supposed to go together. There isn't much help or info available online, as most articles about Di2 only talks about the usage and how it works. Shimano does have its own installation manual for Di2, but even then it may be challenging without proper guidance or hands-on experience.

I asked for advice from more experienced and knowledgeable people, and finally I understood how everything is supposed to work together. It is actually quite simple, with a simpler circuit than Dura-Ace Di2 7970 series.

Let's start with the wiring of the shifters.

The pair of Ultegra 6770 shifters. It has 2 buttons in place of the usual shifter levers. Better ergonomics is possible as there are no internal mechanisms to bulk up the hood.

The handlebar wires. Also called Junction A. Purpose is to link up the two sides of the shifters, and also acts as a battery indicator.

The satellite shifters, SW-R600. Put this anywhere for an auxillary shifting position.

 The special tool for inserting and removing wires from the ports. This is to prevent damage to the wires, as they need to be inserted tightly. The left forked end is for removing wires from the ports, while the enclosed end on the right is for inserting the wires. This tool comes with the shifters.

 Inserting one side of the handlebar wire plus the satellite shifter wire into the right shifter. The satellite shifter is connected to the system by running through the road shifter.

How it looks when the rubber hood covers up the ports

Basic handlebar wiring. This whole section will be mounted entirely on the handlebar.

Once the shifters are hooked up to Junction A, the next step would be to hook up Junction A with Junction B. Junction B is the part that links up all the components, namely the shifters (through Junction A), battery, RD and FD. This distance from Junction A to B varies a lot from bike to bike. For me, I measured the length required if I run it along the rear brake housing, and it is about 1200mm.

The long 1200mm wire. This connects up Junction A to Junction B.

Junction B. It has 4 ports for the 4 wires. Plug into any of the ports as it doesn't matter.

How it looks like when Junction A is connected to Junction B. The other wire is from the battery.

The battery on the battery mount. Connect the wire to the battery mount. I used the 300mm wire for this.

So far, we have connected the battery and the shifters (through Junction A) to Junction B. The other 2 ports are for the RD and FD.

Connecting up the wires to the FD and the RD. I used the 300mm wire for the FD and the 500mm wire for the RD. Note that all wires are interchangeable, use a length which is long enough but not excessively long.

How Junction B looks like when all the components are connected to it.

 Testing out the whole system before installing it onto the bike. It works!

Once you know how the Di2 system is wired up, it only takes you a few minutes to connect everything together. It is always a good idea to test out the whole system before installing the components onto the bike.

It seems easy to set up the Ultegra Di2 system, right? However, the challenging part is to put the whole system onto the bike! Especially for a bike that is not specially designed for a Di2 system, and even more so for a folding bike with non-conventional frame dimensions! In the next part of the article you can see how everything goes onto the bike, and what are the workarounds I had to use to fit the battery and Junction B onto the bike.

Part 3 of the Ultegra Di2 upgrade is now up! Click here to continue reading. 

Journey of the Boardwalk: Part 27 - Ultegra Di2 (Part 3)

$
0
0
Here is the final part of the Ultegra Di2 upgrade! First ever Dahon Boardwalk folding bike with the Shimano Ultegra Di2 system. Read more about the Di2 system in Part 1 and 2 here.

Ultegra Di2 Part 1: System Components
Ultegra Di2 Part 2: Connecting up the circuit

For my Boardwalk, the most tricky part of the installation is the placement of the battery. For full sized road bikes, the bottle cage mounts can be used to hold the battery mount. However, since my Boardwalk needs to fold, I cannot use the bottle cage holes to mount the battery. Thus I had to try out other ways to fix the battery to the frame.

It is necessary to fix the battery tightly to the frame, so that it does not jiggle around and drop off while riding. Using cable ties is not really possible as the battery mount has nowhere for the cable tie to loop through.

One day, the idea to use the FD adaptor clamp to fix the battery mount suddenly occurred to me. Using 2 adaptor clamps, there would be 2 X M4 holes for me to thread a bolt into. Since the external (short) battery mount uses M4 bolts to fix the battery mount, this solution is perfect!

Extra LitePro FD adaptor clamps that I have lying around. Once the "ear" for the FD is removed, I have a M4 threaded hole at the side of the clamp.

From what I see, there are only 2 suitable positions to fix the battery mount. One is to fix it on the rear of the seat tube. The other is to mount it on the top of the frame top tube. In the end the decision was to mount it on the top of the frame.

Mount behind seat tube? Difficult as the original FD clamp is in the way.

Using the 2 clamps on the top tube. The diameter of the top tube (~38mm) is slightly smaller than the seat tube (40mm external), thus 2 thin rubber strips were needed to make the clamp secure. Frames with non-cylindrical top tubes cannot use this mounting method.

Estimating the approximate positions for the clamps, using the battery mount.

Secure the clamps, and bolt on the battery mount!

Once the battery mount is settled, the most tricky part of the installation has been settled. Now it is time to fix on the other components.

The RD goes on with no issues. Standard RD hanger mounting.

FD is installed onto the previous FD adaptor. The crankset had already been changed to Ultegra previously, so the colour scheme matches well.

 The metal tab that is provided together with the FD. As the FD has an extra screw to help support the FD during shifting, this tab is to be pasted onto the frame to prevent damage to the frame.

 From the back, you can see the little screw sticking out from the FD, and it rests against the metal tab that is pasted on the frame.

The next thing to install would be the shifters. This involves a bit more work as the bar tape has to be removed, along with the existing shifters and the inner cables.

 Quick comparison of the Shimano 105 shifters and the Ultegra Di2 shifters.

 
The Ultegra Di2 shifters are smaller in girth and width as there is no internal shifting mechanism. This allows the hand to wrap around more of the shifter hood and give a better grip.

Installed the right shifter. The outer casing on top is the brake cable. The 2 wires (one leading to Junction A, the other coming in from the satellite shifter) will be neatly hidden under the bar tape.


The left shifter with only one electrical wire, as there is no satellite shifter.

The satellite shifter mounted on the flat part of the handlebar with cable ties.


Junction A clipped onto the rear brake housing with cable ties.

 Quite a clean look as there are only 2 brake housings coming out from the handlebar. No more shifter cable housings!

The last part that needs to be fixed to the bike would be Junction B. This is the part that connects up everything (Junction A, battery, RD, FD). This is usually located around the BB area.

I got the internal type Junction B (originally designed to be located inside the frame), as it is small and easy to install anywhere. I found that the best location to put Junction B would be at the back of the seat tube. It would be protected from road spray (the system is waterproof anyway) and is relatively well hidden.

I used strong mounting tape to stick Junction B to the seat tube, and then used a cable tie to hold it against the frame. As long as the cable tie doesn't break, Junction B will not slip downwards. Even if the cable tie breaks, the mounting tape will hold it there (it is really sticky!). And if the mounting tape peels off from the frame, Junction B will not be going anywhere as it is held in place by the 4 wires connected to it.

How Junction B is fixed onto the frame

Using the sticker covers to align and hold the wires against the frame. 

 An overall view of the Junction B setup.

The wire length from the FD to Junction B (300mm) is about right, so there is no excessive slack. The wire from the RD to Junction B (500mm) is slightly too long, so I coiled the wire around the chainstay to take up the slack. The wire from the battery mount to Junction B (300mm) is slightly too long, thus I coiled the excess wire around the seat tube before connecting it. The wire length from Junction A to B (1200mm) is just nice.

Once everything has been fixed in place, we can start tuning the RD and FD. There must not be slack wires hanging around as it will get snagged on the drivetrain.

Tuning this Ultegra Di2 RD is new to me. Unlike conventional mechanical RD, the limit screws are not set first. Rather, the indexing is done first. Start by shifting the RD to the 5th gear. At this point the RD guide pulley may not be aligned to the cassette's 5th gear at all. Press the button on Junction A to enter RD adjustment mode. Then, use the 2 buttons on the shifter to make minute movements to the RD. The aim is to line up the guide pulley with the 5th sprocket on the cassette. Once done, the indexing is set! The RD will shift to all 10 positions accurately. Lastly, tighten the low and high limit screws. These screws do not actually index the RD at the high or low limit, it just acts as a safeguard against overshifting in case the RD acts up.


 Setting up the RD

Setting the FD is also quite easy. Basically just set the low and high limit screws as per normal FD, the servo motor will know how much to shift the chain guide between the chainrings.

Setting up the FD

Once the RD and FD are both set, you are good to go! More pictures of the complete bike below.

The battery and battery mount nicely installed on the frame

Ultegra Di2 RD. Remember to leave some slack for the wire at the RD area as the RD will rotate about the axle in different gears.

 Can't really see the wires that are running down the back of the seat tube. The wire linking Junction A to B also runs neatly along the rear brake housing.

Overall view of the electronic shifting components


 By default, the left button shifts to a higher gear, and the right button shifts to a lower gear. I plan to reprogram it to work the other way round.


Neat routing of the electrical cable, from Junction A (handlebar) to Junction B (behind seat tube)

Overall view of the Dahon Boardwalk with Ultegra Di2

Some people may want to know about the weight of this Di2 system. Compared to a conventional shifting system, would it be heavier because of the extra battery? To answer that question, I had weighed all the parts individually (even the wires) in order to do a weight comparison.

Weight comparison between mechanical and electronic (Ultegra Di2) shifting system:
 Not a totally fair weight comparison, as the components are from a different series (105 vs Ultegra). But it indicates the weight difference for this upgrade for my bike.

In summary, we can see that although there are extra parts in the Di2 system such as the battery, battery mount, and the junctions, this weight increase is mostly offset by the lighter Di2 shifter and elimination of the shifter cable housings. In fact the weight difference is purely caused by the inclusion of the two FD adaptor clamps!


Battery Life?
Some people are worried that relying on battery power for shifting can give you problems if you run out of juice while out on a ride. However, the reality is that this is unlikely to happen unless you purposely choose to. First, the mileage on a single full battery is probably 1000 miles on average (number from other people's review), which is probably more than the distance I ride in a year. It also depends on how frequent you shift. Next, there are multiple warnings for battery life. Even if you let the battery run all the way down to zero, it is said to be able to shift 150 more times before it completely dies. So, you can only run out of battery power if you deliberately choose to ignore all the battery indicator warnings. Surely it is not difficult to charge it once every few months, when the battery life hits 50%?

Advantages of Ultegra Di2 over mechanical shifting system:
1) Effortless, no friction shifting. Pushing a button is so much easier than pushing the levers, especially when shifting gears frequently.
2) Multiple shifting positions possible with the use of satellite shifters.
3) No frequent adjustments required for FD and RD, as there is no inner cable stretch.
4) Smooth and fast gear engagement for both front and rear shifting.
5) Automatic front derailleur trimming, based on position of rear derailleur.
6) Weatherproof, as the system is fully sealed against water, and there are no moving cables that can be jammed up by dirt.

Of course, not everyone may like an electronic shifting system. Some may prefer the clicky feel of a mechanical drivetrain, whereas others may not even need to shift as they ride a fixie or single speed. But for someone who rides a multi-speed bike, having the Ultegra Di2 system is really fun and useful as it makes shifting so effortless that there is no thinking required. Just concentrate on the ride!

Journey of the Boardwalk: Part 28 - Programming Ultegra Di2

$
0
0
Some updates on the Shimano Ultegra Di2 system on my Dahon Boardwalk folding bike! I have been riding the bike for about a week, and I am very pleased with the shifting performance. It is hard to describe the actual feeling of pressing a button instead of pushing a lever to shift gears. Perhaps it is necessary to try the actual bike in order to know how it feels.

On a recent cycling field test, I rode the bike up Kent Ridge, and also along the flyovers along Jalan Buroh. One of the things I really like is that for front shifting, I can leave the shifting till really late, before pressing a button to drop the gear effortlessly and accurately. Also, it makes it easier to change gears when you are tired, such as when you are halfway up the Kent Ridge slope.

Another advantage that I noticed is how easy it is to change gears when in the drops. Previously on a mechanical shifter, it is not possible for me to shift the front derailleur when in the drops, as I cannot apply strength to shift the front shifter lever. As for the rear derailleur, it is difficult to shift, as it takes quite a bit of finger stretching to reach the road shifter levers while holding the drops. Now, with the electronic Di2 shifters, it is easy to change gears any time you like! Even when in the drops, I am able to change gears by using just one finger, with very little effort needed. One way to describe it is to imagine clicking a mouse button.

Some wise people have said that if you do not want to be poisoned by electronic shifting, do not try a Di2 bike! If not it will be very difficult to shake off the poison...

The Ultegra Di2 components that I have is not the latest stock to come out from Shimano Japan, and thus the firmware in the components is not the latest version. One of the key feature of the Ultegra Di2 infrastructure is that the components can be reprogrammed through a firmware update, and also allows customization of certain functions. In order to update the firmware, we first need to download the E-tube program from the Shimano website. This is easily done. Next, we need to link the Di2 system on the bike to the computer. To do this, we need the Shimano PC Linkage Device, or SM-PCE01. For me, this is a pretty much one-time-use device, thus I just borrowed it from a friend instead of buying it, as it can be quite expensive!

What you will see below is the PC Linkage Device, and the Shimano program, called E-tube project.

The electronic box used to link up the Di2 system on the bike to the PC

Comes with the necessary wires to connect one end to the PC and the other end to the bike

Now, you may wonder where on the bike can I connect the wire? For this Di2 system, the wire can be connected to either the left or right shifters. Each shifter has 2 ports, one of them is for linking to Junction A, the other is left empty. The empty port can then be used to connect an auxillary shifter (such as SW-R600 that I am using), or be used to link to the PC. Since both the ports on my right shifter are already taken up, I connected the wire to the unused port on the left shifter (sorry no pictures here). From there, the whole Di2 system can be updated since they are all linked up! Each component (shifter, RD, FD, etc) has its own firmware version.

Upon starting up the program, you can choose which type of bike you are connected to. For now, only road (Ultegra & Dura-Ace Di2) and comfort (Alfine Di2) have electronic components. From here, we can see that in the future there will be MTB Di2!

Upon first connection, the program will check the Di2 system for its firmware version.

It has detected that the firmware version can be updated from version 1 to version 2

Firmware updating in progress...

Firmware update complete! All components now have the latest firmware

Updating the firmware has many advantages. First, it sorts out the programming bugs that may have been discovered in the earlier versions (not that I detected any). Next, it may enable (unlock?) new features that were not previously available! For firmware version 2, one major update is the ability to multi-shift just by pressing and holding a shifter button. Previously one click means only one gear shift, holding on to the button does nothing (except show the battery life on Junction A). With this update, holding onto the button can continue to initiate gear shifts!

As you can see below, there is an option to enable or disable this multi-shift feature. Of course I would want to enable it. There is a setting to customize the gear shifting interval. What this means is how fast it shifts across the gears during multi-shifting. There are 5 different levels; Very Slow, Slow, Normal, Fast and Very Fast. Setting it to slow means that holding on to the button will activate multiple gear shifts, slowly across the cassette. On the other hand, setting it to Fast will initiate quick multiple gear shifts. Basically this is set according to personal preference. I set it to Fast as it seems right for me.

The other setting is the number of gears it can shift during multi shifting. You can limit it to two or three, or set no limit. No limit means that pressing and holding the shifter button will shift gears all the way across the cassette, till the RD stops at either the low or the top gear. This is the setting that I am using.

The options available for multi shifting.

Besides updating the firmware, using the E-tube program also allows customization of the various buttons. Possible settings include the swapping the functions of the main and release buttons, or other unusual setups such as using the left shifter to shift the rear derailleur. This is all possible by reprogramming the buttons. Trying out these programming settings actually reminds me of setting up the controls on an Xbox console game!

I did not change the settings for the road shifter buttons, as I want it to remain similar to the mechanical road shifters. However, I swapped the functions for the satellite shifter. Now, the left button moves to a lower gear (towards left side of cassette) and the right button shifts to a higher gear (towards right side of cassette). The default setting was the other way round which often confused me.

 Reprogramming the individual shifter buttons is possible!

This programming ability of the Di2 system really allows the user to customize the system to exactly the way you like it. If you don't like the default button controls, you can reprogram the buttons to suit your needs. Also, it allows the firmware to be updated which can enable certain new features such as multi shifting. Who knows what additional features may be enabled in the future?

Polygon Cozmic CX 3.0: Bike Specifications

$
0
0
A new bike has joined the family! This time it is not a folding bike, but a mountain bike (MTB). This bike will serve to perform all the other tasks that my folding bikes cannot. This basically means non-paved paths such as off-road tracks. Not so much of serious off road trails like Bukit Timah, but just mild tracks such as the gravel paths around Pandan reservoir and such.

The bike that I bought is a hardtail Polygon Cozmic CX 3.0. This is the 2013 model, which means that it comes with improved components compared to previous years' bikes. The reason I chose this bike is because for the price of 1.1k, this is probably the best spec-ed bike you can find out there! Let us take a closer look at the individual components on this new MTB.

First, the drivetrain. It is a good 30 speed Shimano DynaSys drivetrain, with a mix of Deore and SLX components.

Deore crankset and FD, SLX RD.

A nice Hollowtech II Deore crankset, much stiffer than square taper cranksets. Worth the extra money. DynaSys 42-32-24T.

Front triple Deore FD. Solid performance for an affordable price.

Pretty high end SLX Shadow RD. This is the new 2013 SLX M670, with a new outer link design. This one is the normal version without the Shadow Plus clutch mechanism.

New RD hanger design! Direct mounting for the RD is possible, without the need for an extra plate as seen on conventional Shadow RD. Makes rear wheel removal easier. But this also means that it is not possible to mount non-shadow RD.

 This is the older SLX M660, with an extra link between the hanger and the RD as shown. Fits all bikes with conventional hangers.

Deore grade 10 speed 11-36 cassette, CS-HG62-10.

Comes with the new SLX SL-M670 shifters too! This version does not have the optical gear display.

 Shimano hydraulic brakes, BL-M445. Not the best around, but definitely better than the commonly found Tektro brakes.

 Shimano hydraulic brake calipers and rotors.

 Centrelock disc rotor mounting system, for ease of removal without having to unscrew all 6 bolts.

Rear brake caliper, mounted on the chainstay instead of the more conventional seat stay.


Shimano MT55 wheelset, decent performance for an affordable price.

Nothing much to shout about, but I'm not too particular about tires as long as it does not give me problems. May change these Kenda Kharisma II tires to some Schwalbe ones in the future.

 
This bike comes with a pretty decent suspension fork! A Rockshox Recon Solo Air. Would probably cost $300+ on its own.

A lockout switch is expected. But no remote lockout here.

100mm travel, more than sufficient for light offroad.

A simple table to help you set the air pressure in the air spring.

At the bottom of the right suspension leg, there is also a knob to control the speed of the rebound.


Here is a brief summary of the bike specifications:
Fork: Rockshox Recon Silver Solo Air, 100mm travel
Crankset: Shimano Deore FC-M590, 170mm, 42-32-24T
Front Derailleur: Shimano Deore FD-M590
Rear Derailleur: Shimano SLX RD-M670SGS
Cassette: Shimano CS-HG62-10, 11-36T
Chain: Shimano CN-HG54
Shifters: Shimano SLX SL-M670
Brakes: Shimano BL-M445, BR-M446
Wheelset: Shimano MT55
Tires: Kenda Kharisma II, 26" x 2.10

Entity brand stem, handlebar, seatpost and saddle. Ritchey headset. 

The stock pedals were pretty lousy, being flimsy with bad bearings, so I changed them out for a pair of Wellgo pedals that I had lying around. A bit small, but it will do until I find a pair of proper MTB pedals.


Overall, for this price, this bike comes with pretty good specs! It is a fun bike to ride, with the large wheels and suspension fork absorbing all the bumps. It offers something very different from my folding bikes.

Guide to Upgrading your Dahon / Tern Folding Bike

$
0
0
Do you own a Dahon or Tern folding bike? Do you want to upgrade the components on your folding bike? If the answer is yes, then you have come to the right place! On this blog, there is plenty of info for those who want to know more about folding bike upgrades. However, I also understand that most of the info is scattered all over the place, and that it can be difficult to find the answer to your upgrade question. Also, I have been receiving quite a few questions regarding upgrading a Dahon / Tern bike. Therefore, I have decided to create a simple guide for those who plan to upgrade their Dahon or Tern folding bike.

For real examples of upgrades, please refer to Dahon Boardwalk Di2 or Dahon Vitesse X20-TT for details.

Question: Can these bikes be upgraded easily? Dahon Eco C6 and Dahon Boardwalk D7

This upgrading guide is specially written for Dahon or Tern bike users, as I am more familiar with the folding bikes from those 2 brands, and have some experience myself in upgrading Dahon bikes. However, this does not mean that it is totally irrelevant to other folding bike brands! Some of the pointers may well apply to other bike brands, as many bicycle components are actually quite similar across brands and models.

For this guide, the different components that are available for upgrade will be discussed separately, along with my recommendations and the expected cost of upgrade. At the end of the day, this guide is meant to help you determine if the bike that you have can or cannot be upgraded easily, and at what cost.

Index:

a) Wheelset
b) Cassette
c) Crankset / Bottom Bracket
d) Rear Derailleur
e) Front Derailleur
f) Handlepost / Handlebar
g) Shifters / Brake Levers
h) Brake Calipers

Wheelset

The wheelset is one of the key components of a bike. With a good lightweight wheelset with smooth bearings, getting the bike up to speed definitely feels easier. However, this is also one of the main limiting factors for upgrade.

In terms of upgrade possibilities, there is a huge difference between a 7 speed and a 8 speed bike. This is because of the different freehub body on the rear wheel. For a 7 speed bike such as the Dahon Vitesse D7, DrHon Vybe C7, or Tern Link C7, it cannot be upgraded to 8 speeds and above without changing out the rear wheel which usually also means the entire wheelset.

However, if you get a 8 speed bike, such as Dahon Speed P8 or Tern Link D8, you can upgrade easily to 9 or 10 speeds. This is because 8/9/10 speed freehub bodies are the same, thus you can fit on 8/9/10 speed cassettes.

Stock wheelset from Dahon D7 series.

 Kinetix Comp wheelset, comes stock with Dahon 8 speed bikes.

Although the wheelsets look very similar, the freehub body length is different, which means a big difference in terms of upgrade possibilities.

Tern Link C7. Cannot upgrade to 8/9/10 speeds without changing the wheelset. However, it does have a standard DATT RD hanger which allows upgrades to the RD (more details below).

 Tern Link D8. Can upgrade to 8/9/10 speeds without changing wheelset. However it does not have a standard DATT RD hanger.

Recommendation:
Unless you are getting a basic bike with zero intention of upgrading your bike, you should get a bike model with at least 8 speeds. It is worth the initial investment as it allows you to transit from 8 to 9 or 10 speeds much more easily.

Take note that you can only fit front hubs with 74mm OLD, not the standard 100mm used by most full sized bikes. Thus your wheelset choices are pretty limited (but still much better than previously, where only Kinetix wheelsets are available.)

Cost:
If you have a 7 speed bike, you will need a new wheelset if you intend to upgrade to 8/9/10 speeds. A basic Kinetix Comp wheelset will cost at least $200 second hand, or $300+ brand new. Mid to high range wheels such as Wheelsport or Kinetix Pro cost $400-$600++. There are also high profile carbon wheelsets by Controltech that cost over $1000.

Cassette 

The cassette is the name for the collection of sprockets located on your rear hub. The number of sprockets determine the number of speeds that your bike can have. It is closely linked to the type of wheelset and freehub body that you have.

7 speed freehubs can only fit 7 speed cassettes, while 8/9/10 speed cassettes share the same freehub body dimensions. Thus if your wheelset can fit 8 speed cassettes, it means that you can also fit 9 or 10 speed cassettes on the same wheelset.

How do 8, 9 and 10 speed cassettes fit on the same freehub body length? This is possible as 9 speed sprockets and spacers are thinner than 8 speed ones, which allow 1 more sprocket to fit in the same space. Same concept for 10 speed cassettes, where the sprockets are even thinner and closer to each other.

Stock 7 speed cassette from Dahon Boardwalk (2010).

9 speed SRAM road cassette

Recommendation:
Nowadays, it is getting harder to find aftermarket 8 speed cassettes, as most of the market has moved to 9 speeds and above. Development for 8 speed drivetrain has mostly stopped. Thus, if you are thinking of upgrading from 7 to 8 speeds (with purchase of new wheelset), I would suggest going straight to 9 or more speeds. Although it is slightly more costly, you have a much wider range of shifters and derailleurs to choose from.

Choose an appropriately sized cassette for your riding style. If you do not have a powerful engine, you may want to get cassettes with a larger sprocket (Eg. 11-28T or 12-30T) to help you climb up the slopes.

Do note that when you change cassettes, the chain also has to be changed to match the speed. Do not use a 8 speed chain on a 9 speed cassette as there will be shifting problems and lots of noise.

Cost:
From $25 for a new 8 speed cassette to ~$60 for a Shimano 105 10 speed cassette. Higher grades of cassettes are available, but are much more costly. The main difference for the higher cost is reduced weight.

Crankset/Bottom Bracket

This is another component that many people like to upgrade. Not only can you save a surprising amount of weight, it can improve the pedaling feeling tremendously and also create a fresh new appearance for the bike. The crankset is one of the most important component on a bike in terms of appearance, as most people will look at the crankset when they first look at a bike.

Almost all of the entry to mid range folding bikes come with standard square taper cranksets with a square taper BB. Even high end folding bikes rarely use other cranksets due to cost. The square taper crankset has been around for quite a while, and is a standard on most bikes costing below $1000. The drawback of a square taper crankset is that the stiffness is not as good, as the bearings sit more narrowly inside the frame instead of outside the frame. Another reason is because a square taper BB has a narrower spindle than a Hollowtech II crankset, which means more flex. Weight is also much heavier as compared to newer cranksets.

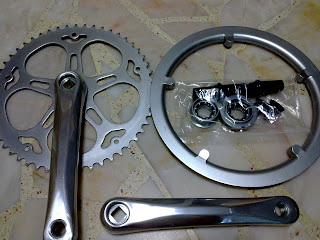
Stock square taper crankset + BB from Dahon D7 bike. Weight is around 1200 grams.

Shimano Hollowtech II crankset + BB. For Ultegra FC-6700, the weight including BB is around 800 grams.

Luckily almost all Dahon / Tern bike frames use standard BB shells on their frames, so it will take all BB with standard dimensions and threads. If in doubt, just consult a bike shop.

Recommendation:
When upgrading the crankset, go for something with quality as you can feel the difference and will appreciate the improved performance. No point changing from a square taper crankset to another square taper crankset, you will not find any big difference other than appearance.

Other middle range standards such as ISIS or Octalink are not commonly found, you are likely to be better off upgrading to a Hollowtech II system.

Cranksets that use outboard bearings include Shimano Hollowtech II or SRAM BB30. These new designs use outboard BB bearings for better rigidity and durability.

Go for a road crankset with 52T and more, as you will need the larger chainring for small wheeled folding bikes. Avoid MTB cranksets as the chainring is too small to give a good gear ratio.

Using 9 or 10 speed cranksets does not really matter, unless you are thinking of fixing a front derailleur. A 10 speed crankset will run an 8 speed chain with no major issue, although chain drop may sometimes occur.

Cost:
$100+ for a Tiagra 10 speed crankset, to $300+ for an Ultegra crankset. Higher end cranksets are lighter in weight due to hollow crank arms and better material used. Find one that suits the style and colour of your bike. Once again, if in doubt, consult the bike shop.

Rear Derailleur

This component is another hot component for upgrades. As the RD is closely linked to shifting performance, many people want to upgrade their RD when they upgrade their bikes with more speeds. Unfortunately for many Dahon / Tern bike users, upgrading the RD can be very troublesome.

Many Dahon / Tern bikes, from entry level to mid-high range bikes, such as D7 or even P9 series, use Dahon / Tern's proprietary Neos rear derailleur. This RD is designed by Dahon and used exclusively on Dahon / Tern bicycles. According to Dahon / Tern, this RD design allows for a low profile RD. You will notice that there is no regular RD hanger on the frame, but a special mounting point located on the chainstay for the RD.

So, if your bike comes with a Neos RD, it is likely that it does not have a normal RD hanger for traditional RD mounting. Sometimes you can find Dahon Speed P8 frames with a Neos RD, but also a RD hanger. This is not so common, probably only available for certain years' model.

In this case, how can you change your RD, since there is nowhere to mount a normal RD with DATT mounting? For Dahon steel frames (Boardwalk, Speed), you will need a third-party RD hanger to do that. For Dahon aluminium frames (Vitesse, Mu), the plate on the rear dropout can be swapped for a genuine Dahon RD hanger for aluminium frames. However, these mountings can be hard to find, thus posing a barrier to RD upgrade.

Some higher end Dahon frames (such as Vitesse P18 or Vector X10) have normal DATT RD mountings with Shimano rear derailleurs, so no problem with upgrading the RD. Ironically, the entry level Dahon Vybe C7A does not use the Neos RD, and thus it has a standard RD hanger which means an easy RD upgrade (although you need to change wheelset to upgrade to 8/9/10 speeds).

As for Tern bicycles, there is no proper RD hanger to use for now. No third party RD hanger is available currently for Tern bicycles, so you are pretty much stuck with the stock Neos RD unless your bike frame already has a normal DATT RD hanger. An example would be the Tern Link C7 or the Verge series of frames.

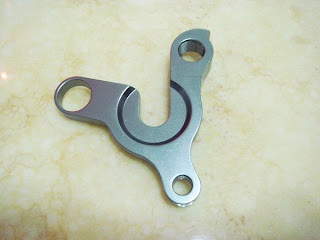
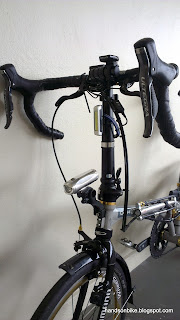
Stock Neos RD on Dahon Boardwalk frame. Notice the special mounting point for the RD. No standard DATT RD hanger!

The special RD hanger for Dahon Boardwalk/Speed frames. Mounts cleverly using the original Neos RD bolt hole and the frame eyelets.

Dahon Boardwalk frame with the RD hanger and the SRAM X-9 MTB RD.

 Dahon Vitesse with a proper RD hanger (bought from MBS), with a normal Ultegra RD.
 
Dahon Boardwalk with some gold bling! The RD hanger is essential if you want to change out your Neos RD.

That said, the stock Neos RD is actually pretty decent. It gives fast shifting, although the gears may sometimes make noise due to looseness in the RD construction. It is also a low-normal design, as opposed to the much more common top-normal design. The stock 7/8 speed Neos RD would probably work up to 9 speeds, but it will not give you optimum performance as it was not designed for 9 speeds (unless you have the premium Neos RD on a Link P9)

Take note that if you use the Neos RD with a conventional non-Dahon / Tern shifter, the gear number indication on the shifter will be reversed. Meaning that the lowest gear on the cassette will show up as gear 9 on the shifter (if a 9 speed shifter is used). Gear shifting will still work normally, only that the indication is reversed. This is due to the low normal construction of the RD (as compared to the common top normal RD construction.

Recommendation:
To avoid unwanted hassle when upgrading your RD, look for a folding bike that comes stock with a normal DATT RD hanger. This will save you the trouble when looking for the RD hanger when you want to upgrade. If you can obtain a suitable RD hanger (such as the RD hanger for Vitesse frames), then you are ready to upgrade!

As far as possible, get a road RD, as it has shorter cages that are more suitable for small wheel bikes. Long cage MTB RD should be avoided.

Short cage vs long cage RD.

Cost:
Around $25 for the RD hanger, that is if you can even find it in stock. Dahon RD hangers are sometimes available at folding bike shops such as MyBikeShop.

As for the RD, the cost can vary greatly. From $30+ for a 9 speed Shimano Sora RD to $100+ for an Ultegra level RD, they are all pretty decent. Just remember to get the correct RD for your speed, and also the appropriate shifter. Use road shifters for road RD, and MTB shifters for MTB RD. Also, do not mix RD and shifters from different brands as the cable pull ratio is different.

Front Derailleur

Most folding bikes do not come with front derailleurs, as they are not so crucial to the bike. Higher end models of bikes such as Dahon Vitesse P18 or Tern Verge P18 do come with front derailleurs for more speeds.

If your bike comes stock with a front derailleur, then upgrading the front derailleur is easy, just take out the current one and swap in the new one.

However, if your stock bike does not come with a front derailleur mount, adding a front derailleur is much more troublesome. You will need a FD adaptor, the most common one being the FD adaptor from Litepro.

FD Adaptor for Dahon frames. May also fit Tern bikes. The one on the left is for Speed/Vitesse frames, the one on the right for Mu frames.

 As mounted on the Dahon Boardwalk seat tube. Quite a bit of adjustment is required to get the setting right.

Recommendation:
A front derailleur is usually not crucial. Not an important consideration here, unless you are planning to ride the bike on a variety of terrain, with lots of up and down slopes. In that case, get a bike with a front double crankset. Saves you a lot of time and money as compared to upgrading from front single to front double later on.

Note that not all bikes can be retrofitted with an FD adaptor. Although the Mu frame can technically fit an FD adaptor, it is difficult to mount a FD properly due to the tight frame clearances.

Cost:
$30 for a Shimano Sora FD, and $50+ for an Ultegra FD. Front derailleurs are very affordable, and performance is quite similar across the price range. You will not go wrong with a Shimano 105 FD, the most value for money road FD. Stick to front double FD as Dahon / Tern folding bikes cannot accommodate front triple cranksets. Also, use road FD and not MTB FD.

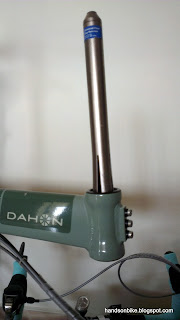
Handlepost/Handlebar

At first glance, this may not seem to be important, as most people will look at the other components when checking out the bikes. However, folding bikes are not normal bikes. Due to its nature of a small frame and the folding feature, practically all folding bikes use a special folding handlepost. Dahon was the first to come out with their hugely successful Radius V handlepost, which combined stiffness and easy folding in one elegant package. Recently, Tern built on the concept and developed the Physis handlepost, which was even stiffer than the Dahon handlepost, but also came with a weight penalty.

As long as you buy a Dahon or a Tern folding bike, you can be sure that you are getting one of the better folding handleposts out there. Higher end models may have a stiffer design, but even the entry level designs are pretty good compared to other folding bike handleposts.

Now, for the tricky part. Although folding handleposts from Dahon and Tern look similar, they are not built the same! 
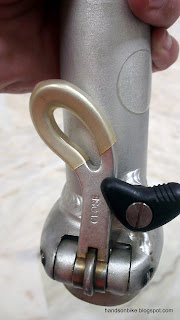
The key part to take note here is how the handlebar is fixed to the handlepost. There are many different systems in use, which will affect the type of handlebar that you can use. Some systems allow any handlebar to be used, while others only allow flat handlebars.

Standard handlepost clamp seen on most Dahon bikes. This clamp opens up fully, so you can also install a bullhorn bar or a drop bar directly in the clamp.

Dahon handlepost clamp that opens up to accept any handlebar.

Handlepost clamp found on the Verge P18. This design is a closed clamp which does not open fully. As such, it can only accept flat handlebars as it is not possible to fit the curvy bullhorn bar or drop bar into the clamp.

This is a feature that is always overlooked when getting a new Dahon / Tern folding bike. If you intend to change out to a bullhorn bar or drop bar in the future, it is best to have a handlepost clamp that can be opened fully. If not, it will be difficult to change to a curvy handlebar.

Fortunately, there are workarounds to this problem. 
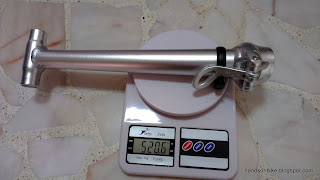
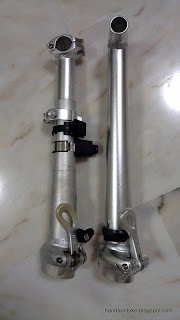
It involves getting a stem that can also modify the reach at the same time, such as the one from Litepro. As the 2 sides of the stem can be separated, they can be threaded through the curves of the bullhorn or drop bar. The entire stem can then be fixed onto the handlepost clamp.

Litepro Stem used to modify the reach on Dahon / Tern folding bikes.


How it looks like when mounted on a Dahon handlepost clamp. 
 
Recommendation:
If you intend to stick to flat handlebars, it does not matter which handlepost you have. However, if you intend to change to bullhorn bars or drop bars in the future, this may pose a problem if you have a closed clamp such as that found on some Tern handleposts.

With the Litepro stem as a workaround, you can still install a curvy handlebar. However, do note that it will also affect the reach at the same time. The stiffness of the handlebar will decrease as there is now one more part linking the handlebar to the handlepost. Usually this will not pose a major issue, unless you are unable to find the stem or if the stem slips/rotates in the handlepost clamp.

Cost:
>$100 if you change out the handlepost, such as from an adjustable 2 piece handlepost to a stiffer 1 piece handlepost. $40 for the Litepro stem, and $40 and above for a bullhorn / drop bar.

Shifters/Brake Levers

This is the component that you operate with your hands whenever you ride the bike, unless you ride a single speed or an automatic 2-speed hub such as the Tern Verge Duo. Folding bikes nowadays typically come with 7 speeds for entry level models, up to 20/30 speeds for top end models. To change gears, there are a few type of gear shifters.

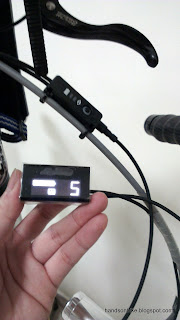
1) Revo / Gripshifts

 Gripshift by SRAM that comes stock with many Dahon / Tern bikes.

Gear changes are made by rotating the gear shifting grip on the handlebar. Found commonly on 7 and 8 speed folding bikes. Advantages of these are that it is lightweight and does not protrude out from the handlebar too much which makes it easier when folding. However they are tricky to operate when travelling at higher speeds, as you do need to relax your grip before shifting.

2) Trigger shifts

Shimano XT and SRAM X9 trigger shifters.

The thumb and index finger will push levers that change gears. Found on almost all mountain bikes, but are rather uncommon on Dahon / Tern folding bikes. Many people upgrade to these as they offer a good and ergonomic gear shifting experience. Comes with some mid-range folding bikes such as Dahon Vitesse P18 / Tern Verge P18.

3) Road Dual Control Levers (DCL)

Shift by pushing the main or release lever inwards with the fingers.

Road shifters used on bullhorn or drop bars. Most of the models combine shifting and braking functions together in the same part, hence dual control levers. Comes standard on folding bikes with drop bars / bullhorn bars. Cannot be used on flat handlebars.

4) Bar end shifters

Bar end shifters. Flick the lever up or down to change gears.

Quite uncommon nowadays, but still popular with some people due to its small size and retro feel. Fixed onto the end of bullhorn or handlebars. May be tricky to use as it involves taking your hands away from the brakes or grips when shifting. Does not come with any Dahon / Tern folding bikes.

Brake Levers
As for brake levers, you can use practically any flat handlebar brake levers you want. No major compatibility issues here. Better brake levers are priced accordingly, because of better build quality. They offer a smoother and stiffer braking feel, as compared to spongy and flexy entry level brake levers found on many stock bikes. A good brake lever does not wobble on its axle.

Recommendation:
There are 2 main categories of shifter upgrades, namely flat handlebar trigger shifters or drop bar road shifters.

When upgrading shifters, you will need a shifter that is compatible with your RD. Use shifters and RD from the same brand, do not mix and match as they will not work properly together. When upgrading the number of speeds, such as from 8 to 9/10 speeds, there are a few components that must match.

Shifter, chain and cassette must be of the same speed. No compromise here. If you change from 8 to 9 or 10 speeds, the shifter, cassette and chain must all be upgraded at the same time. As for the RD, you might be able to get away with using a 10 speed RD with a 9 speed drivetrain, but performance will not be optimum. Crankset should also be changed to the appropriate speed, but usually you can get away with mismatched cranksets (Eg. 8 speed crankset with 9 speed drivetrain), unless you want to install an FD.

For road shifters, they come with the brake lever, and these brake levers are designed to be compatible with caliper brakes and not V-brakes. Thus when changing from flat handlebar brake levers to road shifters/brake levers, it is best to also change the brake caliper. This will be further explained at the brake caliper section below.

It is suggested that during your upgrade, do change to 9 or 10 speeds as there are many more choices of shifters available as compared to 8 speeds.

Cost:
For flat handlebar shifters, costs varies from $110 for a pair of Sora SL-3500 9 speed shifters to $140 for a pair of Tiagra SL-4600 10 speed shifters. If you only need the right side shifter for the RD (no FD), then you may be able to get only the right side for a lower price online.

As for road shifters, they cost much more as the technology is more advanced, with more parts in the shifters. Also, brake levers are integrated with the shifters. Prices start from $200 for a pair of Sora ST-3500 9 speed shifters to $400 for Ultegra ST-6700 10 speed shifters.

 Shimano Tiagra SL-4600 10 speed road flat handlebar shifters. Compatible with all Shimano 10 speed road RD.

Shimano Tiagra ST-4500 9 speed road shifters / brake levers.

Second hand prices can be quite a bit lower, such as $200 for a pair of Shimano 105 ST-5700 shifters ($300+ new).


Brake Calipers

Most folding bikes come with V brakes, as V brakes are easily compatible with flat handlebar brake levers. Caliper brakes are pretty rare on Dahon / Tern folding bikes, as caliper brakes are designed for road shifters / brake levers, which are not common on folding bikes.

V brakes are usually sufficient for everyday use. They are lightweight and pretty powerful. Caliper brakes should be used only with road shifters, but not all frames can accommodate caliper brakes.

 V brakes on the Dahon Boardwalk.


 Caliper brakes on the same Dahon Boardwalk.

Recommendation:
As long as you are using flat handlebars with flat handlebar brake levers, you should just stick to V brakes. There is no point changing to caliper brakes if you are doing fine with V brakes. I strongly suggest upgrading from the stock brake levers and brake calipers to better ones, as this will greatly improve the braking performance and feel. Decent aftermarket brake levers and calipers are relatively cheap, so it does not matter too much if the folding bike has poor stock brake levers and calipers.

If you have changed your folding bike to use bullhorn bars / drop bars with road shifters, then you are strongly encouraged to change to caliper brakes if possible. If you stick to V brakes, the braking performance will be poor as road shifters are not compatible with V brakes. Please refer to these posts for more details about brake compatibility and how to install caliper brakes on your Dahon / Tern folding bike.

Road shifter with V brakes and Travel Agent
Road shifter with Caliper brakes

Cost:
$26 for a pair of Deore V brakes, which are honestly good enough for folding bikes. For best performance, also upgrade the brake levers at the same time ($40 for a pair of Deore brake levers).

As for caliper brakes, they cost much more, and you cannot use caliper brakes with standard reach for most Dahon / Tern folding bikes, as the rim is too far from the caliper brake mounting points. The only caliper brakes that have sufficient reach are the Tektro R559 extra long reach caliper brakes, which cost about $80.

Conclusion

After reading through this long article, you should now have a better idea of what can be upgraded on your folding bike. Some upgrades are cheap and good (such as better brake levers and calipers), while others are more pricey (wheelset and crankset). Upgrades to the number of speeds will involve the entire drivetrain (RD, FD, shifters, cassette, chain and possibly crankset and wheelset), and also involves compatibility issues.

If you are buying a folding bike for the first time, this article will let you know what are the critical components to look out for, so that it is easier for you upgrade the bike in the future. Remember, if you are not sure, just ask for guidance from others with more experience, or go to the bike shop and let them know what you want. They will be more than willing to give you advice.

Geeego Swap Colour Bicycle Light

$
0
0
Recently came across this pretty interesting bicycle light. What is so special about this light is that you can swap between white and red coloured light easily, just by rotating the red plastic piece on top.

Simple packaging

Uses 2 X CR2032 batteries. The LEDs are very bright for its size!

Comes with 2 silicone straps so that you can mount the light anywhere you like.

This is the white light mode. To turn it on/off or switch modes, press the black button in the middle.

By rotating the red plastic piece so that it covers the LEDs, it becomes a red light.

I find that its small size and its ability to switch between white and red coloured lights means that it is very useful as a spare light. If your front or rear light runs out of battery, just use this as a replacement until you get home.

For me, I strapped it around my rear rack, but it will not be switched on normally. In case either my main front or rear light is low on power, I will then use this light as an emergency light if needed. Probably not a good idea to chuck it in a bag as the exposed switch may be pressed accidentally. As it is so small and lightweight, just strap it anywhere on the bike until it is required.

Shimano Saint MX80 Pedals

$
0
0
New pedals for my Polygon mountain bike! The stock pedals that came with the MTB was pretty bad, so I had changed it to the Wellgo M142 pedals even before the bike left the bike shop. However, the Wellgo pedals are actually just a temporary solution. Although they are good pedals, they are not very suited to a MTB as the platform is rather small, and it is difficult to get a firm footing when the bike is bouncing up and down kerbs. So even as I was riding the MTB, I was also looking for a better pair of pedals.

Came across the Saint MX80 pedals, which are plenty big and solid. Not the lightest pedals around, but it makes up for the extra weight with its extra strength. After all, if these pedals are good enough for downhill racing, it is definitely good enough for casual off road riding.

Comes in a pretty solid packaging

The official weight of the pedals

Comes in individual plastic packaging

Ta-da! The rugged looking pedals with a golden touch at the axle area

Plenty of pins on the pedals! One of the useful feature of these pedals is that the pins are screwed in from the back. So even if you break the pin due to a rock strike, you can still unscrew the broken pin from the back and replace it.

The additional pack of pins and washers for the pedals. The pedals come stock with only 7 pins on each side installed, the other 2 pins are not pre-installed. Washers are used to vary the height of the pins. Total of 9 pin locations on each side of the pedal.

All the pins removed! I want to avoid shin and calf injuries caused by pedal pins. Those really hurt! Although grip is reduced, my pain is also reduced.

Side profile of the pedal. Slight concave shape to help keep the foot on the pedal.

Weight of the pedals without the pins. About 460 grams for a pair.

How it looks when installed on the bike.
 
A bit of design mismatch between the pedals and the crankset, a Deore crank matched with Saint pedals. But it works well!

Big solid platform pedals for my foot to rest on.

With these pedals, now it looks more like a proper MTB! The white printing on the pedal also matches the white accents on the bike frame. 
 
Took the bike for a quick spin, and the new pedals feel good! I can feel a much bigger and more stable platform for me to pedal on, especially when I am pedaling standing up. Simple upgrade, but useful! The touch points on the bike (saddle, grips, pedals) are important, and are worth upgrading if it improves your riding comfort.

Handlebar Extension Mount

$
0
0
Is your handlebar overcrowded? No space to add more accessories? Then you will need a handlebar extension mount! Normally MTB handlebars are pretty long, at >650mm long, so there is no problem putting multiple lights / bell / speedometer / GPS / speaker and etc all onto the MTB handlebar.

However, road handlebars such as drop bars are much narrower, at <440mm wide. This means a very limited space on the handlebar for you to mount accessories. Of course, you wouldn't usually mount many items on a drop bar, since a bike with a drop bar is probably meant to go fast and it would have a minimum number of accessories on it.

For my Dahon Boardwalk, I am using a drop bar, and the space on the handlebar is quite restricted. As you can see from this picture, I have secondary brake levers, which takes up quite a bit of space. Also, I have the satellite shifter for my Ultegra Di2 system, which takes up the entire right side of my handlebar. The Cateye Strada Wireless speedometer takes up some of the remaining space on the left side of the handlebar.


Very limited real estate space on my handlebars.

Besides the powerful Lezyne Super Drive XL front light that is mounted on the front fork, I have also installed a Cateye front blinker on the handlepost. You can spot it at the pictures above. This means that the front lights are already located away from the handlebar.

I have a new accessory that I plan to install on the handlebar, but given the limited space, where can I install it? The Di2 satellite shifter cannot be moved, and the speedometer needs to be there or I will not be able to see and use it. The only solution I can think of is to create more space on the handlebar! But how?

This situation calls for the handlebar extension mount! I think this is the generic name for this type of handlebar extension, as there is no standard name for it. Let's take a look at what it is and how it works.

Handlebar extension mount. Comes with an aluminium clamp for 31.8mm handlebars, a 22.2mm carbon fibre tube and 2 sets of shims (for 25.4mm and 26mm handlebars).

The carbon fibre tube is of diameter 22.2mm, similar to the diameter of a flat handlebar. If you need a longer one, just cut from a standard handlebar.

 Side view of the installed extension mount.

The base of the extension mount is clamped onto the handlebar. My Cateye speedometer takes up half of the extension.


 Half of the extension mount is now unused. Awaiting the installation of a new accessory!

Many people have asked about the handlebar extension mount, and where it can be found. Since I am not sure where it can be found locally, and I have no time to go search for it, I decided to search and buy it online. Here are 3 sources where you can get the extension mount.

Dashboard Genie by BDOP Cycling
Quite pricey, but the quality is good. Ships from Taiwan via FedEx and is super fast. I got the mount from this website.

Pro Carbon Computer Mount
Exactly the same mount, ships from US, and thus will be pricey and also take longer.

From Taobao
I only found this at Taobao after I had already ordered from BDOP Cycling. This is cheaper, and the anodised coloured aluminium mounts look really good. Great for adding some coloured bling to your bike!

So what is the accessory that will be installed on the extension mount? It is not a Garmin GPS unit or a GoPro camera (although these are good suggestions!). It will be revealed once the trial is successful!

Journey of the Boardwalk: Part 29 - Alfine Di2 Digital Gear Display

$
0
0
When you ride your bike, do you check the gear display on your shifters? For road bikes, the higher end Shimano models (105, Ultegra, Dura-Ace) do not have gear displays, whereas the mid range components (Tiagra, Sora, Claris) have a gear display to let you know which gear you are in. The reason for the lack of gear displays on higher end models is because of weight savings, and also because riders who use high end components are presumed to be more professional, and thus do not need a gear display to tell them which gear they are in. They just shift the gears according to how it feels while riding.

Same for mountain bike shifters. High end mountain bike shifters such as SLX, XT and XTR have no optical gear displays (or have removable versions), as the riders are unable to check the gear display anyway when they are bouncing along the trail and tackling tough off-road conditions.

It has been almost 3 months since I upgraded the components on my Dahon Boardwalk to the Ultegra Di2 system. During this time, I have had plenty of chances to test out the system and get used to the new system. However, the system is not complete yet. Although it is fully functional, there is actually one more component (optional) in the Di2 system that has not been installed yet.

This component is the digital display of the Alfine Di2 system. Strictly speaking, this digital display is not part of the Ultegra Di2 system. The original Ultegra Di2 system is a road system with no gear display. Besides the Ultegra/Dura-Ace Di2 system, there is also the Alfine Di2 system.

Alfine Di2 is designed more for touring or urban bikes, with a rear internal hub. With Alfine Di2, shifting the internal hub is now even easier, as it is an electronic gear shifting system. This digital display comes with the Alfine Di2 system, providing a clear gear display for the rider. Through experimentation by other users, it is found that the Alfine Di2 digital display can actually be used on the Ultegra Di2 display. This is probably because of similar system architecture between the two Di2 systems.

Alfine Di2 Digital Display. Individual packaging.

 Only the display inside! Model number is SC-S705.

Small display size, with the Alfine name on top of the LCD screen.

 2 ports on the display. This display is connected in series on the Ultegra Di2 system. As such, one of it is the IN port, the other is the OUT port. Either port can be used as the IN port.

The special cable ties and rubber shim that comes with the display. Used to mount the digital display onto the handlebar.

One problem I faced when connecting up the display is that I need an additional wire! As this display will go between two components, one additional wire is needed to connect up the system. I had to borrow an extra wire to try out the system.

Also, it was not clear where the display should be installed in the system. There is no manual as this display is not officially part of the Ultegra Di2 system. Initially I thought it should be installed between the right shifter and Junction A. However, when I connected it up that way, the shifting still works but nothing is displayed on the screen. Subsequently I connected it between Junction A and Junction B, only then did it work and display the gear number!

Yes it works! The screen came alive!

So, the Alfine Di2 digital display needs to be connected between Junction A and B. The good news is that I don't need to remove my bar tape to re-route the wires. The bad news is that not only did I need an extra wire (which should have come with the display), I need a new longer wire between Junction A and B!

The current wire length between Junction A and Junction B is already a pretty long 1200mm. However, since the wire (between Junction A and B) now needs to go into the display before the display connects to Junction A, I need a longer (1400mm) wire! An additional wire of 300mm is also required to connect from the display to Junction A.

Normal Ultegra Di2 wiring on my Boardwalk:
Junction B > (1200mm) Junction A > L&R Shifters

Ultegra Di2 wiring with Alfine Di2 display:
Junction B > (1400mm) Alfine Di2 Display > (300mm) Junction A > L&R Shifters

Thus I had to wait while I ordered the 2 new wires (300mm and 1400mm) from Evans Cycles. Finally, after about 10 days, the new wires have arrived!

2 new wires (300mm and 1400mm) from Evans Cycles

With these new wires of proper and suitable length, I could finally wire up the Di2 system properly. At the same time I also changed the outer casing for the rear brake from grey colour to black, to better camouflage the Di2 wires.

Before: Testing the Alfine Di2 display with inappropriate wire lengths, messy!

 After: With the new wire lengths, the wiring is now neater than before.

The wire from Junction B first goes up to the digital display located on the handlebar extension mount, before another wire connects from the display down to Junction A.

The digital display is fixed to the extension mount by the use of cable ties. I did not use the special cable ties that came with the display as I found that normal cable ties are good enough.

Wires running in and out of the digital display

 Alfine Di2 display right in the middle of the handlebar, above the handlebar clamp.

Wires running around Junction A.

So, what is so good about this display? The main attraction for me is that it looks really good! As you will see in the pictures below, the gear display is really bright and sharp, and gives a really nice high tech feel to the bike. In fact, it looks much better when you see the real thing as compared to seeing it in the picture.

It is also very useful at night, where all other gear displays cannot be seen properly as they are not lighted. Besides showing the gear number, it also has a battery indicator. Probably not so important, as you can already use Junction A to check the battery life. But a nice touch of convenience nonetheless.

For the racers who don't need a gear display, this would not be a useful accessory. But for myself, I still frequently check the gear that I am currently pedaling in. Before I got the display, I would try to identify the gear by looking downwards and back at the cassette, but this is tricky and difficult. With such a prominent gear display right in the middle of the handlebar, checking the selected gear is now super easy!


Displays the current selected gear on the cassette. 

I love the secondary cockpit on my Boardwalk handlebar! With additional secondary brake levers and satellite shifters, I get both a road bike and a flat handlebar setup on the same bike.

Clean cable and wire management on my Dahon Boardwalk. With only one cable+wire running to the rear of the bike, it eliminates messy cabling!

Of course, there are also downsides to having the Alfine Di2 digital gear display. For one, the battery life will be shorter, since the display also consumes some power. Not sure how much it will affect the battery life, it can only be found by experimentation. In any case, the digital display only turns on when you shift gears, and it will turn off after a few minutes of inactivity. I'm loving the new Alfine Di2 Digital Gear Display on my Dahon Boardwalk!

How to Convert Shimano Shadow Plus RD to Direct Mount (Shimano SLX RD-M675)

$
0
0
Recently, Shimano came out with a new RD mounting standard called "Direct Mount". What it does is to free up space around the rear dropout area, allowing frame designers more leeway to design a larger thru-axle or to play around with the frame geometry. As a bonus, this direct mount design also makes it easier to remove the rear wheel, as there is a clearer path for the wheel axle to exit the frame dropout.

Polygon MTB frame with Direct Mount RD dropout

As you can see from the picture above, the Direct Mount RD hanger sticks out behind the frame dropout, making it easier to remove the rear wheel without the hanger or RD getting in the way.


The Polygon Cozmic CX 3.0 MTB that I got a couple of months ago came with this type of RD mount. It was equipped with a Shimano SLX M670 Shadow RD with Direct Mount. This gave me a chance to learn more about this type of RD mounting.

The SLX RD that came with the bike is the new SLX M670 RD, but it is not the Shadow Plus version with the clutch. To learn more about the Shadow Plus technology, click here. As for myself, I was also quite curious about the Shadow Plus technology, having heard about it but not had the chance to try it out.

The Shadow Plus RD was first introduced at the XTR level about 2 years ago, but its price tag made it prohibitively expensive for most people. Luckily for us consumers, the Shadow Plus technology has been trickling down the product lineup of Shimano, and for 2013, SLX also has the Shadow Plus version of the RD! In fact, it will also be available for Deore in 2014, making it affordable for a much larger market.

The new SLX RD comes with a standard RD mounting, but with an option to convert to Direct Mount. Since I also wanted to try out the Shadow Plus feature, I decided to buy a SLX Shadow Plus RD, so that besides trying out Shadow Plus, I can also learn to convert the RD from standard mounting to Direct Mount.

Ordered from CRC. Came in a special shrink-wrapped packaging. Guess it was repackaged from OEM stocks.

Comes with the standard RD mounting as seen from the mounting bolt at the top of the RD.

Rear view of the SLX RD-M675.

 Shadow Plus switch set to OFF

Switch set to ON position! One way clutch activated.

Now, in order to mount the new SLX RD on my Direct Mount dropout, I will need to convert the mounting on the RD, from the standard mounting to the new Direct Mount.

Without removing anything, this RD can be bolted onto a standard RD hanger, but not a Direct Mount RD hanger.

To convert to Direct Mount, the extra link plate shown needs to be removed.

First, use a flat tool to pry open the E-ring. Surround the E-ring with your hand so that the E-ring doesn't spring away and disappear.

How it looks with the E-ring removed

Next, unscrew the bolt shown above with an M5 Allen key. Note that this bolt is VERY tight!

With the bolt unscrewed but not removed yet.

From left to right: Spacer, link plate, bolt, E-ring. May differ between different RD models.

With the extra link plate removed, this is how it looks like.

Finally, put back the bolt that was just removed. The RD has been converted into a Direct Mount RD!

When installing, first remove the bolt from the RD. Slide the RD onto the Direct Mount RD hanger as shown.

Once the holes are aligned, put back the bolt and screw it onto the RD hanger as per normal.

Ta-Da! New SLX Shadow Plus RD with Direct Mount. Looks sweet!

Shadow Plus switch on the RD. Currently in OFF mode.

I have not had the chance to bring the bike out onto the trails, to try out the Shadow Plus feature. Will write another post about the Shadow Plus feature after some testing. Also, in the next writeup I will also show how to adjust the clutch mechanism inside the Shadow Plus RD. Watch this space!

Moon Comet Front Light Review

$
0
0
As you may already know, I am always interested in bicycle lights. No matter how many lights I already have on my bikes, I will still want to check out new lights to see if they are better than what I already have. It seems that the recent trend for bicycle lights is to use USB recharging, so that there is no need to keep changing batteries when the light goes dim. For myself, I try to use lights that can use standard rechargeable AA or AAA batteries, while minimizing the use of lights that use button cells.

At the recent OCBC Cycle exhibition, I came across this new brand of lights called "Moon". Although I have read about the brand in magazines, I did not know much about the lights until then. What surprised me was how bright it was, given its small size! Let's take a look at the Moon Comet Front Light which I bought.

Transparent packaging showing the product clearly

6 different lighting modes, each with its estimated runtime

Diagram showing the spread of light at different distances.

The accessories that came with the light. A standard mini USB cable for charging, plus a rubber strap mounting.

The power button located on the side of the light. Pressing on the button for 1.5 seconds turns the light on or off.

New type of LED packaging technology, called COB (chips on board) LED. 
Read more about it here and here.

This is the special LED that caught my eye, and this is what differentiates it from the other thousand and one lights out there. The traditional LED is a single chip that sits within a small bulb, and it can be found on almost every other LED light out there.

However, the new COB LED technology used in this Moon Comet front light embeds these LED chips within a panel, creating a flat light source and high chip density. What this means is more LED chips within the same amount of space, enabling higher brightness and more uniform lighting. On this light, there are 32 LED chips embedded in the panel.

Rubber cover for the USB charging port.

USB port covered to protect against dust and rain.

Very impressive lighting!

This light has 6 lighting modes, which can be separated into 2 different types, constant and flashing.

For constant mode, you can choose between 20%, 50% and 100%. 20% is quite OK for city use where the path is well lighted. 100% is really bright and is surprisingly blinding. Good enough for on the road usage. 50% is for anything else in between.

As for the blinking mode, there are also 3 types. Flashing at 50% brightness, flashing at 100% brightness, and a strobe type of flash. For myself, I use 50% flashing when I cycle on the road, as it gives me a good balance between brightness and runtime (up to 5 hours). I find that the strobe mode which flashes something like 5 times per second is too seizure-inducing to use. It is probably useful if you wish to irritate somebody with this light.

 Orange LED showing the battery level of the light. When it blinks, it is time to charge the battery.

Mounted vertically on my handlepost. It can also be mounted horizontally by rotating the light 90 degrees.

This light suits a folding bike well as it can be nicely mounted on the handlepost, freeing up space on the handlebar.

Gives off a uniform glow that has a wide viewing angle, without the use of any reflectors. Note that even my shifters which are way off to the side of the light has a shadow cast on the wall.

Soft glow when projected against the wall

What I like about this light:
1) Small and lightweight.
2) Wide viewing angle. Great as a to-be-seen light.
3) USB charging. No need to bother about batteries.
4) Versatile rubber mount. Can be mounted almost anywhere on the bike.
5) Sturdy casing, feels well built and not flimsy.
6) COB LED packaging gives off a nice glow that looks like a solid bar of light.
7) Many different lighting modes to suit different riders/situations.

What I dislike about this light:
1) Runtime is a bit too short. Charging is probably required after every 2~3 night rides, depending on the length of the ride. A bit troublesome to keep removing the light and reinstalling on the clamp.
2) Rubber seal for USB port feels a little loose. May not be able to keep out the rain effectively.
3) Difficult to switch between modes easily.

To elaborate on the switching of modes, the modes are separated into two different groups, constant and blinking. When you are in the constant mode, pressing the power button for 0.5 seconds will cycle through the 3 constant lighting modes. Same for when you are in the blinking mode. However, the tricky part is switching between constant and blinking modes. It seems that you need to press for 1.5 seconds to switch between modes. Sounds easy according to the manual, but for me, it operates rather inconsistently. Sometimes it works, sometimes it just turns the light off. Even now I find it difficult to switch quickly between modes, most of the time it is trial and error.

This light cannot be used as a to-see light, as the light beam is too diffused to light up the road effectively. However, because of the diffused lighting, it is great as a to-be-seen light as you can be spotted easily due to the wide viewing angle.

Overall, I am quite pleased with this light as it replaces my previous to-be-seen light by Cateye. Not only is this light brighter, it also looks much sleeker on the handlepost. For those who are interested in this light, it also has a rear version with red COB LED.

How to Install LitePro Headset for Dahon Bikes

$
0
0
The headset on a folding bike is rarely upgraded, as it is not considered an important part of the bike. However, the headset on a folding bike is under greater stress than conventional road bikes or even mountain bikes, due to the long handlepost fixed onto the bike. With this long handlepost, a lot of torque is exerted on the headset when the rider pulls on the handlebar. Thus it is important that the headset is regularly checked to ensure that it is turning smoothly with no excessive tightness or looseness.

I noticed that the Vitesse X20-TT has a headset that seems a bit worn out. When turning, the bearings feel notchy, and it is not possible to turn the handlebar more than 45 degrees to either side without the headset getting jammed. Riding the bike is still possible, as there is usually no need to turn the handlebar more than 30 degrees either side. However steering while pushing the bike is a problem as it can be difficult to turn the handlebar properly.

Due to this reason, I decided to change the headset for the Vitesse. Previously my Boardwalk also had its headset changed, along with the fork. The operation was done at MyBikeShop, as I did not have the proper tools or the skills to perform the change of headset. However I did learn how to change the headset by watching how it was done. Usually there is no need to change the headset unless it is really spoilt.

This time, I managed to borrow some headset tools that is required when changing the headset. These tools are pretty heavy and expensive, and they are also rarely used so there is no need to own a set of them unless you own a bike workshop. I borrowed the tools so that I can try changing the headset at home instead of bringing the bike down to the bike shop.

The new headset that I am going to install will be a LitePro headset. These headsets are specially made for Dahon bikes, as conventional headsets will not fit due to the extra large headtube on the Dahon frames. Both the steel and aluminium frames use the same headset.

LitePro headset in silver colour

Laser etched logo on the upper cover

The full set of headset parts

 This is the crown race, it sits on the steerer tube on the fork.

This is the compression ring, it sits on the top bearing, between the bearing and the upper cover. This part ensures a tight fit between the bearings and the steerer tube.

Bearing cup and sealed angular bearings. Same size for the top and bottom bearings.

 Upper cover. Provides a stable platform for the handlepost to rest on the headset.

Before installing the new headset, the current stock headset has to be removed. I feel that removing the headset from a bike is the most difficult operation of all, even harder than removing a square tapered BB from the frame.

First, mount the bike onto a workstand by the seatpost. If possible, rest the front wheel on the floor to provide more support. Next, the handlepost needs to be removed. Here is a step-by-step picture guide.

Use a M6 Allen key to loosen the clamp at the base of the handlepost.

Use a M10 Allen key to loosen and remove the compression bolt.

Compression bolt removed. Note that there is a brass shim under the compression bolt.

Lift off the handlepost, here you can see the black plastic headset upper cover. Place the handlepost + handlebar nearby on a stable platform. Take note not to overstretch the front brake cable as it is still connected.

Pull out the fork from the bottom of the headset. At this point the front wheel is still fixed onto the fork. You may find it easier to remove the front wheel when working on the fork.


There is a rubber seal resting on the crown race of the fork. Use a flat blade to remove it.

Those were the easy tasks! Now we will need to remove the bearings, bearing cups and crown race. From here on the operation will be more tricky and challenging.

Leave the fork aside for the moment, the crown race can be removed later on. Now the bearings should be removed from the bearing cups.

Use a flat blade to remove the circular spring clip that keeps the bearing cover in place.

Upon lifting the bearing cover, you will see lots of small individual ball bearings! Remove all of them using a magnet so that they don't drop all over the floor.

This is what you see when you remove all the bearings. What remains is the bearing cup.

After removing all the bearings on top, invert the bike frame and do the same for the bottom side. When all the bearings have been removed, what is remaining should only be the bearings cups in the head tube.

To remove the bearing cups, we need to use the head cup remover. This is a tool with split ends so that it will rest on the inside ledge of the bearing cups.

Universal Head Cup Remover

Split ends which will conform to different bearing cup diameters.

To remove the bottom bearing cup, insert the tool from the bottom and pull upwards.

If done correctly, the split ends will now rest on the inside of the bearing cups.

At this point, heavy knocking is needed to knock out the bearing cup. Use a mallet or hammer and knock on the top of the head cup remover. You will need a second person to help you hold the frame so that it doesn't move around. It can be rather difficult to knock out the bearing cups as they are press fitted into the frame.

Once done, flip the bike upside down and do the same for the other bearing cup.

Both bearing cups removed! Clean the inside of the headtube and apply some fresh grease.

Just for additional info, the bearing cups are press fitted into the head tube. Thus the bearing cup is designed to be slightly larger than the headtube, so that they fit snugly. The interference diameter will be around 0.1mm.

Inside diameter of headtube.

Outside diameter of LitePro bearing cup. Slight interference.

Lube the interface between the frame and the bearing cups for easier seating of the cups.

The bearing cups cannot be installed by hand, as it is too tight. A bearing cup press is required to set the cups properly. Do not knock in the cups using a hammer or other DIY tools, as it will damage the cups or frame, causing the bearings to malfunction also. You must use the bearing cup press to properly seat the bearing cups.

 
Bearing cup press. Yet another heavy tool.

The tool comes with a stepped block for different bearing cup diameters. Ensure that the block rests on the outside of the bearing cup.

 Bearing cup press ready to be used!

Once the block has been properly set on both the top and bottom, clamp the tool together and spin the handle on top to press both the cups into the frame. Do it slow and check to see that the cups are going in evenly. It should not be too difficult as this is a very powerful tool. For this frame, the bearing cups went in quite smoothly as the interference between the frame and cup is quite small.

Bearing cups seated properly in the frame. No gaps seen all around the edge of the cup.

Lube the bearing cups before installing the sealed bearings

Even though the bearings are sealed bearings, it is still a good idea to lube the bearing cups before placing the bearings into the cup. This improves sealing against water and also prevents creaks later on.

Now that the new bearing cups and bearings have been installed into the frame, let us come back to the fork. As the LitePro headset uses a different crown race, we will need to remove the stock crown race and install the new crown race on the steerer tube.

To remove the crown race, I will be using a crown race puller. This is a special tool that has blades which hook the crown race and pulls it out. If you can't find such a tool, you can use a flat bladed screwdriver and a mallet. But it will damage the crown race and possibly also the steerer tube.

The crown race puller. A very solid and heavy tool.

 The blades at the bottom of the tool, which will slide in under the crown race.

To use the tool, insert the entire tool over the steerer tube, and rest the blades on the bottom of the steerer tube.

Use the two knobs at the side to push in the blades, such that the blades are wedged in under the crown race. Take your time and double check to ensure that the blades are in the correct place.

Next, spin the handle at the top of the crown race puller tool. This forces the blades upwards, and hopefully the crown race is pulled off as shown!

The LitePro crown race uses a split ring design, so it is easy to fit the new crown race onto the steerer tube. 

Lube all contact areas on the crown race before seating it properly. This crown race will be in contact with the lower bearings.

Finally, insert the steerer tube back through the frame. Remember to put the compression ring on top of the top bearing, and cover the headset with the upper cover provided. Reinstall the handlepost and your headset upgrade is complete!

 View of the headset BEFORE the upgrade. Note the small gap at the bottom of the headset.

After installing the LitePro headset. Since there is no rubber seal ring, the gap appears to be bigger, and is a potential problem if water gets into the headset.

To solve that problem, a Lizardskin Headset Cover is used to wrap around the opening and reduce the chance of water getting into the headset bearings.

After this upgrade, the headset feels brand new again! The steering is smooth and consistent, with no notchy or friction feeling. One downside of this LitePro headset is that no rubber seal is provided to seal the bottom of the headset against water ingress. From what I know, newer versions of the headset come with a rubber ring on the upper cover to protect against water.

Overall, it was quite a tough job as it involved a lot of knocking and handling heavy tools. If there is a need to change the headset, it is recommended that you leave the job to the bike shop, where they should have the proper tools and skills to service the headset. Another advantage of changing to this LitePro headset is that in the future, if the sealed bearings need replacement, it will be just a 15 minute job, as you only need to remove the handlepost, pull out the fork, replace the sealed bearings and assemble everything back again. No need to replace the bearing cups or crown race unless those are the parts that are spoilt.

Installing FNHON Handlepost for Dahon Bikes (T-shaped, 31.5cm, Silver)

$
0
0
What you see in the title is not a typo error. Yes there is a bicycle brand called "Fnhon", and it is no surprise that they produce parts similar to Dahon bikes. From the name, it is obvious that it is a knockoff brand, but the quality seems to be pretty decent. In fact, it is getting popular in China, where there is a really hot market for folding bikes, with countless brands of folding bikes popping up.

I got to know of this brand through reading bicycle forums based in China/Taiwan, such as Mobile01 or 77Bike. From other people's reviews, this brand seems to be one of the better knockoff brands that are similar to Dahon.

Of course, there are many many brands that attempt to copy Dahon, making frames that look so alike that the only difference seems to be the colour and graphics. However, what makes Fnhon stands out from the rest is that they actually take Dahon's designs and improve on it, adding features and specifications that Dahon does not have.

For example, mounting the FD on Dahon bikes have always been troublesome, especially if the frame does not come with the FD mounting bracket. For Fnhon, what they improved on is that all their frames come with the FD mounting bracket AND also the cable stopper for the FD outer casing. This makes installing the FD and the cabling a breeze, as easy as installing the RD system.
 
The outer casing stopper located on the rear of the Fnhon frame seat tube. 
Simple but useful addition!

Another Fnhon component which I am impressed with is the handlepost. Although Dahon was the first to come up with the ubiquitous Dahon handlepost design, what I feel is lacking in Dahon designs is the choices available for the end user. For example, their T-shaped handleposts (such as on Speed Pro TT, Vector X27) are all outward folding only, and of only one height.

Fnhon saw a chance and came into the market, offering different handlepost specifications. Just to list a few, Fnhon has 1 piece, inward folding handleposts of at least 3 different lengths. Besides the different lengths and different colours (silver and black), there are also various mounting methods for the handlebar. You can choose between the T-shaped type (where you need an additional LitePro Stem), the popular quick release type (same page as the LitePro Stem), and a new bolted type. To see more, check out this Taobao page.

Warning: Very poisonous page for bike upgrading!

For my Dahon Boardwalk and Vitesse bikes, the handleposts are both of the inward folding type. Due to the special folding method that I use to fold the bikes, inward folding handleposts give a more compact fold with bullhorn or drop bars. This method also ensures that all the vulnerable parts such as the RD and shifters are on one side of the bike, and you can lean the bike on the other side safely. This are the reasons why I only use inward folding handleposts on the Boardwalk and Vitesse.

However, inward folding handleposts from Dahon are rather limited in choice. Besides the 2 piece handlepost on the Vitesse (which can be flexy and creaky, and may rotate if not tightened properly), and the Mu Uno handlepost on my Boardwalk (which is rather long), there are no other options from Dahon.

Therefore, when I came across the Fnhon range of handleposts, it felt like Fnhon has exactly the type of handleposts that I need! 1 piece, inward folding handleposts that are light and stiff.

This handlepost is meant for the Dahon Vitesse, to upgrade from the stock 2 piece handlepost to this 1 piece handlepost. Let us first take a look at the new Fnhon handlepost, and then a comparison with the Dahon handlepost to see the differences.

Fnhon T-shaped handlepost, 31.5cm length (excluding height of bottom section), silver colour.

Closer look at the T-shaped top and the Fnhon logo

My first impression of the handlepost is that it is rather well built. From the feel of the surface treatment and the welded joints, it looks just as good as Dahon handleposts. The hinge is also solid with no signs of excessive play.

Next, I took out the stock 2 piece handlepost from the Vitesse and compared it with this new handlepost.

Fnhon handlepost with the old type of safety latch

Dahon handlepost with the automatic safety latch, better but at a higher cost.

 Fnhon handlepost with a simplified construction of the latch mechanism. Instead of using a bolt with opposite left and right hand threads for adjustment, it was simplified to a long bolt that can be adjusted from the outside.

Adjust the tightness of the Fnhon clamp using an M4 Allen key from the outside

Dahon handlepost with the special oppositely threaded bolt, requires a wrench for adjustment.

Closer look at the Fnhon latch mechanism. Simple and elegant mechanism.

 The original Dahon latch mechanism. Ingenious, but comes at a higher cost than the improved Fnhon mechanism.

The base of the handlepost looks similar

Of course, a weight comparison. 521 grams for this Fnhon handlepost.

The stock 2 piece Dahon handlepost, 752 grams.

The most significant difference of all is the weight. The Fnhon handlepost is about 230 grams lighter, which is 30% lighter than the Dahon 2 piece handlepost. This dramatic reduction in weight is due to the absence of clamps on the top and in the middle of the handlepost, and the 1 piece construction.

Placing the handleposts side by side. Almost similar in length when the 2 piece handlepost is at its shortest.

Of course, the Fnhon handlepost is not perfect. There are some blemishes which can be seen, such as this.

Big burrs on the inside of the handlepost, at the T-shaped area. Does not affect function though.

Installing the handlepost is quite straightforward. Due to the open clamp design of the Dahon handlepost, the current bullhorn bar can be easily removed from the handlepost. Also, since the bullhorn bar already has the LitePro stem on it, it can be easily fixed onto the T-shaped end of the Fnhon handlepost. This is the reason why I chose the T-shaped handlepost for the Vitesse.

Bullhorn bar still on Dahon handlepost. The quick release lever limits the possible positions of the handlebar.

Remove the quick release clamp, and the handlebar can be removed easily!

Place the bullhorn bar to the side for now, and proceed to remove the handlepost from the bike. For more detailed instructions you can refer to the step by step guide here.

Next, we can install the new Fnhon handlepost. It goes on exactly the same way as the Dahon handlepost. No problems here.

Looking sleek!

 The surface of the handlepost looks really good. Can't tell if it is sandblasted and then anodised or painted.

After fixing the new Fnhon handlepost onto the bike, the handlepost is now ready to accept the handlebar!

Loosen the LitePro stem further, and remove the connecting tube in the middle. It is no longer required. Space out the clamps so that it can go onto the T-shaped handlepost.

Dab some Fiber Grip onto the contact surface with the stem to prevent unwanted rotation.

Place the LitePro stem over the handlepost, move them inwards onto the handlepost, tighten them and you are done!

Adjusting the angle of the LitePro stem. 

In this case, the stem is rotated behind the handlepost, as putting the stem at the front will make the reach too far, while putting it vertically up will set the bullhorn bar too high up. Since a bullhorn bar is used, the overall reach is still in front of the handlepost, which ensures the stability of the bike steering. It is not recommended to set the stem behind the handlepost when using a flat handlebar, as the resulting short reach will make the bike steering feel weird.

Bullhorn bar mounted on the T-shaped handlepost with a LitePro Stem

 Overall view of the Dahon Vitesse X20-TT with the new Fnhon handlepost

The Fnhon handlepost feels really stiff due to the 1 piece construction, and the removal of the height adjustment joint also means one less source of creaking. Bike fitting is maintained as the height is similar to what was used previously.

After these headset and handlepost upgrades, the Vitesse has also been thoroughly upgraded, with the only stock parts being the frame, fork, frame clamp and seat post clamp. It is almost at the level of the Dahon Boardwalk, where only the frame is stock!

I also have a handlepost upgrade for the Dahon Boardwalk...coming soon!

How to Adjust Shimano Shadow Plus RD

$
0
0
About 1 month ago, I wrote about the Shimano Shadow Plus rear derailleur, and how it can be converted from a standard dropout mounting to a Direct Mount dropout. In this second part of the article, I will describe briefly how to adjust the clutch mechanism in the Shadow Plus RD.

The RD that I am operating on is the new SLX Shadow Plus RD, model number RD-M675. The construction of the clutch mechanism is quite similar to the XT and also upcoming Deore Shadow Plus RD. The mechanism is slightly different from the top-end XTR RD, but the adjustment principle is the same.

Before adjusting the clutch mechanism, set the switch to the OFF position. This is to release any spring tension in the clutch mechanism and to make it easier to adjust the mechanism.

Clutch switch in the OFF position

Before we go further, I am sure you want to know what you are adjusting! Sorry for not making that clear right at the beginning. What we intend to adjust on the Shadow Plus RD is the amount of resistance in the clutch mechanism. The clutch mechanism works by creating resistance to the RD cage movement. When traveling over rough terrain, the whole RD bounces around, and the bottom of the RD cage tends to swing forward/downward, causing a loss of chain tension and subsequently leading to chain drop.

When the one way clutch mechanism is turned ON, the cage resists any forward/downward movement, while still allowing the cage to rotate backwards easily. This ensures that chain tension is maintained, greatly reducing any chance of chain drop.

The downside of having a strong clutch is a higher shifting force at the shifter. Therefore, it is good to be able to adjust the clutch mechanism. Too light, and the clutch mechanism will not be effective in preventing chain drop. Too heavy, and it will be tiring to shift gears. The optimal setting is when the amount of resistance is just sufficient to prevent chain drop, while also minimizing the effort required to shift gears.

When adjusting the clutch mechanism, it is OK to leave the RD on the bike, as long as the switch is set to OFF and there is no pedaling.

The first step is to remove the 3 bolts securing the cover to the RD.

The 3 bolts on the cover of the clutch mechanism

Once the cover is removed, the clutch mechanism can be seen clearly. How it works: When the switch is turned from OFF to ON, a metal clamp band wraps and tightens around the one way clutch, creating resistance to cage movement. The tighter the clamp band, the more resistance there is. Therefore, what we are adjusting is the tightness of the metal clamp band.

One way clutch in the middle, with metal clamp band wrapped around it. Adjustment nut can be seen at the top left corner.

Adjustment nut located on the left side of the mechanism.

Turn the adjustment nut to adjust the tension on the clamp band. Turn the nut in minor increments, as even a quarter of a turn can cause a significant difference in resistance. It is difficult to judge exactly how much tension is needed, as the bike is not in an actual riding condition. For myself, I set the tension such that when I pull lightly on the cage, it does not rotate.

When doing the adjustments, avoid poking around the rest of the mechanism. If grease gets into places where it should not be, it may cause the clutch mechanism to malfunction.

Different riders on different terrains will need different amounts of clutch resistance. As I do not foresee myself going on super rough terrain, I will not need very high clutch resistance. In the end, the only way to find the optimum setting is to go for a ride, and make adjustments depending on the result. If you find yourself still getting chain drops, you may need to increase the resistance. If you get zero chain drops, you may have found the optimum resistance for yourself. You can even try reducing the resistance slightly, to reduce shifting force while ensuring that the clutch mechanism is still effectively preventing chain drop.

After adjustment, remember to close the cover, making sure that the rubber seal sits properly in the groove around the cover. Tighten the 3 bolts and you are good to go!

Recently I had the chance to see how well the clutch mechanism works. On a long flight of stairs, some of my friends took turns to ride different mountain bikes down the steps. As you can imagine, riding a hardtail MTB down a flight of stairs can be really rough, dangerous even. On other MTBs without the Shadow Plus RD, the chain often dropped off just halfway down the stairs. By the bottom of the stairs, all the MTBs already had dropped chains.

For my Polygon MTB, it was first tested with the clutch mechanism OFF. This meant that it functioned just like a normal RD. As expected, the chain dropped off the gears by the time the bike reached the bottom of the stairs. We then tried the run again with the clutch mechanism set to ON. The results were pretty amazing.


Looking at the RD as the bike went down the steps, it is clear that with the clutch mechanism ON, the RD only bounced slightly, preventing any loss of chain tension that would cause chain drop. When the clutch mechanism is OFF, the RD would swing wildly, with the chain whipping about furiously and eventually dropping outside the gears.

With this easy experiment, it can be clearly seen that with the clutch mechanism activated, the chance of a chain drop is greatly reduced. Although the shifting force is increased, it is a small price to pay for chain security without the need for any external chain retention devices. The ability to turn the clutch mechanism ON or OFF is also very useful. When traveling on smooth roads, the clutch mechanism is not required, and thus setting it to the OFF position will reduce shifting force. It only needs to be turned ON when tackling rough terrain.

After reading this article, you should have a pretty good idea on how the clutch mechanism works, how to adjust the mechanism, and why it is useful. Depending on your riding style and terrain, you may find this Shadow Plus feature very helpful in preventing chain drops.

Journey of the Boardwalk: Part 30 - FNHON Handlepost (双钉)

$
0
0
Finally, I have the chance to blog about the latest upgrade for my Dahon Boardwalk Di2. Right after I changed the handlepost for the Vitesse, I also changed the handlepost for my Boardwalk. You may have known that my Boardwalk handlepost was upgraded quite sometime ago, from the stock adjustable handlepost to a one-piece handlepost.

Recently I came across the Fnhon range of handleposts, which has a wide variety of lengths and designs to cater to most handlebar requirements. Besides taking the chance to upgrade the handlepost on the Vitesse, I also found a new handlepost for my Boardwalk. Let us take a closer look at the new Fnhon handlepost for my Boardwalk.

New Fnhon handlepost, in black. Can you see what is the difference?

Different clamp design for the handlebar. This uses a 2 bolt design to secure the handlebar, very similar to normal road/MTB stems.

This new handlebar clamp design is why I decided to try the new Fnhon handlebar. I find that I don't adjust the QR clamp on the handlepost at all, since I don't need to rotate the handlebar when folding the bike. With a QR clamp, the clamp lever is actually quite long and restricts the position of my handlebar extension mount. Thus it is better for me to use this 2 bolt design as it looks less bulky and allows me to clamp the handlebar properly with an Allen key, without it slipping.


  Same designs as described on the other Fnhon handlepost blog post.

Applying some grease on the sliding surfaces of the clamp will make it easier to achieve a proper clamping force and also avoid creaking sounds.

After I removed the Mu Uno handlepost, I decided to compare the two handleposts side by side before installing the new Fnhon handlepost.

The new Fnhon handlepost is shorter than the Mu Uno handlepost

The Fnhon handlepost (31.5cm) that I chose is 5 cm shorter than the Dahon Mu Uno handlepost. Also note the different handlebar clamp designs.

The Mu Uno handlepost is rather long, and weighs 635 grams. Still lighter than the weight of the stock adjustable handlepost (752 grams).

The new Fnhon handlepost weighs 524 grams, more than 100 grams lighter than the Mu Uno handlepost. An added bonus!

Before: Mu Uno handlepost. Note that the handlepost is quite a bit higher than the saddle. Good for comfort but hard to get low for speed.

After: Fnhon 31.5cm handlepost. The handlepost is now at the same level as the saddle.

 With the elimination of the QR clamp on the previous handlepost, the stem area is now much cleaner and neater.

Without the QR lever in the way, the Di2 display can now be placed lower for a neater cockpit.

 Side view. I like the clean look of the new 2 bolt clamp design on the Fnhon handlepost. In fact they have just come up with a 4 bolt clamp design that is stiffer, but the length is too short for me.

By changing from the Mu Uno handlepost to the Fnhon handlepost, there are a few differences:
1) Weight reduction of 100+ grams.
2) Cleaner stem area from the elimination of the QR clamp.
3) Shorter handlepost (5 cm shorter) for a more sporty riding position.
4) Stiffer handlepost due to the shorter length of the handlepost.

After 100km of test riding with the new Fnhon handlepost and the new, lower riding position, I am quite happy with the upgrade. Initially I was not used to the lower riding position, since I have been using the Mu Uno handlepost for more than 2 years. A 5 cm reduction in height is actually quite a lot and the different riding position is very obvious. On the plus side, I like the new sportier position, and an added benefit is that the handlepost is stiffer since it is shorter, and I can now pull on the handlepost for added power.

I also find myself holding the top of the handlebar more often, when I want to ride in a more relaxed position. With the secondary brake levers and Di2 satellite shifters, I can stay in the more relaxed position for as long as I want, without sacrificing any brake or shifting functions. It is like riding both a drop bar and a flat handlebar road bike at the same time.

A minor problem which I detected during riding is that the brake cable overlaps the secondary brake lever. This is because when I changed to the lower handlepost height, I did not trim and shorten the cables. I will need to find time to shorten the brake cables.

 
Brake cables are now too long since the handlepost height has been reduced.

More sporty riding position!

Another view of the bike

Looks all ready to chiong!

One word of caution is that if you do get a Fnhon handlepost, you will likely have to change the handlepost yourself, as the bike shop would probably not service and install the Fnhon handlepost for you. Also, changing to alternative components is always at your own risk, as this is not an official Dahon part which may be covered under warranty.

Bonza Bike Tours in Sydney, Australia

$
0
0
I have always believed that cycling is one of the best ways to explore a new place. You are able to travel a reasonable distance at a relatively good pace, while not expending too much of your energy. By cycling, you will get a good understanding of the geography of a particular place, and also enjoy the scenery along the way. Stopping at any time to take pictures and to check out particular features is also easily done.

Compared to walking, it is less tiring, and you can carry a load on the bike more easily than lugging it on your bag. Driving only gets you from one place to another, you can't really enjoy the scenery or know the local geography well if you are zooming along the road at 80km/h.

With that in mind, me and my wife decided to go on a bike tour in Sydney, as part of our holiday! I am so glad that she is also a cyclist and supportive of these kind of tours. We signed up for a tour with Bonza Bike Tours, which would bring us to different areas around Sydney. The tour which we signed up for was the Manly Beach and Sunset Cruise, which looked pretty interesting! The tour description also warns of a significant hill along the route, which I am eagerly looking forward to...

Upon arrival at the Bonza Bike Tour office, we realised that we were the only two who signed up for the tour! This means that the tour guide would only be bringing the two of us along, which is pretty good for us as it pretty much means that me and my wife can dictate the pace and choose when to stop or move on.

The tour starts off with a ferry ride to Manly, before we cycle along Manly beach and the nearby viewing areas and cliffs.

Our trekking bikes with 3x7 Shimano EzyFire shifters. LCSG in Sydney!

View of Sydney Harbour Bridge from the ferry!

 And a view of the Sydney Opera House from the ferry. Better than any view you can get on land.

Sydney downtown area

Approaching our destination...

The streets at Manly beach!

Lots of surfers even though the air temperature is less than 20 degrees. 
Wonder if it is cold in the water?

Nice paved path running along the beach

White sands and blue skies at Manly Beach. Great weather!

View of the coastline

Undulating terrain even amongst the residential areas

Start of the slopes! Long constant slopes that seem to go on and on...

Feels like a cold version of Desaru. Windbreaker shed due to the climbing involved

View of Sydney city area

View of Sydney city area 

Nice little winding path through the forest

Best view of the day! Manly cliffs

Sunset ride


Sun in the eyes!


View of Sydney Harbour Bridge on the return ferry. Gorgeous sunset in the background!

Night view of Sydney Opera House

It was a really good trip with Jane, our wonderful tour guide. We took in some amazing views, and learnt much about the history and geography of Manly. The bike tour was really fun as it enabled us to see so many places in such a short time. This is probably more interesting than the other tour packages that brings you around the Sydney downtown area, as we get to see the other side of Sydney that most tourists wouldn't know.

Highly recommended if you ever go on a holiday in Sydney, and have half a day to space. Do note that the tour does not run every day, so check the tour schedule on the Bonza Bike Tour website. The 3x7 speed bikes worked well with no problems (although I had to adjust the brakes for optimal performance). Although these bikes are not high end bikes, the front triple chainring allowed us to get up the slopes without much difficulty.

Remember to bring the correct cycling attire appropriate for the season! It was winter (10-20 degrees) so we were well prepared with a base layer and windbreaker. Gloves were necessary to prevent our hands from going numb in the cold wind. If you are going in summer you can probably just go in normal T-shirt and pants.

Shimano Click'R Pedals PD-T400

$
0
0
What is SPD? SPD is an acronym for Shimano Pedaling Dynamics, which refers to the system used to bind the cycling shoes to the pedals. There are also many other clipless systems out there, by other pedal/shoe companies, such as Look, Crankbrothers, Time, etc.

For cyclists who are new to clipless pedals, fixing the shoe to the pedal can be scary. The main worry is that you cannot or forget to remove the shoe from the pedal when you stop, ending in a fall. But this risk can be minimised with the new Click'R SPD pedals from Shimano.

Before you read further, do read up more on clipless pedals at the post here. It will be useful info when you decide to use SPD pedals on your bike.

A Beginner's Guide to Clipless Pedals

Shimano came out with the new series of Click'R pedals last year. The main selling point of these pedals is that the clipping in and out force is much lower than other pedals, making it easy for beginners to learn the basics of cycling with SPD. With that in mind, I found the Shimano PD-T400 which seemed like an ideal training SPD pedal.

The weight of these pedals is slightly over 500grams, which means it is not for weight weenies. However, the large platform and easy clipping in/out makes it ideal for beginners.

Bought half a year ago, but didn't have the chance to install it till now...

Good looking pair of SPD pedals! It comes in white colour too.

The two sided spring mechanism

 The front part of the spring naturally pops up, making it easy to locate and clip in the cleat

Click'R logo clearly visible on the pedals.

As installed on the Dahon Vitesse X20-TT! Swapping the pedals is a simple 10 min job.

Close up look. The spring tension can be easily adjusted using an M3 allen key. Remember to adjust for both sides of the pedal!


Yup the SPD shoe clips in fine. All ready a la triathlon style.

Yes the pedal looks really huge. Which is good for beginners for a stable pedaling platform.

I have tried the pedals, with the spring tension adjusted 2 clicks up from the weakest position. I have been using SPD pedals for over a year, and I find the spring action too light as I am used to it. But for beginners, this is perfect, as they can clip in easily, and can also yank their foot out in emergencies.

As I have stated earlier, these Click'R pedals are designed more as a training set of SPD pedals. Once you are used to clipping in and out, you can turn up the tension for more secure clipping, or upgrade to a nicer and lighter set of SPD pedals.

This means that once the SPD pedals on the Vitesse have been upgraded, I will have one pair of PD-T400 to pass to the next person to try SPD...

I found this very detailed and honest review of the PD-T400 pedals by another writer. It is worth a read as it provides so much more information than my short review. Here it is!

Shimano Click'R Pedals - Less is Much More

Viewing all 668 articles
Browse latest View live


Latest Images